Create Unique Grunge Style Letter in Photoshop

In this tutorial I am going to show you in detail how to play with textures and layer styles to create mesmerizing grunge style letter in Adobe Photoshop.
To achieve the final result I have used Trebuchet MS default font. One of the gradients applied (Copper 2) is exclusive for the higher Photoshop versions, but I have given you the color stops on the screenshot so that you'll be able to create the Gradient yourself.
You can create this cool typography in any Photoshop version, including Photoshop Elements.
All seven textures used for the Background and the M Letter are my own photos and unrestricted stock. Feel free to use them for your own works.
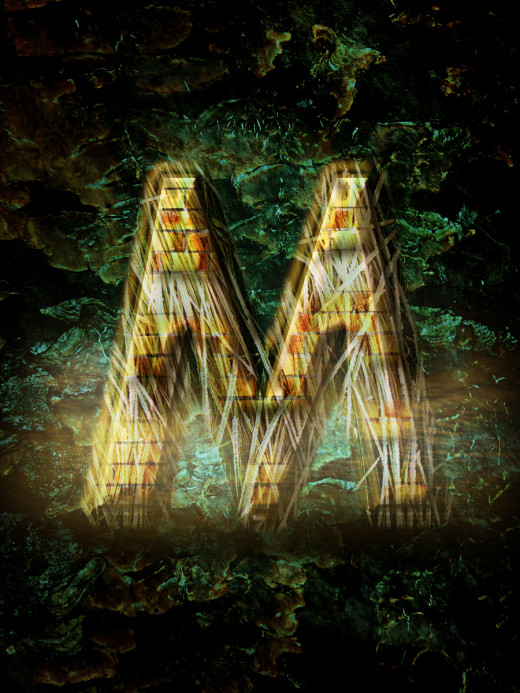
This is the final result. If you like it, let's get down to work. :)

STEP 1
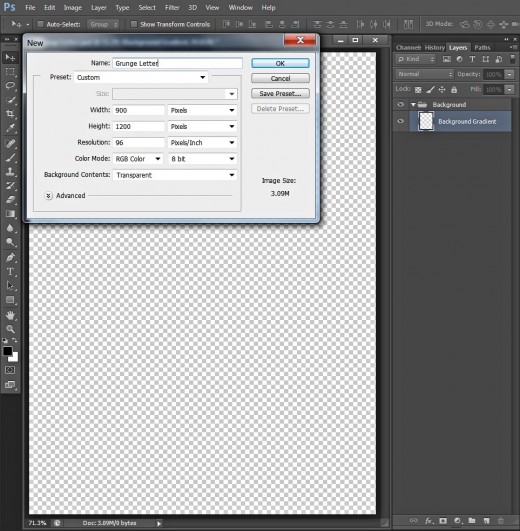
Create a new .psd file called Grunge Letter. Set its Width to 900 Pixels and Height to 1200 Pixels, then insert 96 Pixels/Inch for Resolution and choose RGB Color for Color Mode. Select also Background Contents of your choice. I prefer Transparent because I will automatically get editable Layer 1 in Layers panel.
Now rename Layer 1 to Background Gradient and press Ctrl+G to put it in a group. Call the new group Background.
Please, don't forget to create a folder where to place this .psd document, the seven textures which you'll download and the final image saved in .jpg or any other format you prefer.
Fill the Background with Radial Gradient and Apply Stone Texture
In Steps 2-5 your task is to colorize Background Gradient layer with dark Radial Gradient. After that you are going to Paste Stone Texture into your .file above the Background Gradient layer. You'll Resize the Texture with Free Transform and change the Blend Mode of its layer to give the Background dark mystic look.
STEP 2
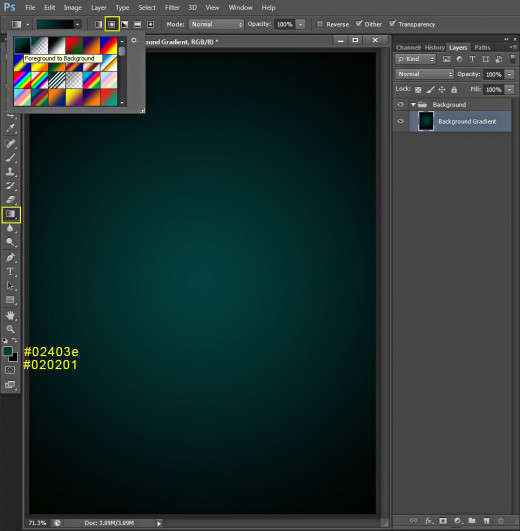
Change the Foreground Color to #02403e and set the Background Color to #020201. Select Gradient Tool (press G key), click on the Gradient thumbnail in the Options bar to open the Gradient Picker and choose Foreground to Transparent Gradient. Click also on the Radial Gradient icon.
Drag with Gradient tool from the middle to any corner of the canvas to fill it with the chosen dark Gradient.
STEP 3
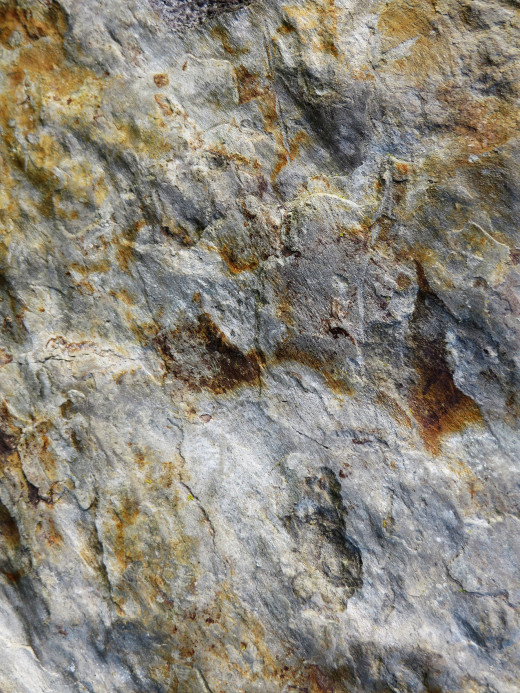
The first file you should download for your work is this Stone Texture. Click on it to get it in high res then right click and select Save As. Save it in the folder created for your Grunge Style Letter. We'll use it in the coming step.
STEP 4
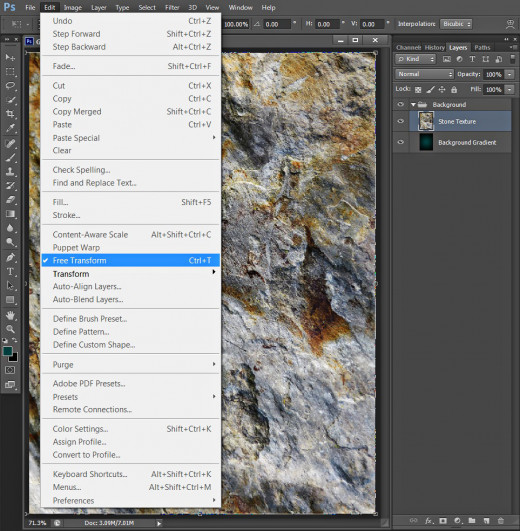
Create a New Layer on top of Background group and name it Stone Texture. Open in Photoshop the previously saved Texture, press Ctrl+A to Select it, then press Ctrl+C to Copy it. Move back to your Grunge Letter document and highlight the Stone Texture layer. Press Ctrl+V to Paste the Texture there.
You can see that the Stone Texture is bigger than the canvas. To remove this problem, go to Edit, Free Transform and move a chosen corner node in inner direction to cover only the canvas with the Texture. Press Enter key to apply the Transformation.
STEP 5
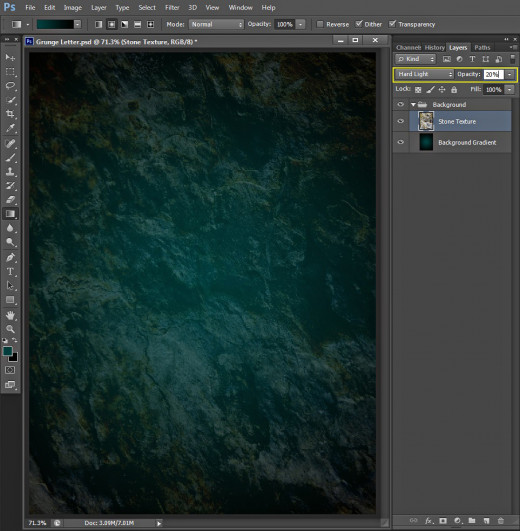
Change the Blend Mode of Stone Texture layer to Hard Light and lower its Opacity to 20%.
Add Fungi Texture to the Background
In Steps 6-8 you have to Paste in a new layer cool Fungi Texture, then Resize it to be fixed to your canvas and change its Blend Mode and Opacity to make it transparent.
STEP 6
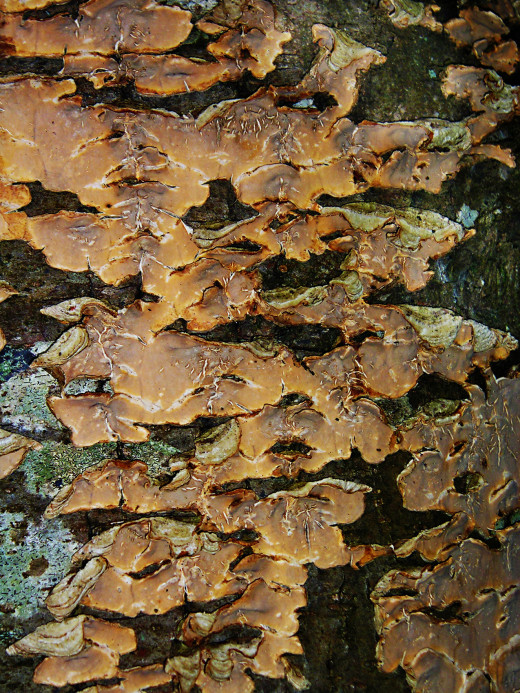
Now download this Fungi Texture (see Step 3) and save it in your folder.
STEP 7
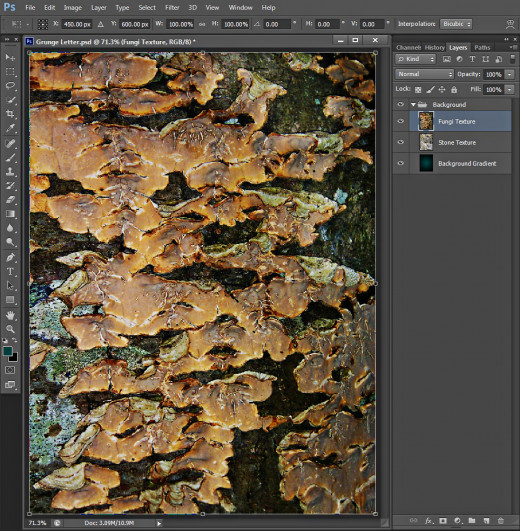
Create a New Layer on top of Background group and call it Fungi Texture. Copy the previously downloaded Fungi Texture and Paste it in this new layer just like you did with the Stone Texture in Step 4.
Use Edit, Free Transform to make the Fungi cover your canvas and press Enter to apply the Transformation.
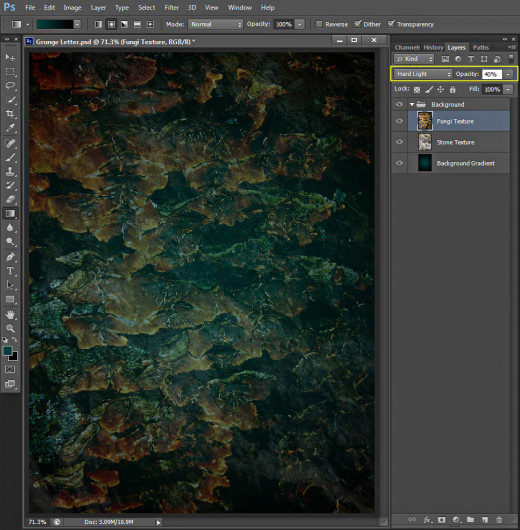
STEP 8
Change the Blend Mode of Fungi Texture layer to Hard Light and reduce its Opacity to 40%. Keep the layer highlighted.
Add Two Adjustment Layers and Complete the Background with Black Brush
In Steps 9-13 you have to achieve better contrast and colors for your Background. For the Purpose you have to add two Adjustment layers- Levels and Photo Filter with Cyan color. You also have to create Vignette Effect so you should use Soft Black Brush to darken the left side of the canvas.
STEP 9
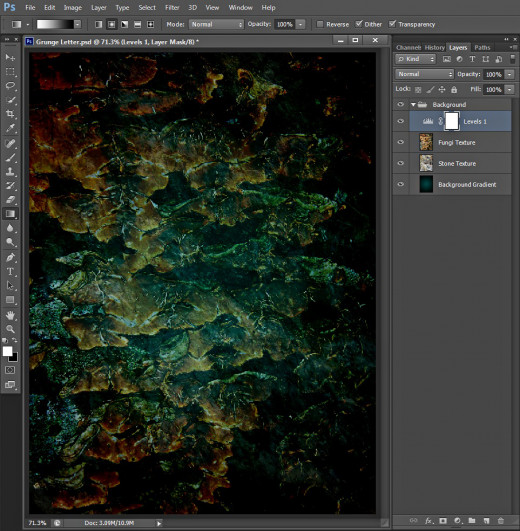
We are going to sharpen and darken our Background in this step and this will be achieved with Layers Adjustment Layer. So firstly navigate to the Menu bar, select Layer, New Adjustment Layer, then click on Levels. In the Levels dialog box Adjust Shadow Input Level (the black slider) to 23 and Adjust Highlight Input Level (the white slider) to 120. Adjust also Highlight Output Level to 155.

This should be your outcome after adding Levels Adjustment Layer. You can see that the left side of the image is a bit lighter. As my purpose is to create natural looking vignette effect, in the coming steps I am going to darken that side.
STEP 10
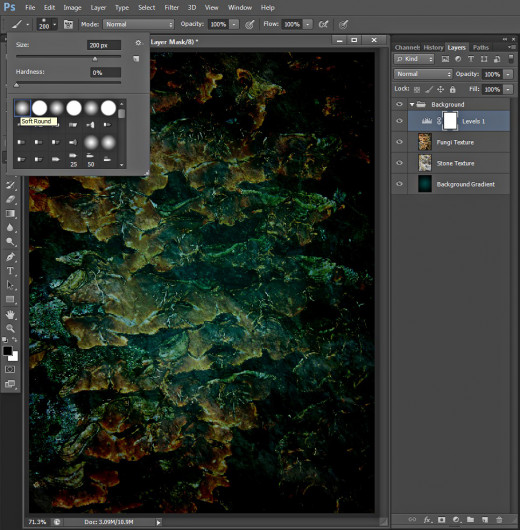
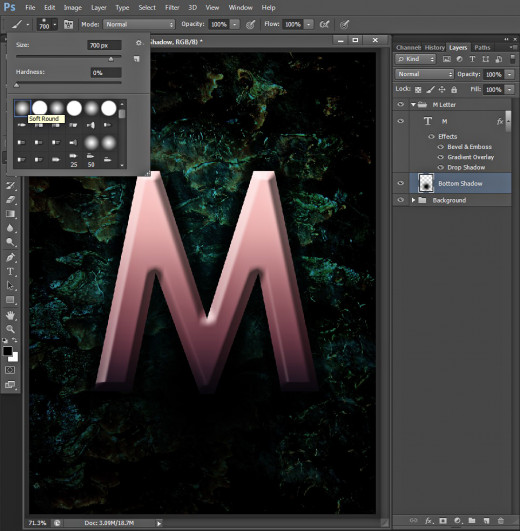
Grab Brush Tool and from the Brush Preset Picker select Soft Round Brush. Increase its Size to 200px.
Press D key to set Foreground/Background Color to Black/White.
STEP 11
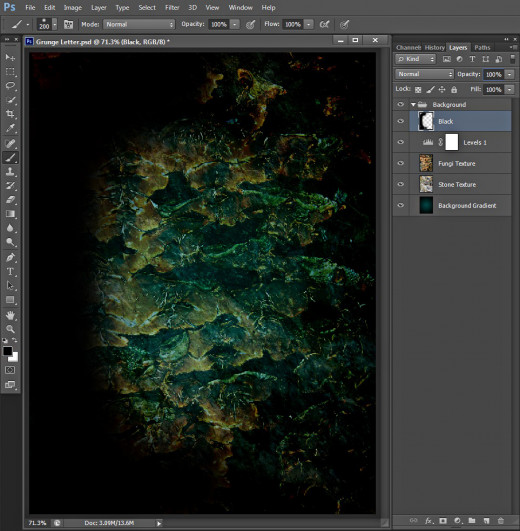
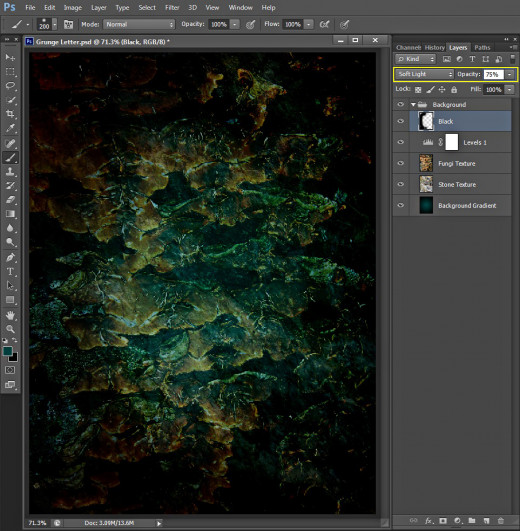
Create a New Layer on top of Background group and call it Black. Using the Soft Round Brush of 200px Size, cover the right side of the canvas with black color as you see on the screenshot below.
STEP 12
Change the Blend Mode of Black layer to Soft Light and lower the Opacity to 75%.
STEP 13
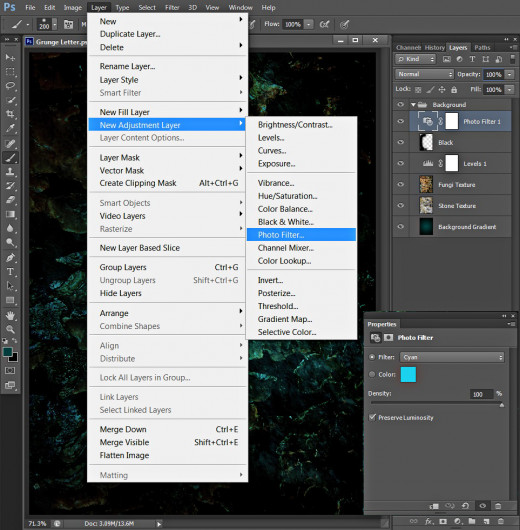
We'll need another Adjustment layer to give a subtle bluish look to our background. For the purpose go to Layer, New Adjustment Layer and this time select Photo Filter. In the Properties dialog box select Cyan from the Filter drop down menu and increase the Density to 100%.
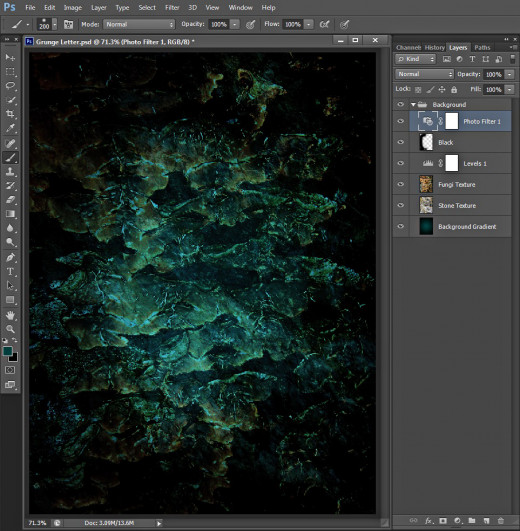
We already finished our work in Background group. This is the result of adding Photo Filter Adjustment layer.
Type "M" Letter and Apply Layer Styles
In Steps 14-17 you have to type M Letter, using Trebuchet MS Font. You have to apply four Blending Options on the Letter layer- Drop Shadow, Copper 2 Gradient Overlay, Bevel and Emboss and Contour.
STEP 14
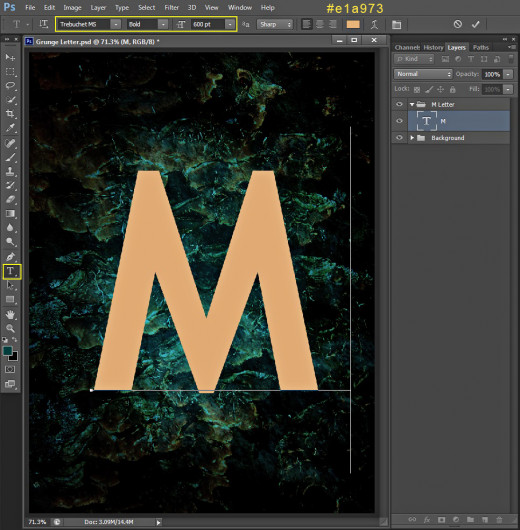
Now we are going to type our letter. We'll need a thick font to achieve better effect. Take Horizontal Type tool, choose the default font Trebuchet MS from the Font Family drop down menu, set the Font Style to Bold, increase the Font Size to 600pt and set the Text Color to #e1a973. After you are ready with the settings, type capital M on your canvas.
Move M Text layer on top of Layers pane and place it in a group called M Letter for example.
STEP 15
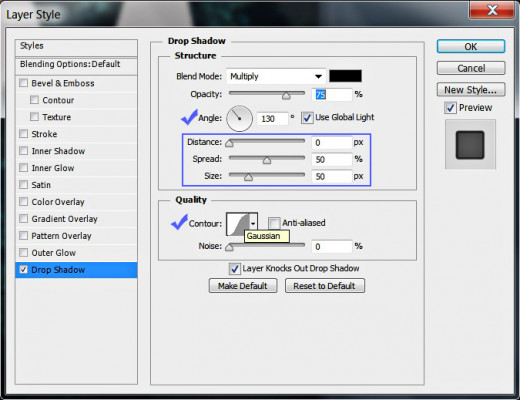
Now we are going to apply layer styles on our big letter. Right click on M Text layer and select Blending Options (Layer, Layer Style, Blending Options). Check Drop Shadow in Layer Style dialog box and change five of its settings: change the Angle to 130 degrees, Distance to 0px, Spread to 50 %, Size to 50px and select Gaussian from the Contour Picker.
Keep Layer Style box opened as we have to add more Blending Options.
STEP 16
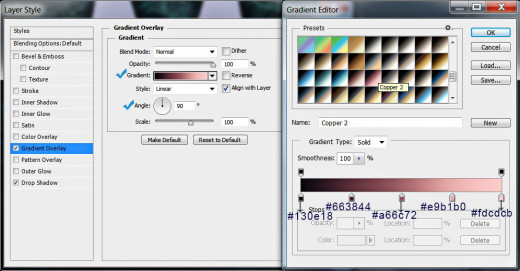
In this step we are going to colorize our big letter with awesome Gradient. So check Gradient Overlay Layer Style and change its Angle to 90 degrees. Click on the Gradient thumbnail to open the Gradient Picker and find Copper 2 Gradient. If your Photoshop version doesn't offer this Gradient, just create it with these Color Stops:
First Color Stop (Location 0%): #130e18
Second Color Stop (Location 25%): #663844
Third Color Stop (Location 50%): #a66c72
Fourth Color Stop (Location 75%): #e9b1b0
Fifth Color Stop (Location 100%): #fdcdcb.
STEP 17
Now let us make our M Letter more prominent and give it 3D look. Check Bevel and Emboss in Layer Style box. Set the Depth to 155% and increase Size to 25px. Change the Color for Highlight to #d7afaf and change its Opacity to 100% then lower the Opacity of Color of Shadow to 55%. Please take into consideration that the Angle is left to 120 degrees as by default.
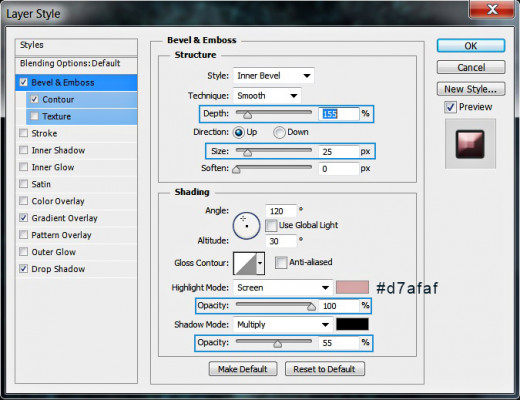
Check Contour Layer Style (which is actually a part of Bevel and Emboss) and only reduce its Range to 35%.

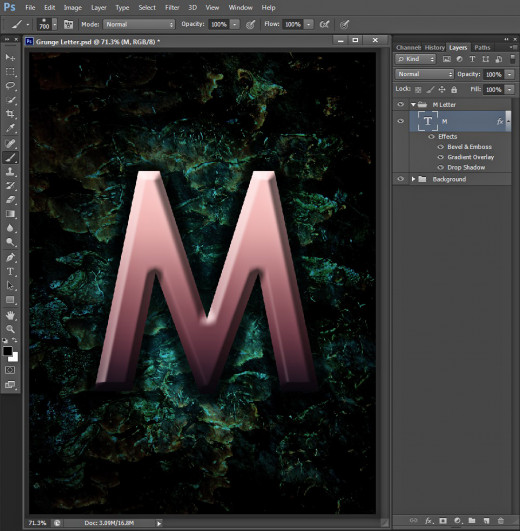
This is how your M Letter will look as a result of adding the Blending Options:
Paint Shadow with Soft Black Brush
In Steps 18 and 19 your task is to paint some shadow at the bottom of the Letter in order to enhance the mystic look of your masterpiece. You should grab Soft Round Brush with Black color and paint the shadow then use Free Transform Option to give it elliptical shape and reduce the Opacity of its layer.
STEP 18
Now press D key to get black Foreground Color, take Brush Tool and select Soft Round Brush from the Brush Preset Picker in the Options bar. Set the Brush Size to 700px and Create a New Layer at the bottom of M Letter group. Name it Bottom Shadow then click twice at the base of the M Letter. You should get the same black spot as the one on the screenshot below.
STEP 19
Now reduce Opacity of Bottom Shadow layer to 80% and use Edit, Free Transform to squish the black spot and to shape the shadow of our M Letter. Use the following screenshot for a reference and don't forget to press Enter to apply the Transformation.

Enhance the 3D Look of the Letter with Bevel and Emboss
In Steps 20-23 you have firstly to Rasterize the layer styles applied on the Letter, then create two duplicates of the Letter and add Bevel and Emboss to both of them in order to improve the 3D Effect. The Fill Opacity of both Letters layers should be reduced to 0%.
STEP 20
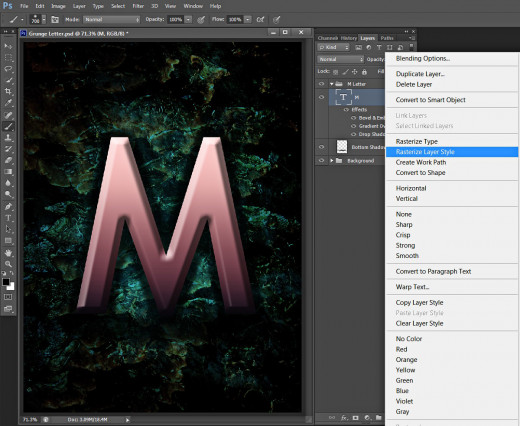
Go back to your M Letter layer, right click on it and select Rasterize Layer Style.
STEP 21
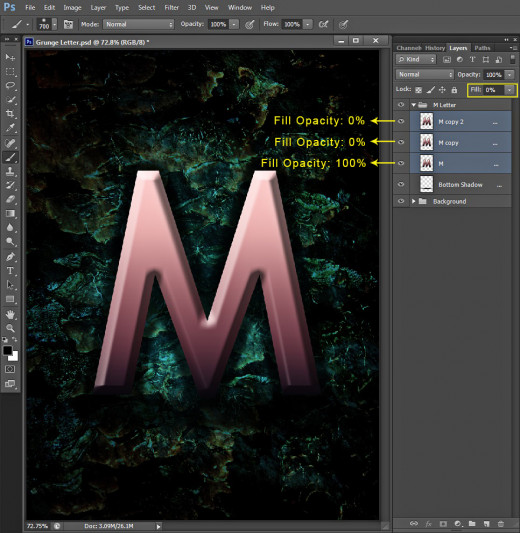
After you have Rasterized the Layer Styles applied on M layer, press twice Ctrl+J to make two copies of it. Reduce Fill Opacity of both M copy and M copy 2 layer to 0%.
STEP 22
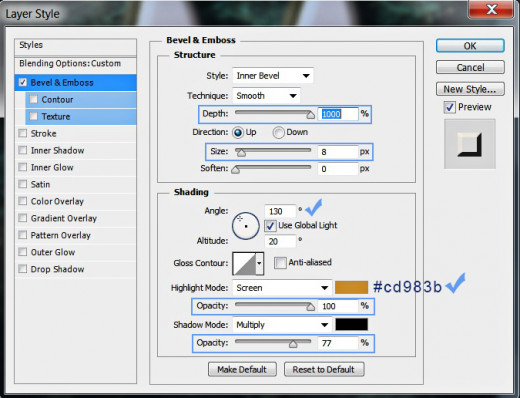
Double click on M copy layer to call Layer Style box and check Bevel and Emboss.
Increase Depth to 1000% and Size to 8px. Change the Angle to 130 degrees, Set Color for Highlight to #cd983b and increase its Opacity to 100%. Slightly increase also the Color of Shadow Opacity to 77%.
This is the outcome after applying 3D effect to M copy layer:
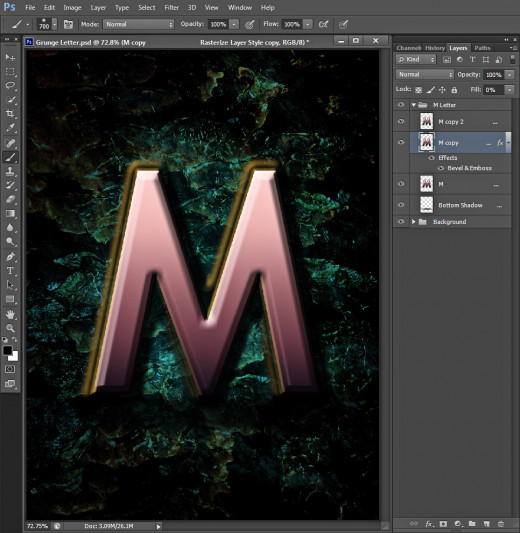
STEP 23
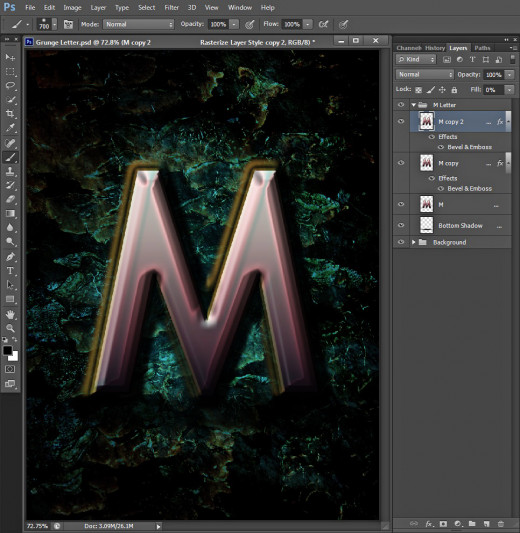
Now apply Bevel and Emboss, this time on M copy 2 layer. Change the Depth to 1000% and verify that the Angle is automatically set to 130px. Increase also to Size to 45px, select Cone Contour from the Picker, change the Highlight Mode to Multiply and Set Color for Highlight to #aee7e1. Increase its Opacity to 100%. At last lower the Shadow Mode Opacity to 40%.
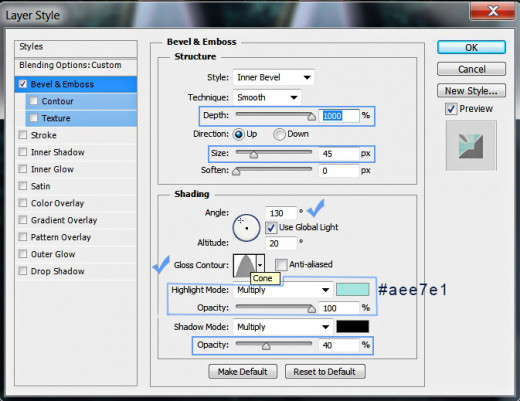
Below you can see the result of applying Bevel and Emboss on M copy 2 layer.
Our M Letter is still far from beautiful, but we'll improve its look in the coming steps. We were creating only the base for the textures so far.
Add Frosted Grass Texture to the Letter and Use Clipping Mask
In the coming two steps you have to Paste Frosted Grass Texture in a layer placed above the layer of the original M Letter. You have to Resize it to cover the Letter, then apply Clipping Mask using the Letter as a Masking Agent. You should change the Blend Mode and Opacity of the Letter.
STEP 24
Now download this cool Frosted Grass Texture and save it in your folder.
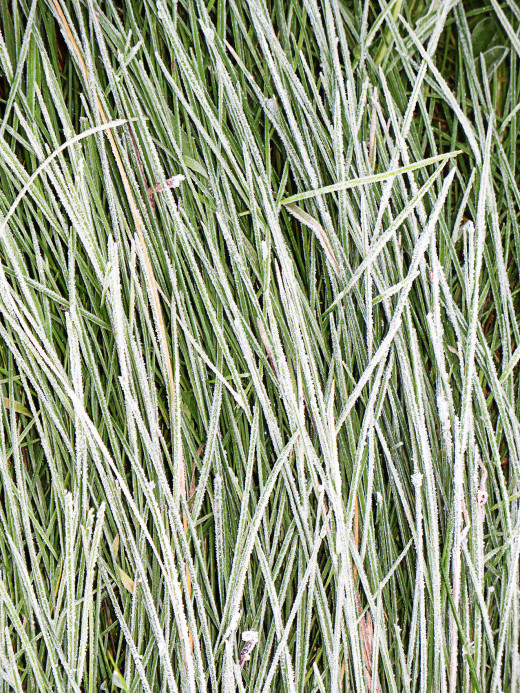
STEP 25
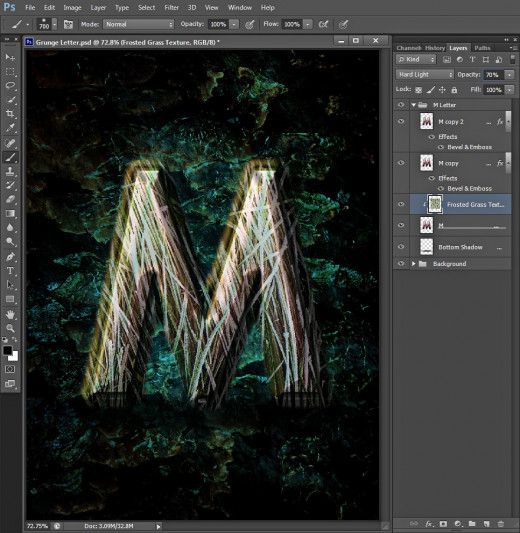
Create a New Layer named Frosted Grass Texture, placed above M layer in M Letter group. Paste there the Texture you downloaded in the previous step then use Edit, Free Transform and move the nodes so that your Frosted Grass Texture covers the whole M letter. Press Enter to apply the Transformation, then change the Blend Mode of Frosted Grass Texture layer to Hard Light and lower Opacity to 70%. After you have completed these actions, right click on the layer and select Create Clipping Mask.
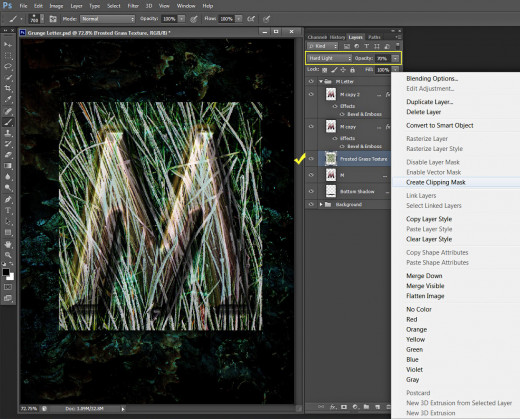
This is how your M Letter will look after applying the first Clipping Mask. Much better, isn't it? :)
Apply Bricks Texture to Improve the Relief of the Letter
In Steps 26-30 you are going to add more Pattern and 3D look to the Grunge Letter with the help of Bricks Texture. You should Paste the Texture in a layer placed above the Frosted Grass Texture then Create Clipping Mask. Your next step is to add Bevel and Emboss to the Bricks Texture and apply Layer Mask to its layer. You will finish this stage with erasing with Soft Round Black Brush portions of the Bricks Texture while the Layer Mask thumbnail is selected. You will be astounded by the awesome effect.
STEP 26
Now download the following Bricks Texture:

STEP 27
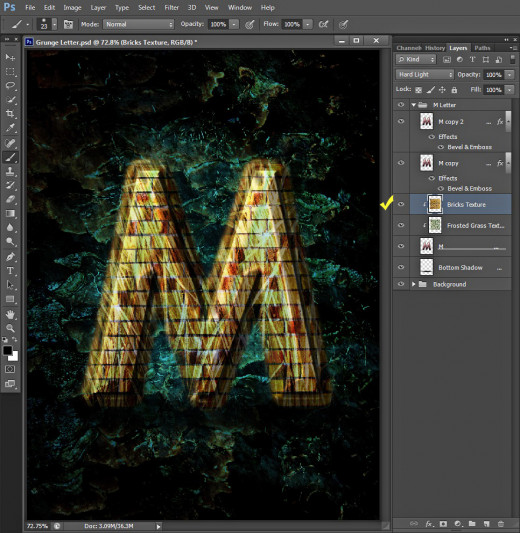
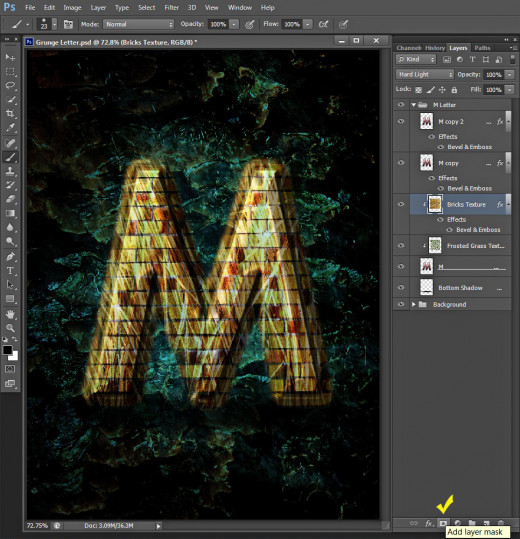
Create a New Layer placed above the Frosted Grass Texture and call it Bricks Texture. Paste there the Texture you downloaded in Step 26 and with the help of Free Transform reduce its size to make it cover the M Letter. Change the Blend Mode of Bricks Texture layer to Hard Light.

Right click on Bricks Texture layer and choose Create Clipping Mask. You should get the result shown below:
STEP 28
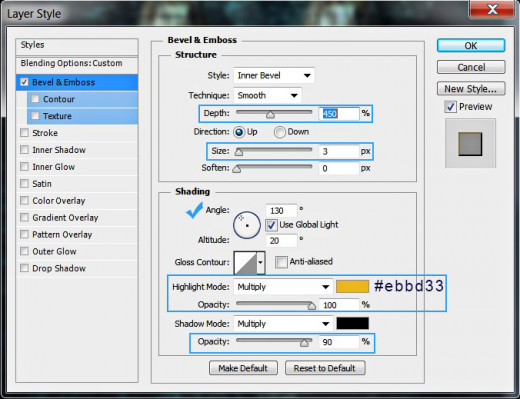
Now apply Bevel and Emboss Layer Style on Bricks Texture layer. Increase Depth to 450%, slightly reduce the Size to 3px and check if the Angle is 130 degrees. Select Multiply for Highlight Mode, change the Color for Highlight to #ebbd33 and increase its Opacity to 100%. Increase also the Color of Shadow Opacity to 90%.
This is the result of adding 3D Effect to the Bricks Texture. You still can't see a big difference but after we mask the layer you will realise why this Bevel and Emboss is applied.

STEP 29
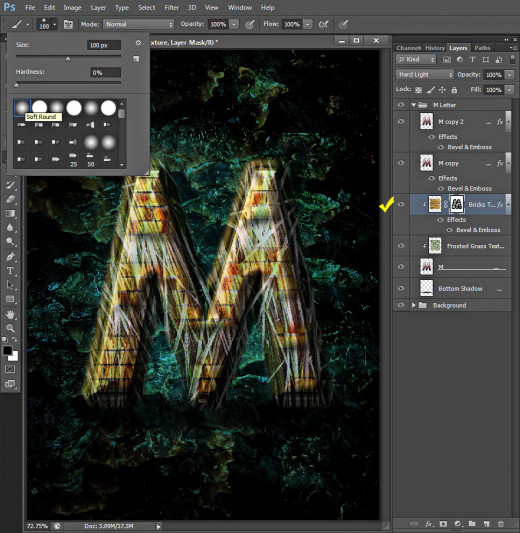
While Bricks Texture layer is highlighted, click on Add Layer Mask symbol at the bottom of your Layers pane.
This is how your masked layer will look:

STEP 30
Take Brush Tool, select Soft Round Brush and set its Size to 100px. Check if the Layer Mask thumbnail of Bricks Texture layer is selected and make a few lines with the Brush on the M Letter. See what I have done on the following screenshot. Of course, you can erase another parts of the M Letter, according to your taste.
Add Clouds Texture to your Grunge Typography
In Steps 31-33 you have to add and process the last Texture which will be used in this tut- cool Clouds. You have to Paste it in a New Layer and Resize it with Free Transform as you did with the previous textures. When you are ready, you have to apply Layer Mask on its layer and to erase the rough edges of the Texture, to make its sides smooth. At last you have to change the Blend Mode of the Clouds Texture and reduce its Opacity.
STEP 31
The last photo to be downloaded in this tutorial is the following Clouds Texture. Keep it in your folder for the next step, when we are going to use it.

STEP 32
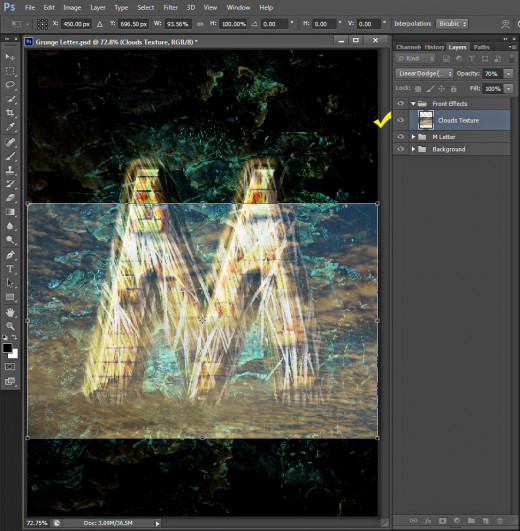
Create a New Layer named Clouds Texture on top of your Layers panel. Place it in a group called Front Effects. Paste there the Texture you downloaded in the previous step and use Edit, Free Transform to resize it so that it covers almost the whole M Letter and the parts of the canvas around it. Change the Blend Mode of Clouds Texture layer to Linear Dodge and lower its Opacity to 70%.
STEP 33
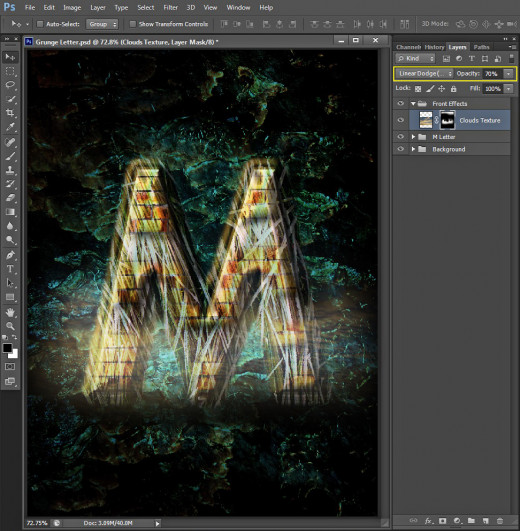
Add Layer Mask to Clouds Texture layer and use Soft Round Brush of 100-200px Size to erase the sides of the Texture. Leave only the part, covering the bottom side of our unique M Letter.
Add One More Adjustment Layer
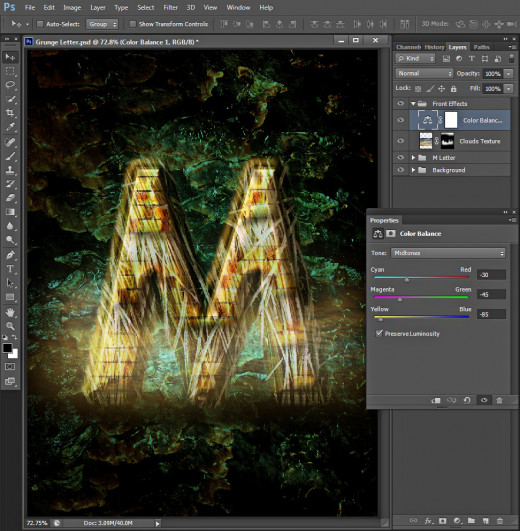
Your last action is to apply Color Balance Adjustment Layer to slightly sharpen the image and soften its colors.
STEP 34
We have only one layer to add to our panel in order to finish our hard work on the Letter. While Clouds Texture layer is still highlighted, navigate to the Menu bar and choose Layer, New Adjustment Layer, Color Balance. We are going to change only the Midtones, so when the Properties box pops up on your screen, insert the following settings for Midtones (Tone Option):
Cyan-Red: -30
Magenta-Green: -45
Yellow-Blue: -85.
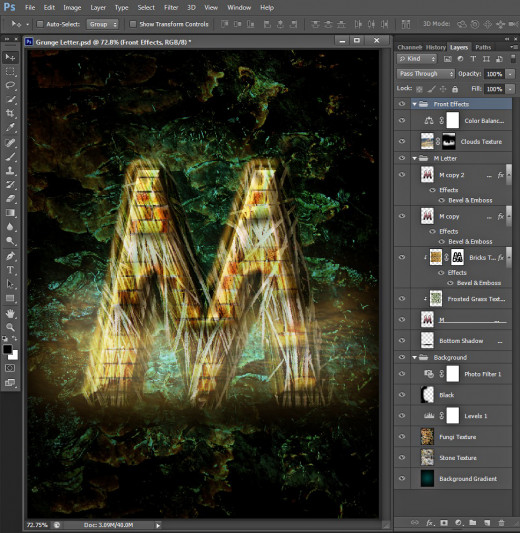
Now you should only verify that you have the same result in your Layers panel like mine. There should be three groups of layers in it:
-
Background group with the following six layers in it: Background Gradient, Stone texture, Fungi Texture, Levels 1, Black and Photo Filter 1;
-
M Letter Group also with six layers in it: Bottom Shadow, M layer, Frosted Grass Texture, Bricks Texture, M copy and M copy 2 layer and
-
Front Effects group which includes only two layers: Clouds Texture and Color Balance layer.
STEP 35
This is our super cool M Letter saved in .jpg format.
Hope you find this tutorial useful, funny and easy to follow. If you need help, don't hesitate to leave a comment below. I am going to answer ASAP.
Thanks a lot for reading and God bless! :)