Create Text with Timber Texture and Gray Value Stripes Gradient
From this quick tip type of tutorial you will learn how to create lovely translucent Text Effect on Timber Background in only twenty one steps. All you need to do is to blend the stock Texture with the Radial Gradient Background and then type the Text and apply Blending Options to achieve the glossy translucent effect.
You can create the Text in any Photoshop version.
The Tree Bark Texture applied on the Background is my own photo and unrestricted stock. You can use it for your own works and projects.
This is the Text on its awesome Background which you are going to create:

STEP 1
Before you start to create the Text it is better to prepare a folder where you are going to keep your .psd file, the Tree Bark Texture you are going to download and your outcome saved in .jpg or .png format.
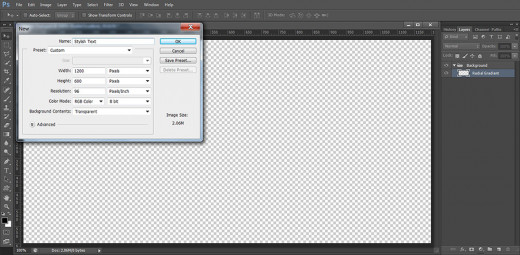
Now open Adobe Photoshop, go to the Menu bar and select File, New. Call your new document Stylish Text for example then insert 1200 Pixels for Width and 600 Pixels for Height. Type 96 for Resolution, select RGB Color for Color Mode and choose Transparent from Background Contents drop down menu to get an editable first layer.
Those of you who plan to print their work, should insert 300 Pixels/Inch for Resolution and select CMYK Color from Color Mode drop down menu.
Rename your first layer from Layer 1 to Radial Gradient then drag it to the Folder icon at the bottom of Layers panel or press Ctrl+G to put it in a group. Rename this new Group 1 to Background.
Create Rough Textured Background with Radial Gradient and Tree Bark Photo
In Step 2-6 you should firstly colorize the canvas with blue shaded Radial Gradient. After that you have to Paste in a New Layer the Tree Bark Texture you have to download and Resize it. Your next step will be to change the Blend Mode of the Texture in order to merge it with the Radial Gradient, then you have to duplicate the Tree Bark Texture layer and this time modify not only the Blend Mode but also with the Opacity option.
STEP 2
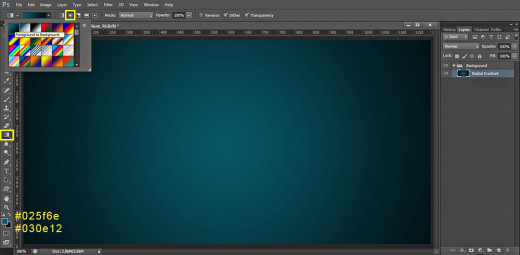
Keep Radial Gradient layer highlighted, then Set Foreground Color to #025f6e and Background Color to #030e12. Grab Gradient Tool (hot key G) and navigate to the Options bar to change the settings of the instrument. Firstly select Foreground to Background Gradient from the Gradient Picker then press Radial type of Gradient icon. After the settings are OK, just drag with Gradient tool from the middle to any chosen corner of your canvas.
STEP 3
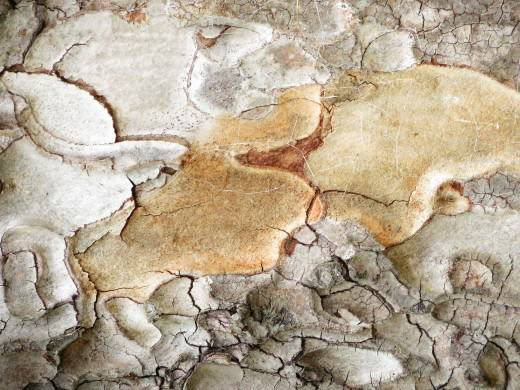
You should download this Tree Bark Texture now which in the coming steps will be added to our Radial Gradient Background. Simply click on the Texture photo below to open it in high resolution, then press right mouse key and choose Save As to put the photo in your folder.
STEP 4
Create a New Layer on top of Background group and call it Tree Bark Texture then open the photo you downloaded in Photoshop, press Ctrl+A, after that press Ctrl+C to Select and Copy it. Return to your Stylish Text file, select Tree Bark Texture layer and press Ctrl+V to Paste there the Texture.
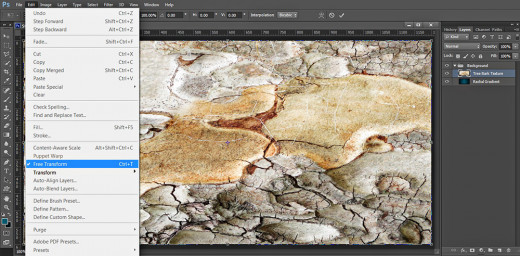
As the Texture is slightly bigger than your canvas, navigate to the Menu bar and select Edit, Free Transform. Move any corner node in inner direction until the Texture covers your canvas. Press Enter key to apply the Transformation.
STEP 5
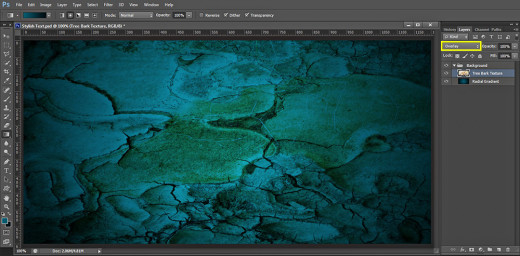
Change the Blend Mode of Tree Bark Texture layer to Overlay.
STEP 6
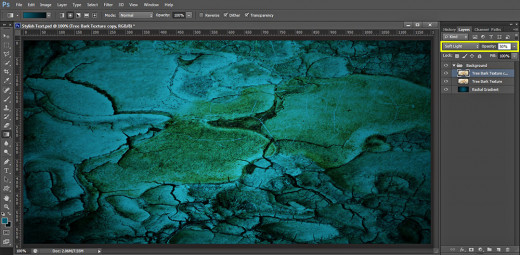
While Tree Bark Texture layer is selected, press Ctrl+J (Layer, Duplicate Layer) to make a copy of it. Change the Blend Mode of Tree Bark Texture copy layer to Soft Light and lower the value of its Opacity to 50%.
Type the Text and Apply Thick Dark Stroke
In Steps 7-10 your important work is to type the Text using the default Courier Font, then you have to add thick Stroke Layer Style to enhance the Size of the Text.
You should turn the Text layer contents into Pixels so you have to Rasterize it. You need also to duplicate the original Text layer and reduce Fill Opacity of the original and copied one to 0%.
STEP 7
Well, the fun part starts here. In this step we are going to type the Text then in the next steps we'll proceed to the big play with the layer styles.
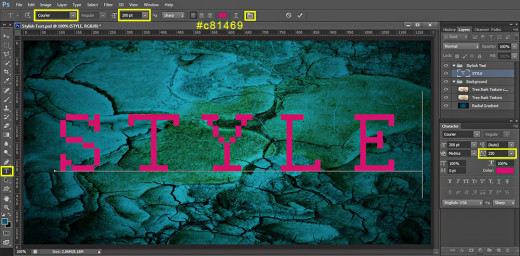
Grab Horizontal Type tool (hot key T) and navigate to the Options bar to insert new instrument's settings. Choose Courier Font (the Font is default for Photoshop) and Set Font Size to 200pt. Set the Text Color to #c81469 then type any five lettered word using capital letters. I preferred to type Style.
After you have typed the Text, highlight it and click on Toggle the Characted and Paragraph Panels icon in your Options bar (Window, Character). Insert 250 for Tracking value. We need a bigger space between the letters as we are going to add Stroke Layer Style and it might make the letters overlap if they are close to one another.
Now move your Style Text layer on top of Layers panel and place it in a group named Stylish Text.
STEP 8
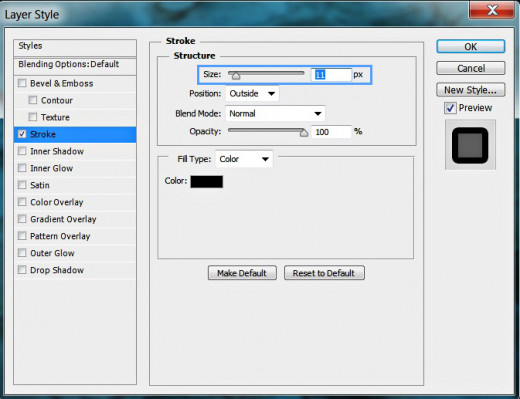
In this step we are going to make our Text thicker. Right click on Style Text layer, select Blending Options (Layer, Layer Style, Blending Options). Check Stroke Layer Style and only increase its Size to 11px. Leave all other default settings unchanged.
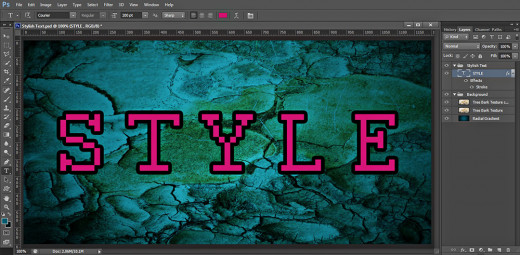
You should get this outcome after applying Stroke Layer Style on the Text layer:
STEP 9
Right click on Style Text layer and select Rasterize Layer Style from the fly-out menu.
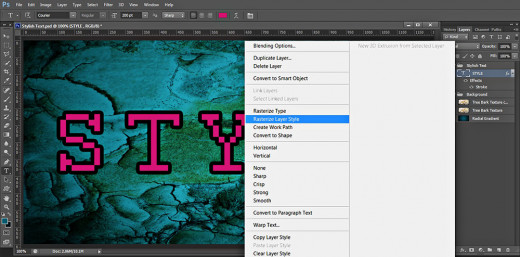
STEP 10
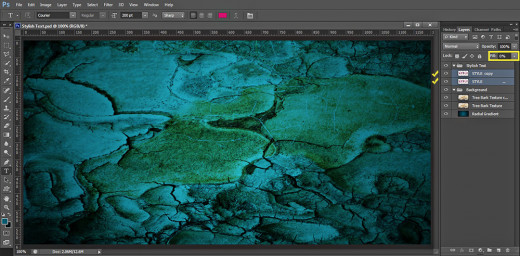
After Style layer gets rasterized, keep it selected and press Ctrl+J (Layer, Duplicate Layer) to make a copy of it. Now reduce Fill Opacity of both Style and Style copy layers to 0%. The Text will disappear from your canvas but don't worry, in the next step you'll start seeing it again when we apply the first Layer Style.
Add Seven Blending Options to the Original Text Layer
In Steps 11-17 you will turn the first Style layer into a glossy striped Text. You will achieve the effect with the help of Shadow, green Outer Glow, default Gray Stripes Gradient, orange Inner Glow and Bevel and Emboss combined with Contour Lyer Style.
STEP 11
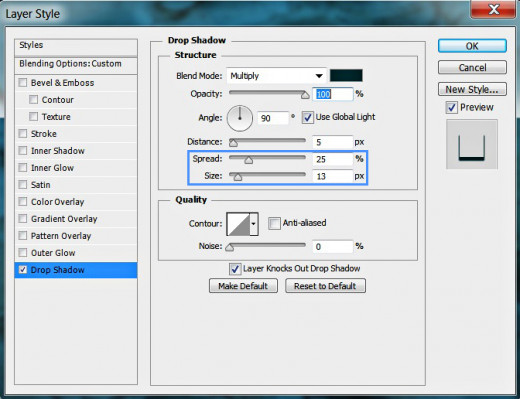
Double click on Style layer's thumbnail to activate Layer Style box and firstly tick Drop Shadow. Modify only these two settings: heighten the values of Spread to 25% and Size to 13px.
Keep Layer Style box active because more Blending Options are waiting to be applied.
STEP 12
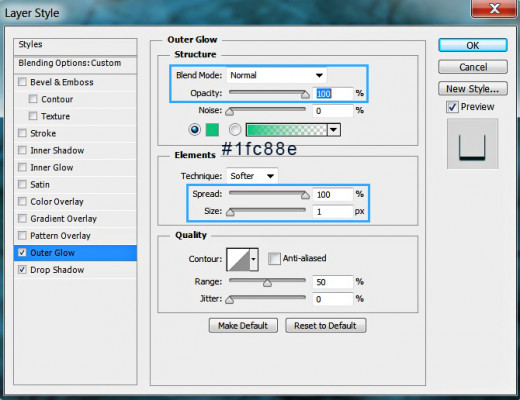
Let us add thin greenish border to our text. Tick Outer Glow Layer Style then set its Blend Mode to Normal, increase Opacity to 100% and Set Color of Glow to #1fc88e. Increase also Spread to 100% and change Size to 1px.
STEP 13
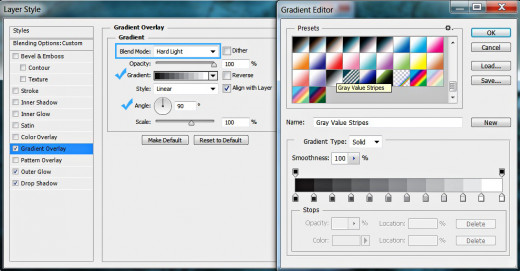
In this step we are going to add striped Gradient to create awesome relief and texture for our glossy translucent Text. For the purpose check Gradient Overlay Layer Style, change the Blend Mode to Hard Light, select Gray Value Stripes Gradient from the Gradient Picker and set the Angle to 90 degrees.
STEP 14
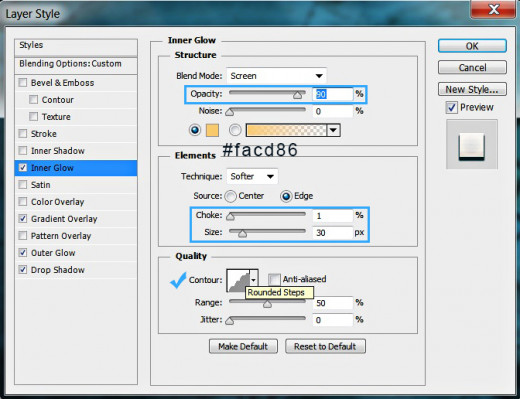
The fourth Blending Option we have to apply on the Style layer is Inner Glow. Increase its Opacity to 90% and Set Color of Glow to #facd86. Increase also Choke to 1% and Size to 30px then select Rounded Steps from Contour Picker.
STEP 15
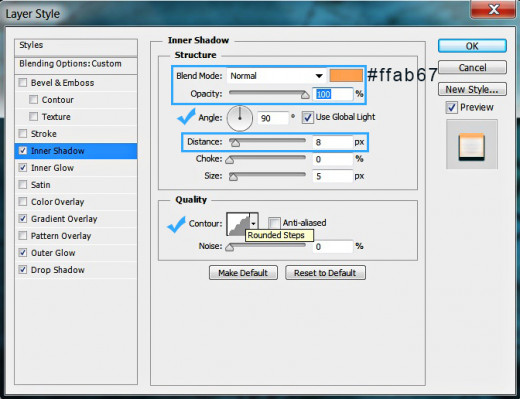
Now tick Inner Shadow Layer Style and change the following settings: change its Blend Mode to Normal, Set Color of Glow to #ffab67, increase Opacity to 100% and check if the Angle has been set automatically to 90 degrees. Slightly increase Distance to 8px and select Rounded Steps contour from the picker.
STEP 16
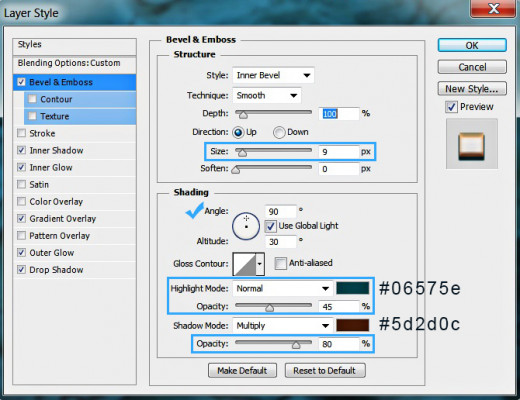
The sixth Layer Style which have to be applied to Style layer is Bevel and Emboss. Slightly increase its Size to 9px, change Highlight Mode to Normal, Set Color for Highlight to #06575e and reduce its Opacity to 45%. Change also Color of Shadow to #5d2d0c and slightly heighten the value of its Opacity to 80%.
STEP 17
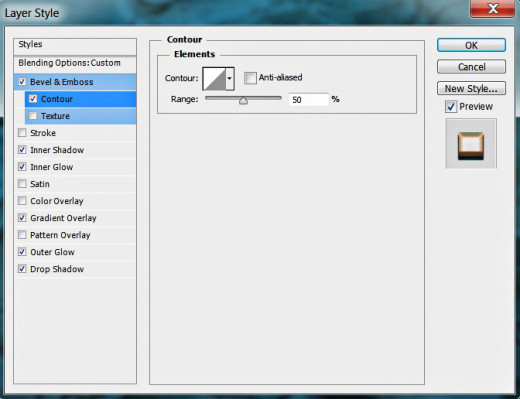
To improve the 3D Effect added in the previous step only check Contour Layer Style without changing its default settings.
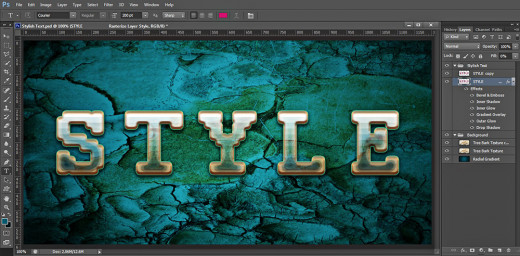
This should be the result on your canvas after adding all Blending Options to the first Style layer.
Apply Layer Styles on the Duplicated Text Layer
In the last steps of this tut you are going to apply only three Blending Options on Style copy layer but they will improve the colors of the Text and will add more glow. You should add more volume and color shades using orange Inner Glow, navy blue Inner Shadow and Gradient Overlay.
STEP 18
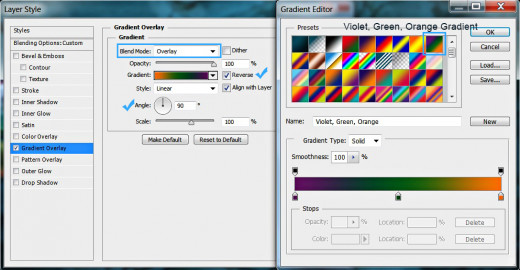
Now select Style copy layer and firstly apply Gradient Overlay Layer Style on it. Change the Blend Mode of the Gradient to Overlay, select Violet, Green, Orange Gradient from the picker, tick Reverse Option and check if the Angle is set to 90 degrees.
STEP 19
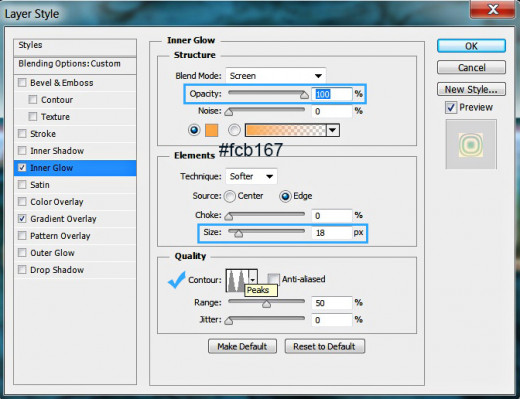
The second Layer Style we have to add to Style copy layer is Inner Glow. Increase its Opacity to 100%, Set Color of Glow to #fcb167, increase the Size to 18px and choose Peaks Contour from the Contour Picker.
STEP 20
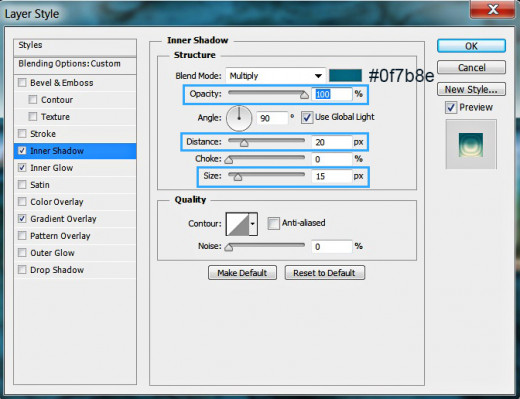
At last add Inner Shadow to the copied Style layer. Set Color of Shadow to #0f7b8e, increase Opacity to 100%, increase also Distance to 20px and Size to 15px.
We have no more Blending Options to add. This is how the Text will look after applying the three Layer Styles on Style copy layer.
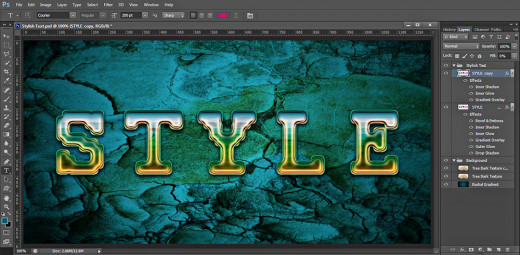
You should have these two groups and layers in your Layers panel:
-
Background group which consists of three layers: Radial Gradient, Tree Bark Texture and Tree Bark Texture copy and
-
Stylish Text group with two rasterized Text layers in it: Style and Style copy.
STEP 21
This is my Text Effect saved in .jpg format. You can make it look better if you apply Filter, Sharpen, Unsharp Mask and insert settings according to your taste.
Hope that you find this short tutorial useful and like the final result. If you have questions, just leave a comment below. Maby thanks for reading and God bless.
