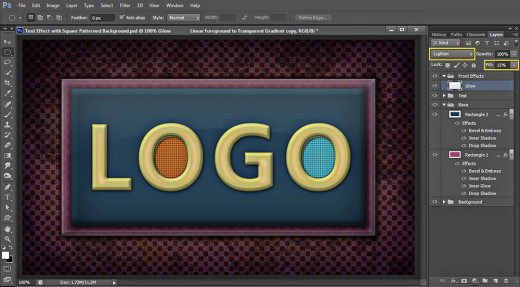
Create Text Effect with Square Patterned Background in Photoshop

From this tutorial you will learn how to create awesome Text Effect on stone plate and square patterned background. In the process of work I am going to show you how to make and save pattern in photoshop and how to use textures and layer styles to create unique texts and backgrounds.
Both textures- Lichen and Stone are my photos and unrestricted stock, so it is not necessary to inform me if you decide to use them for your own works.
I have used basic instruments and default font to create the Text. All Adobe Photoshop versions are applicable.
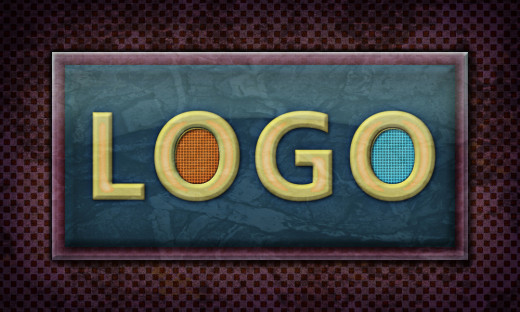
This is what you are going to create:

STEP 1
At first you need to create a folder where to save all your files. Except the Text Effect .psd file, you'll have to keep there also the Square Pattern .psd file, both textures- Lichen and Stone and your fnal result saved in .jpg or .png format.
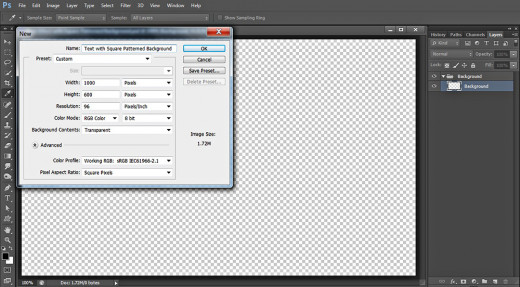
After the folder is ready, open Adobe Photoshop and select File, New to create a new .psd document. Name it Text with Square Patterned Background, insert 1000 Pixels for Width and 600 Pixels for Height then set the Resolution to 72 or 96 Pixels/Inch. Choose RGB Color for Color Mode and Transparent for Background Contents.
Those of you who plan to print the final result should set the Color Mode to CMYK Color and insert 300 Pixels/Inch for Resolution.
When you are ready with the settings, you should get transparent Layer 1 in your Layers panel. Double click on its name and type Background to rename it. Press Ctrl+G to place it in a group. Rename Group 1 to Background.
Prepare the Background using Custom Square Pattern and Lichen Texture
In Steps 2-16 your first task is to fill the Background with dark color. Secondly, you have to create a new .psd file and draw with Rectangular Marquee tool of Fixed Size your Square Pattern. Before saving the Pattern, you have to apply Drop Shadow and Inner Shadow on the Rectangles.
After the Square Pattern have been saved, you need to go back to your original .psd file and apply it on the Background layer together with another two Blending Options.
As a final touch you have to blend Lichen Texture with the Background layer by resizing it and changing its Blend Mode and Opacity.
STEP 2
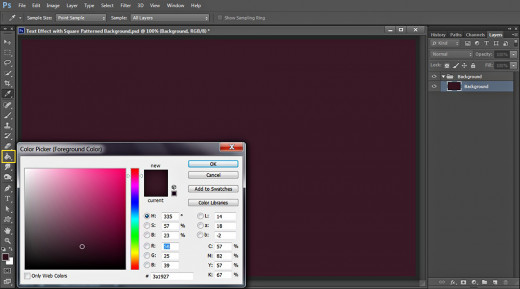
While Background layer is selected, click on Set Foreground swatch in the Tools bar and change the Foreground Color to #3a1927. Take Paint Bucket tool and drag once on your canvas to colorize it.
STEP 3
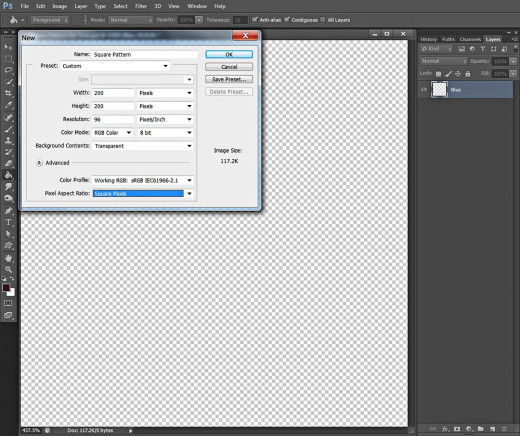
Save your Text with Square Patterned Background .psd document but don't close it. Now we firstly have to create our Square Pattern which will be used for the Background. Navigate to the Tools bar and select File, New to create a new .psd document of 200 Pixels both Width and Height. Name it Square Pattern, Insert 96 Pixels/Inch for Resolution, choose RGB Color for Color Mode and Transparent for Background Contents. Rename Layer 1 to Blue after you are ready with the settings.
STEP 4
We have to continue our work on Square Pattern .psd file. Set Foreground Color to #82acbd and colorize Blue layer using Paint Bucket Tool or Edit, Fill, Foreground Color.

STEP 5
Create a New layer on top of Layers panel and call it Rectangle, then Set Foreground Color to #662c44.
Select Rectangular Marquee Tool and change its settings in the Options bar- choose Fixed Size for Style and type 100px for both Width and Height. Draw yor rectangle, then colorize it with Paint Bucket tool. Press Ctrl+D to deselect when you are ready. Using the help of Smart Guides (View, Show, Smart Guides), place the rectangle in the middle of the canvas.

STEP 6
Double click on Rectangle layer's thumbnail to activate Layer Style dialog box (Layer, Layer Style, Blending Options). Firstly tick Drop Shadow and change these three settings: insert 2px for Distance, 18% for Spread and 6px for Size.
Don't close Layer Style box because we have to add Inner Shadow in the coming step.

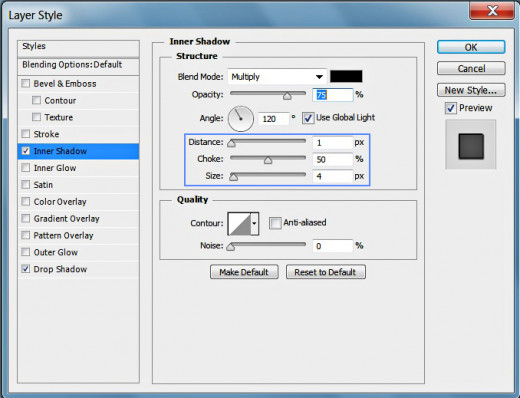
STEP 7
Now check Inner Shadow and set its Distance to 1px, Choke to 50% and Size to 4px.
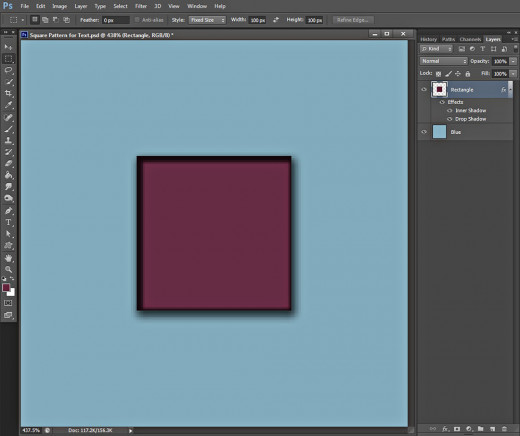
This is how your rectangle will look after applying both layer styles:
STEP 8
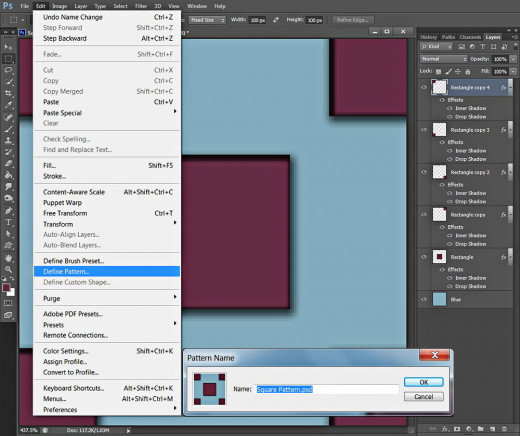
While Rectangle layer is selected, press Ctrl+J four times to make four duplicates (Layer, Duplicate Layer). Move the copied rectangles to place them at every corner of the canvas. See the screenshot below for a reference:

STEP 9
When you are ready with the Square Pattern preparation, navigate to the Tools bar and select Edit, Define Pattern and click OK when Pattern Name dialog box pops up on your screen (the name of your Square Pattern .psd file will automatically appear in Name field).
Now you can Save and close your Square Pattern document.
STEP 10
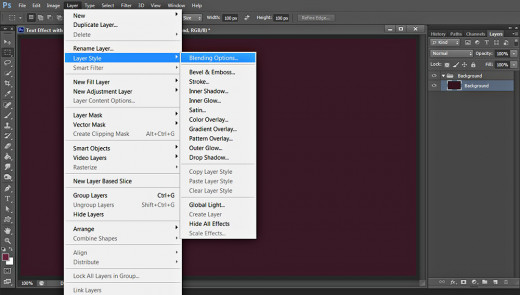
Go back to your Text with Square Patterned Background file and double click on the Background layer's thumbnail to activate Layer Style dialog box or go to Layer, Layer Style, Blending Options.
STEP 11
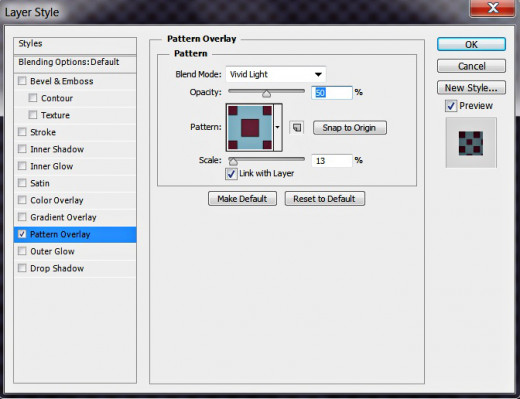
The first and most important Layer Style we have to apply on Background layer is Pattern Overlay. Set the Blend Mode to Vivid Light and Opacity to 50%, find the Square Pattern you created in the Pattern Picker and set the Scale to 13%.
Still don't close Layer Style box as two more Blending Options have to be added.
STEP 12
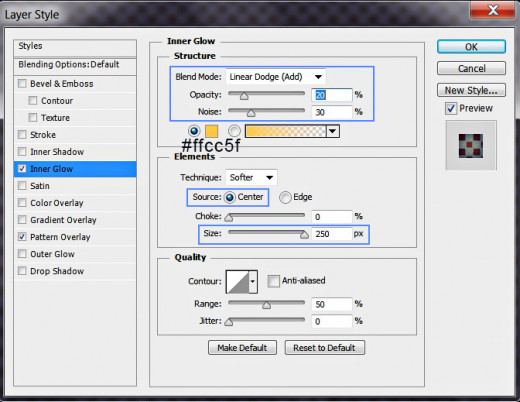
The second Layer Style we have to select is Inner Glow. Change the following six settings:
Blend Mode: Linear Dodge
Opacity: 20%
Noise: 30%
Color of Glow: #ffcc5f
Source: Center
Size: 250px.
STEP 13
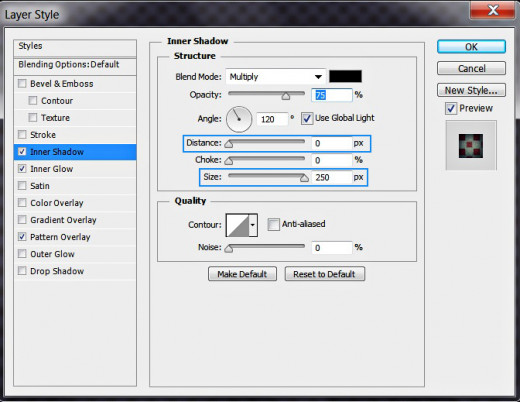
The last Layer Style to be added to the Background is Inner Shadow. This will create vignette effect. Decrease the Distance to 0px and heighten the value of the Size to 250px.
Now you can press OK button to close Layer Style box and apply the effects.
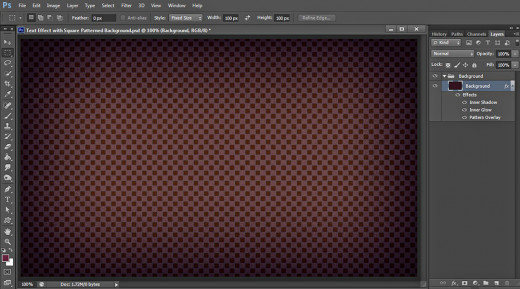
This is how your Background should look so far. In the next steps we are going to add more texture.
STEP 14
You need to download the Lichen Texture below which will be added to the Background in the next step. So click on the photo to get it in high resolution in a new window, then right click and choose Save As to place the Texture in your folder.

STEP 15
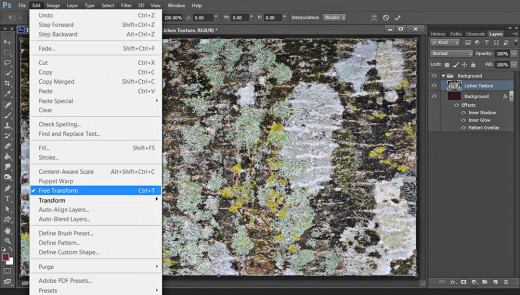
Create a New Layer on top of Background group and name it Lichen Texture. Keep this layer selected. We have to place there the image downloaded in the previous step.
Now you have to open the Lichen Texture in Adobe Photoshop, press Ctrl+A then press Ctrl+C to Select the whole image and to Copy it. Go back to your Text with Square Patterned Background .psd file and press Ctrl+V to Paste the Texture.
You see that the Lichen Texture is bigger that your canvas so apply Edit, Free Transform to resize it within the borders of the canvas. Press Enter to tell your Photoshop to accept the Transformation.
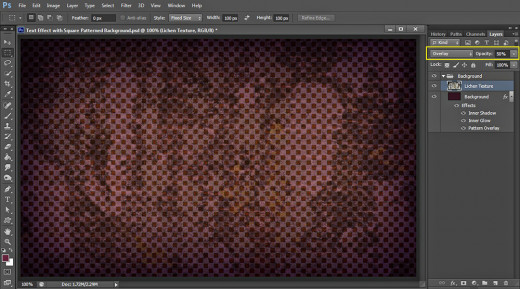
STEP 16
Change the Blend Mode of Lichen Texture layer to Overlay and lower its Opacity to 50%.
Create Both Background Plates with Rectangular Marquee Tool of Fixed Size and Blending Options
In Steps 17-26 you will draw two rectangles of different color then you have to add shadow, glow and 3D Effect to give them embossed look.
STEP 17
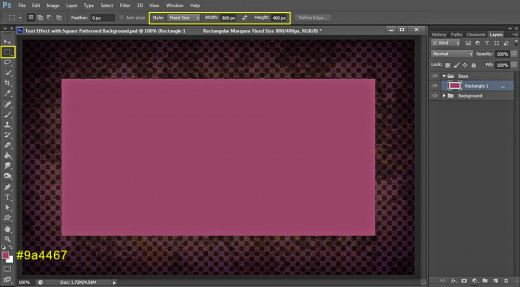
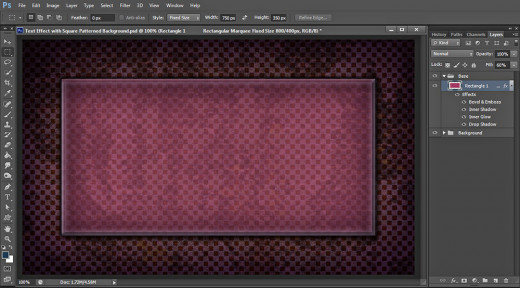
Set Foreground Color to #9a4467 then Create a New Layer on top of Layers pane and call it Rectangle 1. Place it in a group (Ctrl+G) called Base.
Grab Rectangular Marquee Tool of Fixed Size- 800px Width and 400px Height then draw a rectangular selection in the middle of the canvas. Colorize the rectangle with the Foreground Color then press Ctrl+D to deselect.
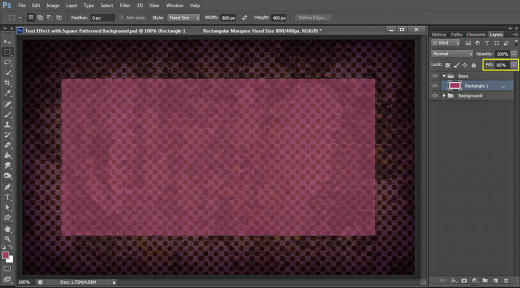
STEP 18
Change Fill Opacity of Rectangle 1 layer to 60%.
STEP 19
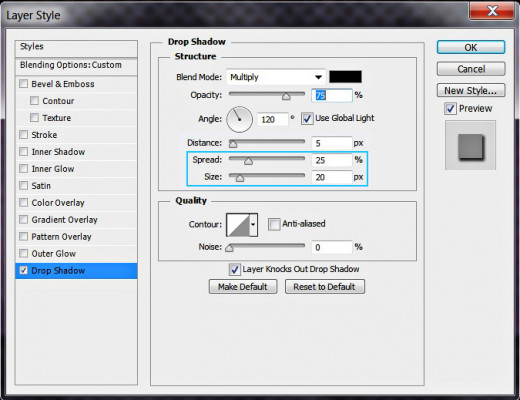
It's time to play again with Blending Options. The first Layer style we have to apply on Rectangle 1 layer is Drop Shadow. Increase Spread to 25% and Size to 20px.
STEP 20
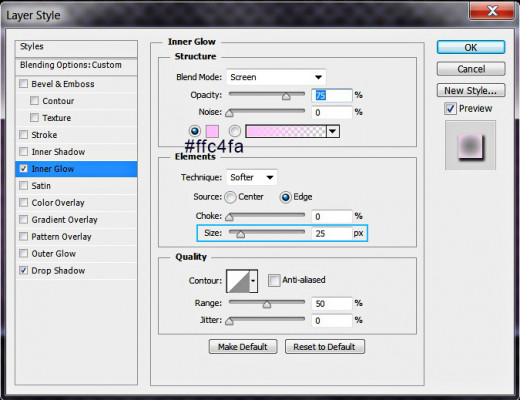
Now we are going to add glow to the borders of our Rectangle 1. For the purpose tick Inner Glow Layer Style, change the Golor of Glow to #ffc4fa and increase Size option to 25px.
STEP 21
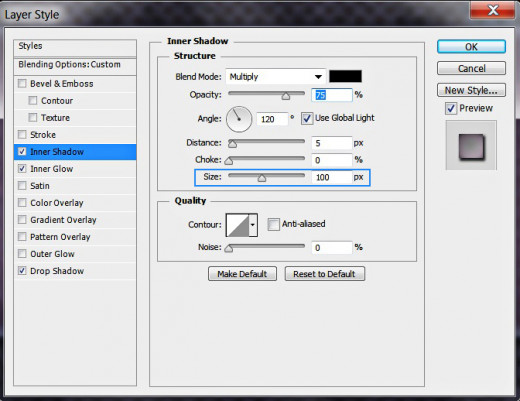
The next Layer Style we have to apply on the first Rectangle is Inner Shadow. Increase only its Size to 100px.
STEP 22
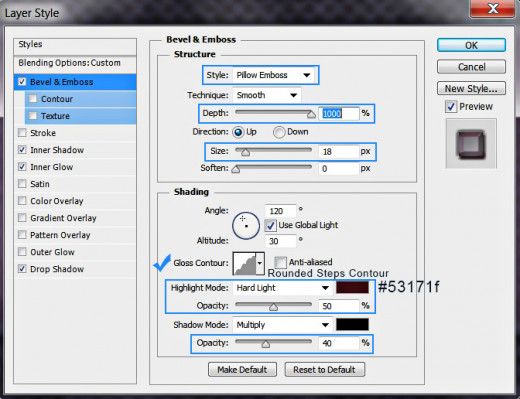
In order to make Rectangle 1 more prominent and to add 3D Effect now we should check Bevel and Emboss Layer Style. Change the following settings:
Style: Pillow Emboss
Depth: 1000%
Size: 18px
Gloss Contour: Rounded Steps
Highlight Mode: Hard Light
Color for Highlight: #53171f
Color for Highlight Opacity: 50%
Color of Shadow Opacity: 40%.
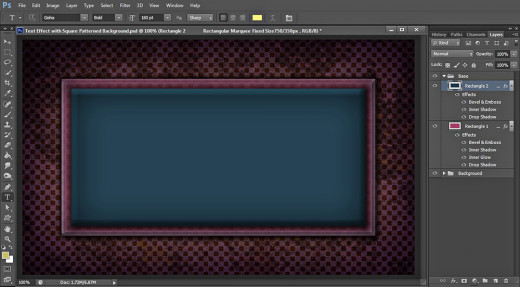
This is how Rectangle 1 will look after the four Blending Options have been applied.
STEP 23
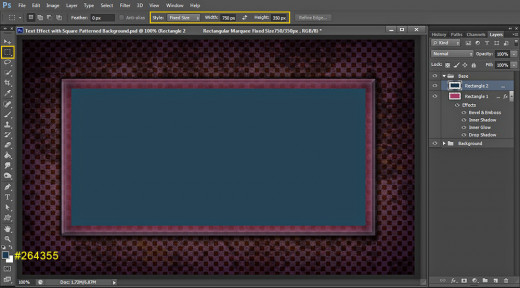
Create a New Layer on top of Base group and name Rectangle 2. Set the Foreground Color to #264355 then Grab Rectangular Marquee Tool and set its Fixed Size to 750px Width and 350px Height. Draw the Rectangular selection and fill it with the Foreground Color then Deselect (Ctrl+D) and place Rectangle 1 in the middle of the canvas as you see on the following screenshot.
STEP 24
Now apply on Rectangle 1 layer the same Drop Shadow we already added to Rectangle 2: only change the Spread to 25% and Size to 20px.

STEP 25
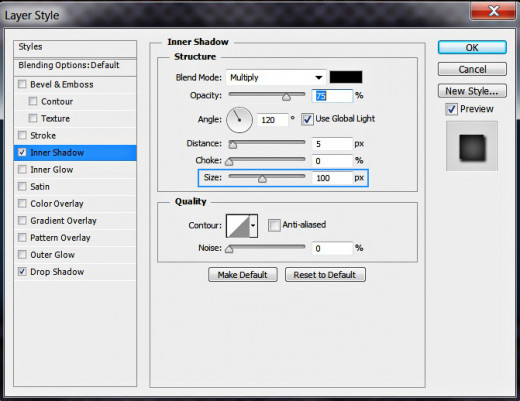
The next Layer Style to be added to Rectangle 1 layer is Inner Shadow. Increase its Size to 100px as you did for the same Layer Style applied on Rectangle 1.
STEP 26
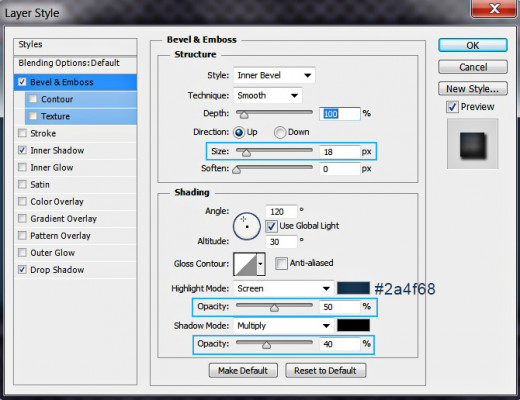
The last Layer Style we have to apply on Rectangle 2 layer is Bevel and Emboss. Increase its Size to 18px, set the Color for Highlight to #2a4f68 and reduce Color for Highlight Opacity to 50%, also lower Color of Shadow Opacity to 40%.
We finished our work in Base group. This is how the result on your canvas will look so far:
Type the Text and Add More Effects to Both „O“ Letters
In Steps 27-37 you have to type the Text using thick default Font then add Layer Styles. When you are ready with the work on the Text Layer, you have to fill the inside areas of both „O“ letters with colors and apply Woven Flat Pattern (default), Shadow and Bevel and Emboss.
STEP 27
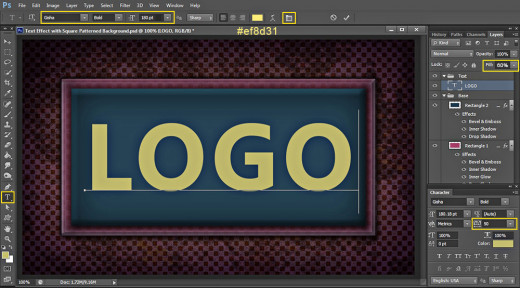
The fun part begins with this step. We'll start to create the Text Effect so grab Horizontal Type tool (or press T), find Gisha (default font) from Font Family drop down menu, Set the Font Style to Bold and the Font Size to 180pt. Select #ef8d31 for Text Color and click on Toggle the Character and Paragraph Panels icon in the Options bar to check if the Tracking is set to 50. Type Logo or any other four letters word with Capital Letters when you are ready then reduce Fill Opacity of the Logo Text layer to 60%.
Move the Logo layer on top of Layers panel and place it in a group called Text.
STEP 28
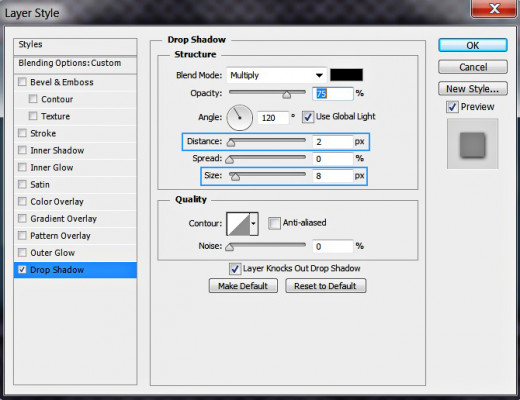
Now we have to add Blending Options to our Logo Text layer. Right click on it and choose Blending Options. The fist Layer Style you have to tick is Drop Shadow. Reduce Distance to 2px and heighten the value of Size to 8px.
STEP 29
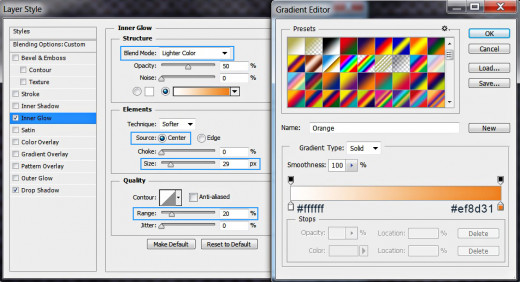
The second Layer Style to be added to the Text layer is Inner Glow. Firstly change the Blend Mode to Lighten Color and click on the Gradient rectangle to select Orange Gradient from the Gradient Picker. Both Color Stops are these:
First Color Stop (Location 0%): #ffffff
Second Color Stop (Location 100%): #ef8d31.
Change also the Source to Center, increase the Size to 29px and heighten the value of Range to 20%.
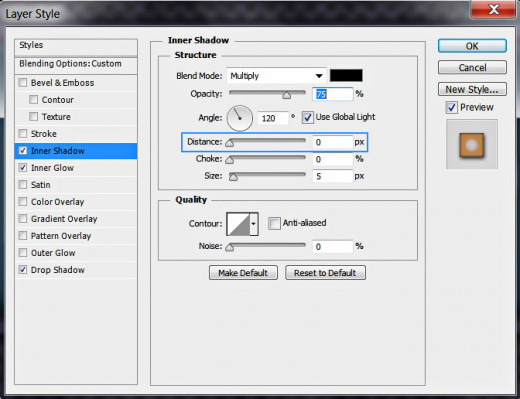
STEP 30
The next Layer Style will be used to slightly darken the borders of the letters so check Inner Shadow in Layer Style box and only reduce its Distance to 0px.
STEP 31
We have to give our Text 3D Look now so check Bevel and Emboss Layer Style and modify these settings:
Depth: 286%
Size: 9px
Color for Highlight: #fff71f
Color for Highlight Opacity: 60%
Color of Shadow Opacity: 30%.
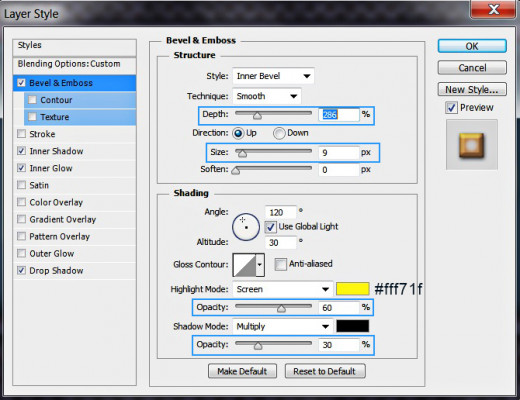
This is how your Text will look so far after the four Blending Options are applied:
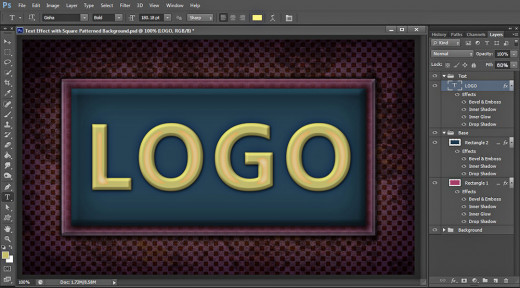
STEP 32
Hold down Ctrl key and click on Logo Text layer's thumbnail to Load Selection (Select, Load Selection).


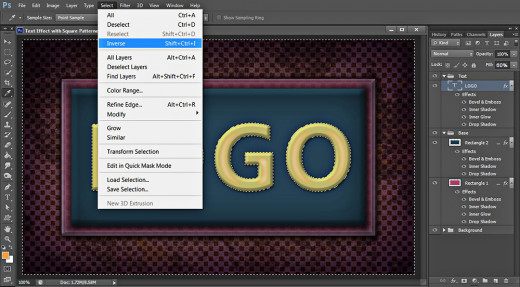
STEP 33
Navigate to the Menu bar and choose Select, Inverse to invert your Selection. You'll get this outcome:
STEP 34
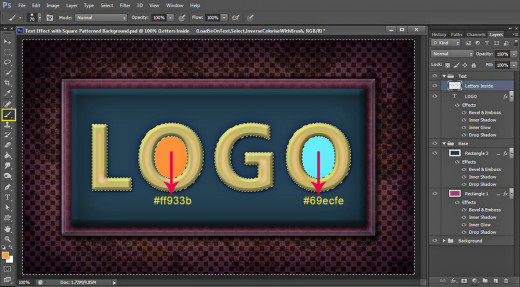
Create a New Layer on top of Text group and name it Letters Inside. Select Brush Tool and use it to colorize the inner part of both O letters- I have used #Ff933b and #69ecfe color. Deselect (Ctrl+D) when you are ready.
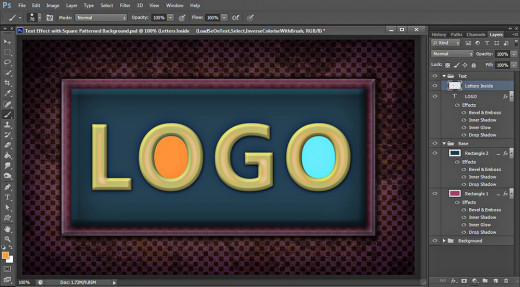
This is the outcome so far:
STEP 35
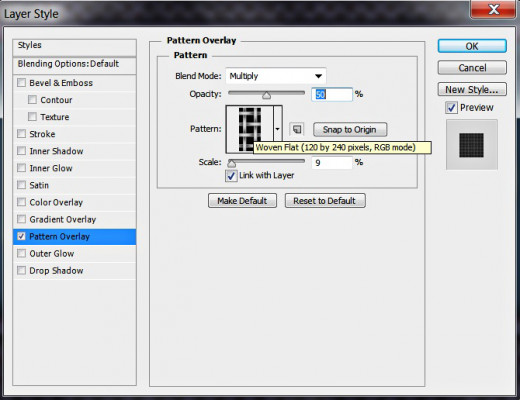
Now we have to add layer styles in order to give texture and volume to the inside parts of both O letters. Double click on Letters Inside layer's thumbnail to call Layer Style box. Firstly check Pattern Overlay and insert the following settings:
Blend Mode: Multiply
Opacity: 50%
Pattern: Woven Flat (120 by 240 pixels, RGB mode)
Scale: 9%.
STEP 36
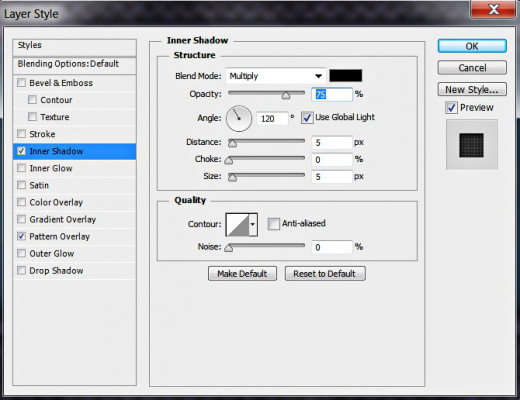
The second Layer Style we have to add to Letters Inside layer is Inner Shadow. Only tick it in Layer Style box and leave all its default settings unchanged.
STEP 37
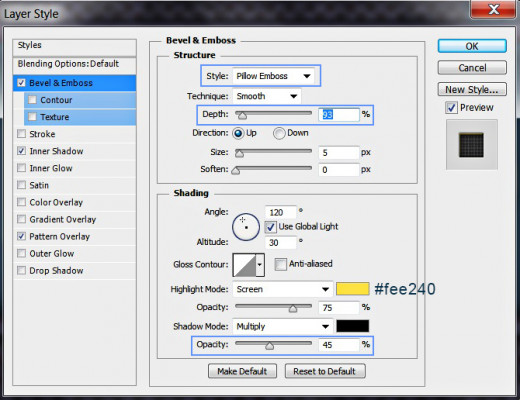
The last Layer Style to be applied on Letters Inside layer is Bevel and Emboss. Select Pillow Emboss for Style and slightly decrease Depth to 93%. Choose #fee240 for Color for Highlight then lower the Color of Shadow Opacity to 45%.
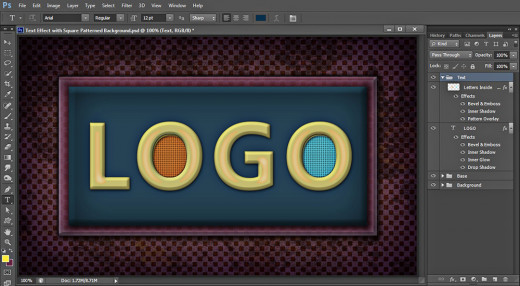
We finished our work in Text group. Below is shown the result of applying Blending Options on the inside ellipses of both O letters.
In the coming steps we are going to add glow and texture.
Add Glow and More Texture
You will finish the work on this awesome Text Effect with loading Selection on the bigger background plate and filling it with Foreground to Transparent Gradient. Then you have to create another elliptical selection to improve the shape of the glow.
For final, you have to Paste Stone Texture in your .psd document, resize it and blend it with both plates and the Text.
STEP 38
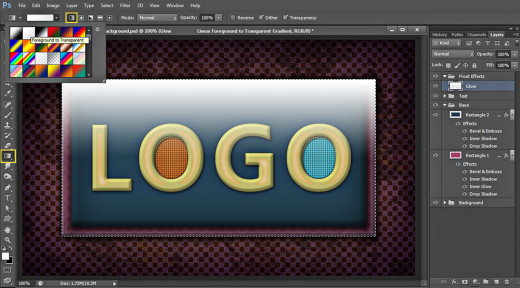
Create a New Layer on top of Layers pane and call it Glow then place it in a group which you should name Front Effects.
Press D then X to set Foreground/Background Color to White/Black.
Grab Gradient Tool (hot key G), select Foreground to Transparent Gradient from the Contour Picker in the Options bar and click on Linear type of Gradient icon.Now hold down Ctrl and click on Rectangle 1 layer's thumbnail to Load Selection. With the Selection active and Glow layer highlighted, drag with Gradient tool from the top to bottom of the rectangular Selection (you can hold down Shift key while using the Gradient tool to be more precise). Deselect (Ctr+D) when you are ready.
STEP 39
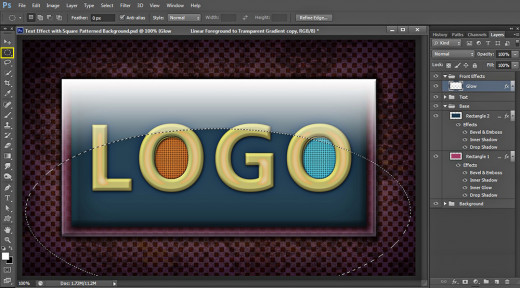
Keep Glow layer highlighted then grab Elliptical Marquee tool and draw a selection covering the bottom part of the gradient as you see on the following screenshot. Press Delete key to get rid of the selected parts then press Ctrl+D to remove the elliptical Selection.
STEP 40
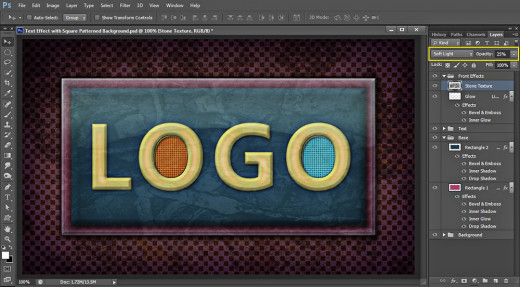
Change Blend Mode of Glow layer to Lighten and reduce the Fill Opacity to only 15%.
STEP 41
We have to add two Layer Styles to Glow layer. Firstly apply Inner Glow- reduce Opacity to 35%, select #9cffdb for Color of Glow and increase Size to 13px.

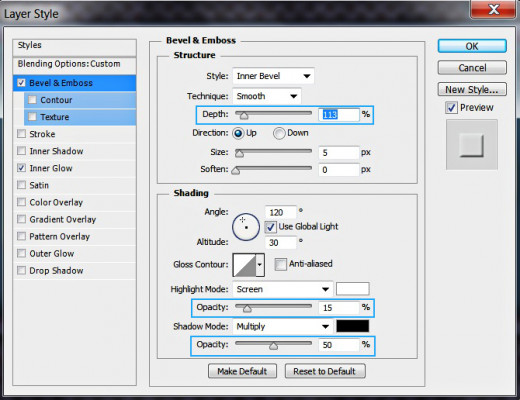
STEP 42
In order to make our transparent Glow more prominent, now we are going to apply Bevel and Emboss Layer Style. Increase its Depth to 113%, then reduce Color for Highlight Opacity to 15% and Color of Shadow Opacity to 50%.
This is how our Text Effect will look with the Glow added:
STEP 43
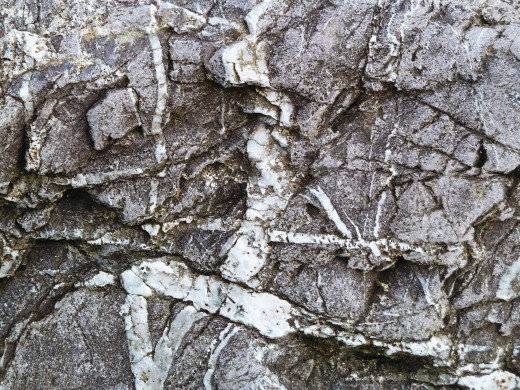
You have to download this cool Stone Texture now like you did with the Lichen Texture in Step 14.
STEP 44
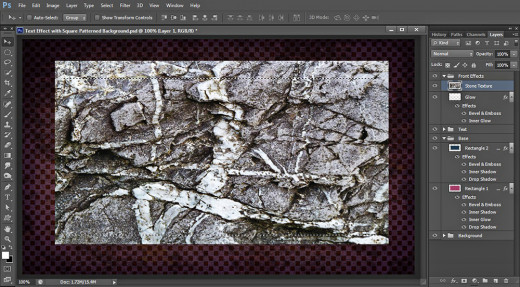
Create a New Layer on top of Front Effects group. Paste there the already downloaded Stone Texture (see Step 15) and resize it with Edit, Free Transform so that it covers the bigger Rectangle 1. Now hold down Ctrl and click on Rectangle 1 layer's thumbnail to Load selection. You should get this result:
STEP 45
Go to Select, Inverse, then press Delete key to get rid of the excess parts of the stone Texture. Press Ctrl+D to Deselect.

STEP 46
Change the Blend Mode of Stone Texture layer to Soft Light and reduce Opacity to 25%.
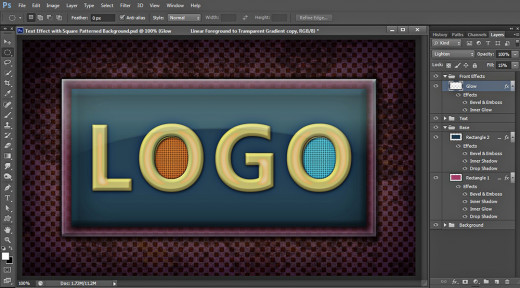
STEP 47
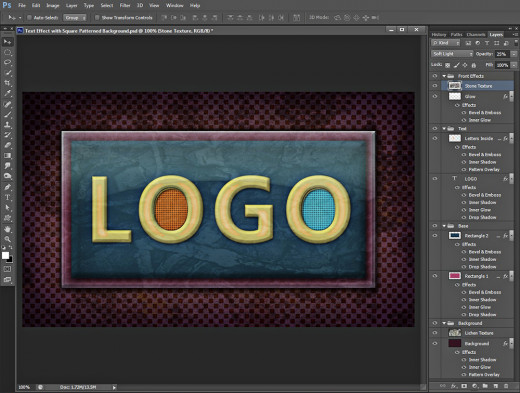
We completed our work on the Text Effect. You should have these three groups in Layers panel if you have followed all my steps:
-
Background group with two layers in it: Background and Lichen Texture;
-
Base group which includes Rectangle 1 and Rectangle 2 layer and
-
Front Effects group also with two layers in it- Glow and Stone Texture.
STEP 48
This is my outcome saved in .jpg format. To improve the final image I have applied Filter, Sharpen, Unsharp Mask (Amount 50%, Radius 1.0 pixels, Threshold 1 levels).
Hope you find this tutorial easy to follow and like the final result. Thank you very much for reading and God bless! :)