Create Ravishing Text with Timber and Ice Textures in Photoshop
From this Tutorial you will learn how to create attractive colorful text effect using Blending Options and three textures- Tree Bark, Ice and Timber. You don't need special artistic skills to achieve the final result- Brush tool will only be applied on layer masks as an erasing agent.
The thick Font I have used is the default Myriad Hebrew of Bold Italic Style and the depth and color shades of the image are result of adding adjustment layers.
All textures used in this tutorial are my own photos and unrestricted stock. Feel free to use them for your own works.
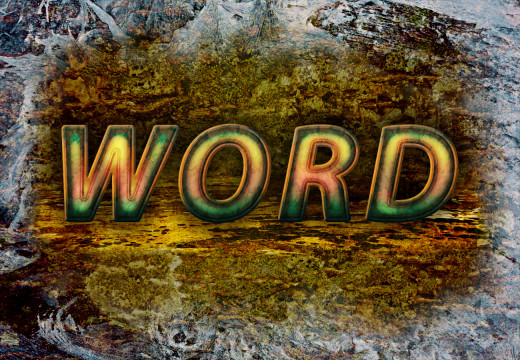
This is a preview of the outcome you should get:

STEP 1
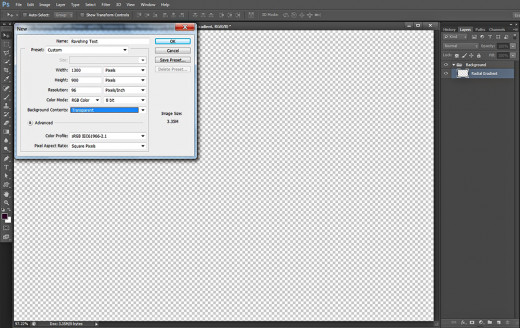
First and foremost, you should create a new folder where your .psd file and the downloaded textures will be saved. After that open Adobe Photoshop and create a new .psd document (File, New). Name the file Ravishing Text then set the Width to 1300 Pixels and the Height to 900 Pixels. Insert 96 Pixels/Inch for Resolution, choose RGB Color for Color Mode as we don't intend to print the text and set the background Contents to Transparent. As a result, transparent Layer 1 will appear in your Layers panel. Double click on its name and insert Radial Gradient. After you have renamed your first layer, press Ctrl+G to place it in a group. Rename this new Group 1 to Background.
Colorize the Background and Add Three Textures
In Steps 2-16 we are going to colorize our first layer with earth colored Radial Gradient.
When the Gradient base is ready, our next task will be to add three cool textures to our Background. We are going to use also Layer Masks and Adjustment Layers to achieve unique and beautiful effect.
STEP 2
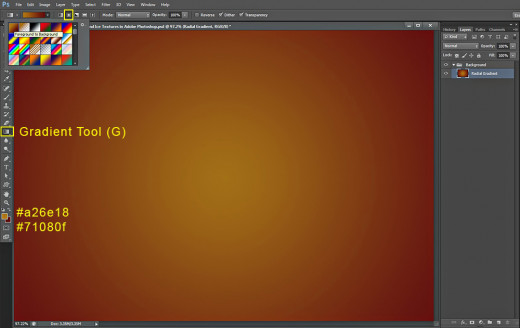
In this step we have to colorize our Background. Make sure that Radial Gradient layer is highlighted, then Set Foreground Color to #a26e18 and Background Color to #71080f. Select Gradient tool (hot key G), navigate to the Options bar and there choose Foreground to Background Gradient (the first one) from the Gradient Picker. Select also Radial type of Gradient icon. After the settings are ready, drag with Gradient tool from the middle to any corner of your canvas to colorize it with the Radial Gradient.
STEP 3
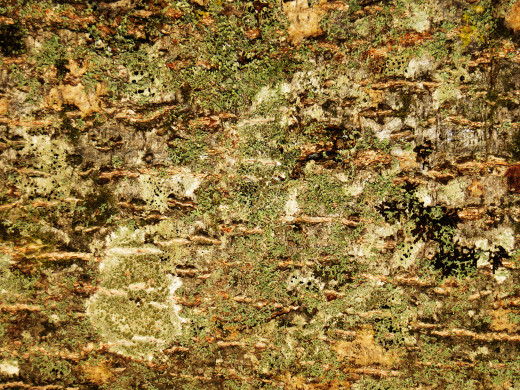
Now you have to download the first Texture which will be used for the Background. Click on the following Tree Bark Texture to open it in high resolution, then right click and choose Save As to place the image into your folder.
STEP 4
Create a New Layer on top of your Background group and name it Tree Bark Texture because there we are going to paste the previously downloaded photo.
Open the Tree Bark Texture in Adobe Photoshop, press Ctrl+A to Select the whole image, then press Ctrl+C to Copy it. Go back to your Ravishing Text .psd file, make sure that Tree Bark Texture layer is selected and press Ctrl+V to Paste there the Texture.
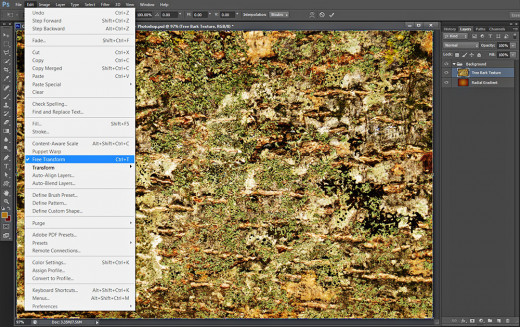
In order to resize the Texture to cover your canvas, go to Edit, Free Transform and move any corner node in inner direction. Press Enter to apply the Transformation.
STEP 5
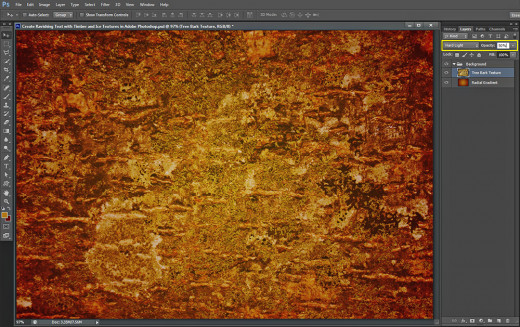
Change Blend Mode of Tree Bark Texture to Hard Light and reduce its Opacity to 50%.
STEP 6
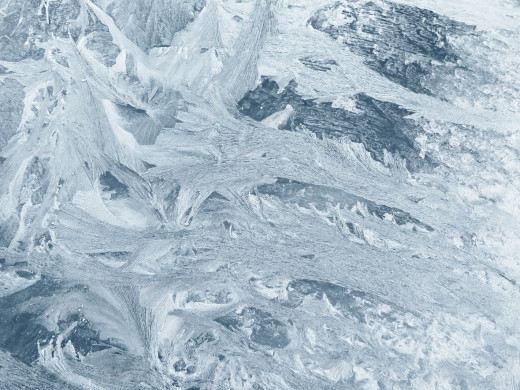
Now download this Ice Texture the same way you saved as the Tree Bark Texture in Step 3.
STEP 7
Create a New Layer on top of Background group and call it Ice Texture then Paste there the Texture of the same name (like in Step 4).
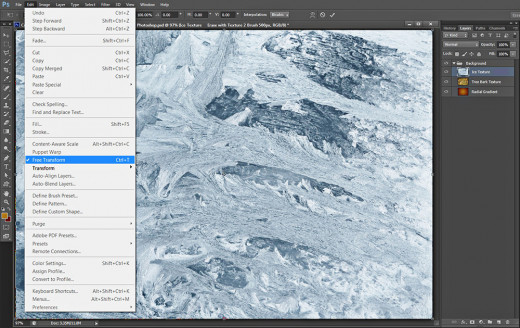
After you have pasted the Ice Texture in its layer, apply Edit, Free Transform to make it cover your canvas and press Enter to tell your program to accept the Transformation.
STEP 8
Change Blend Mode of Ice Texture layer to Hard Light and lower the Opacity to 85%.
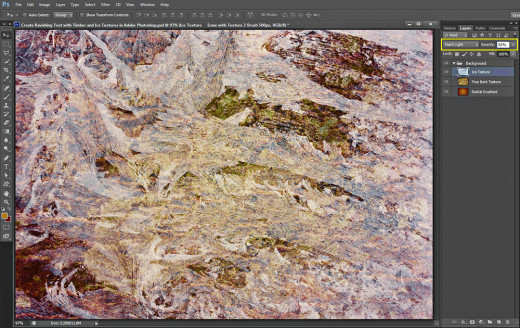
STEP 9
While Ice Texture layer is selected, grab Brush tool and find Texture 2 Brush from the Brush Preset Picker. Set its Size to 500px.
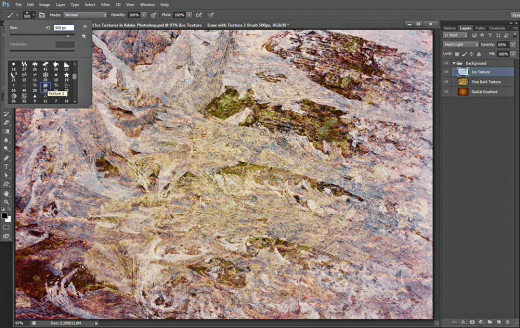
Now click on Add Layer Mask icon at the bottom of Layers panel (Layer, Layer Mask, Reveal All).
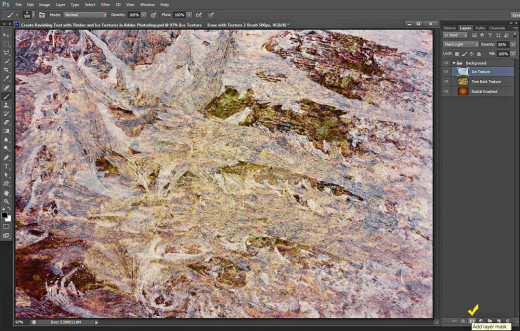
This is how your Ice Texture layer will look in Layers panel after adding Layer Mask to it:
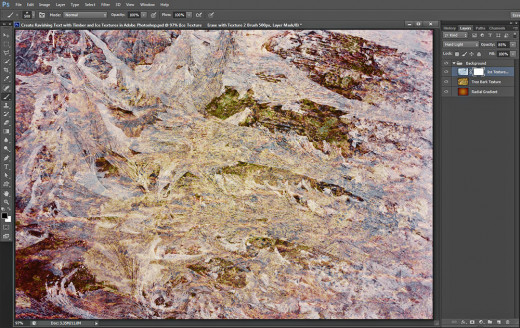
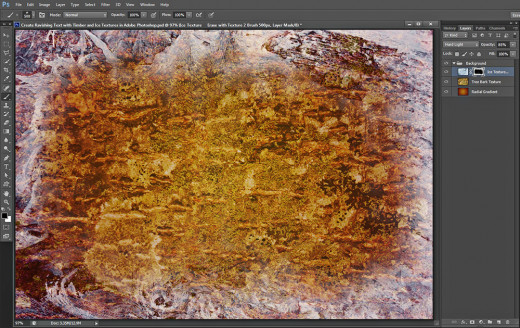
While the Layer Mask thumbnail is selected (Foreground Color should be black), start brushing in the middle of the canvas to erase most parts of the Texture. Leave only the borders intact. You should get this outcome:
STEP 10
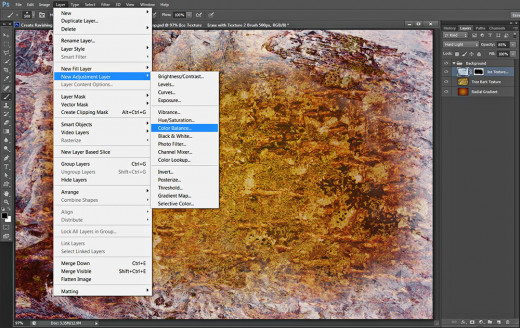
Now we are going to slightly change the color shades of our Background. For the purpose, while Ice Texture layer is still highlighted, navigate to the Menu bar and select Layer, New Adjustment Layer, Color Balance.
When Properties dialog box appears on your screen, firstly change the settings of Midtones option as follows:
Cyan-Red: -100
Magenta-Green: -47
Yellow-Blue: -31
then select Shadows from the drop down menu and change their settings like this:
Cyan-Red: -42
Magenta-Green: -39
Yellow-Blue: -1
Don't change the settings of Highlights.
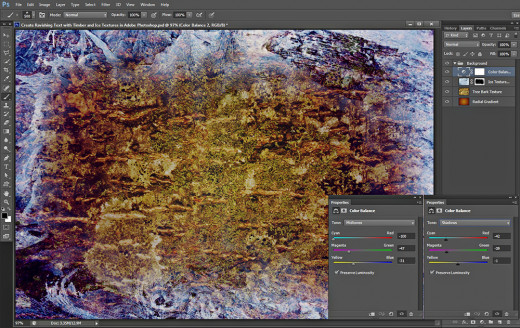
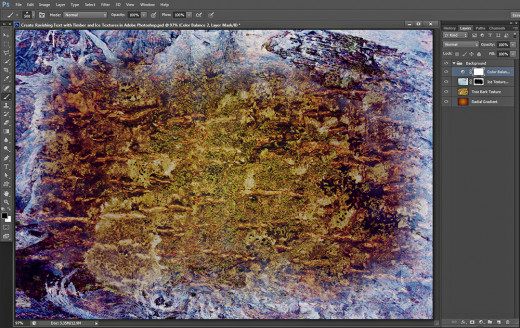
This should be the result on your canvas so far:
STEP 11
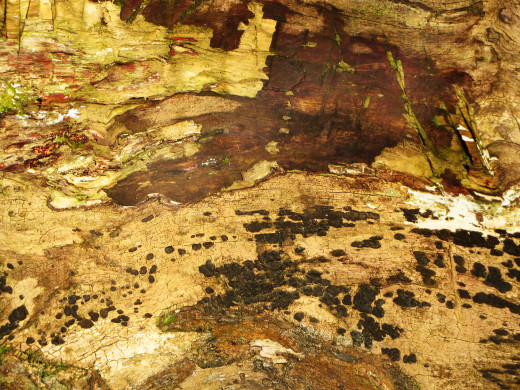
The last photo you should download is this Timber Texture:
STEP 12
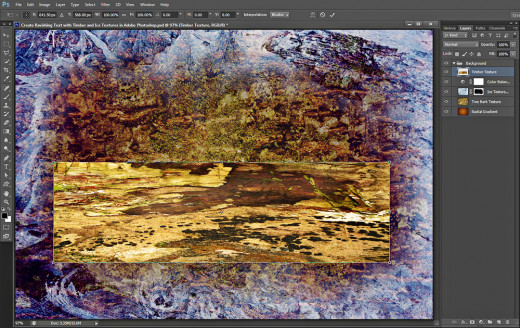
Create a New Layer on top of Background group and name it Timber Texture. Copy the already downloaded image and Paste it in this new layer then apply Edit, Free Transform and resize the Texture to a small rectangle placed closer to the bottom of the canvas- use the screenshot below as a reference. Press Enter to apply the Transformation.
STEP 13
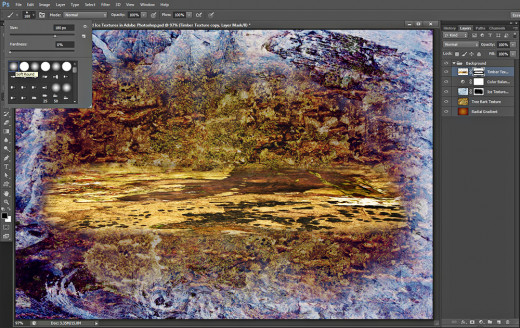
Take Brush Tool, select Soft Round Brush of 180 pixels Size, then Add Layer Mask on Timber Texture layer (Layer, Layer Mask, Reveal All). Check if your Foreground Color is set to black and while the Layer Mask thumbnail is highlighted, start erasing with the Brush the borders of the Timber Texture. You should get something like this:
STEP 14
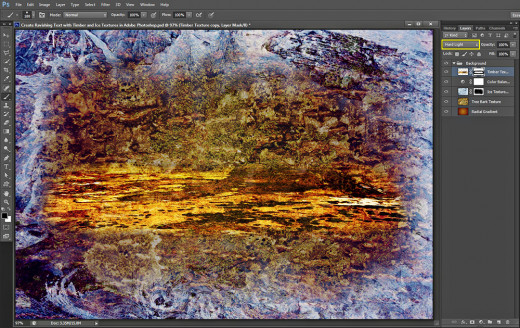
Change Blend Mode of Timber Texture layer to Hard Light.
STEP 15
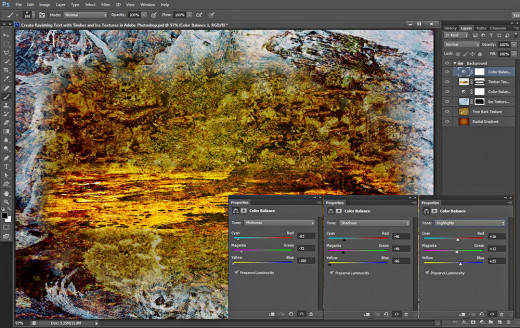
In this step, like in Step 10, we are going to add Color Balance Adjustment Layer. While Timber Texture layer is selected, go to Layer, New Adjustment Layer and select Color Balance. Change the settings in Properties box as follows:
Midtones:
Cyan-Red: -83
Magenta-Green: -72
Yellow-Blue: -100
Shadows:
Cyan-Red: -46
Magenta-Green: -49
Yellow-Blue: -96
Highlights:
Cyan-Red: +16
Magenta-Green: +12
Yellow-Blue: +25.
STEP 16
We need to add one more Adjustment Layer to our Background in order to increase the contrast. Go to Layer, New Adjustment Layer, Black and White and leave all its settings as given by default.
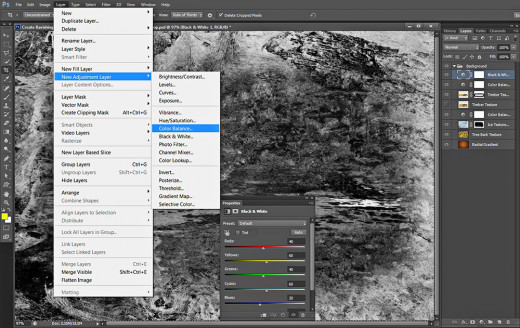
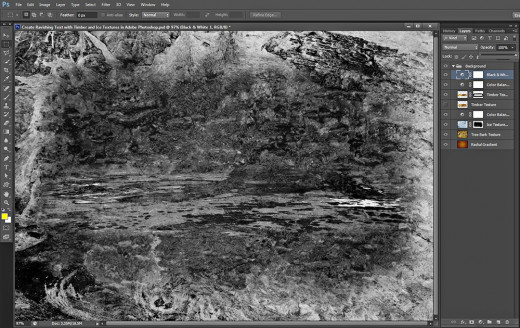
Now it seems that your whole image has turned Black and White:
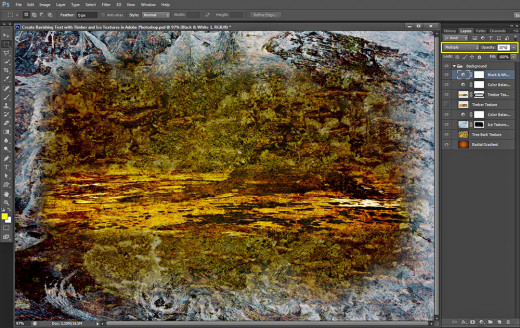
Change the Blend Mode of Black and White Adjustment Layer to Multiply and lower its Opacity to 30%.
Type the Text Using Myriad Hebrew Font and Apply Blending Options
From Step 17 till the last Step of this tut we have to work on the Text. Firstly we'll type it with with Myriad Hebrew Font which is default for Photoshop, then we'll have to duplicate its layer and add Blending Options to both Text layers. The Red Rock Pattern (default) used in Step 26 will add cool relief and texture.
STEP 17
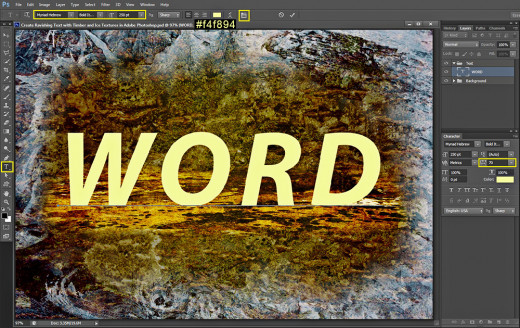
Grab Horizontal Type tool and change its settings in the options bar like this: firstly select Myriad Hebrew from Font Family drop down menu, then Set the Font Style to Bold Italic and insert 250pt for Fot Size. As you can see, I have chosen light yellow for Text Color- #f4f894. As we are going to add Stroke Layer Style and it might make the letters too close to one another, I have chosen a bigger Tracking of 70- just click on Toggle the Character and Paragraph Panels icon in your Options bar and when Character dialog box pops up on your screen, change the Tracking option.
Now type some four-lettered word using capital letters and place it in the middle of your canvas- the Timber Texture should be as its base.
Place your Text layer on top of Layers panel then press Ctrl+G to put it in a group. Rename the group to Text.
STEP 18
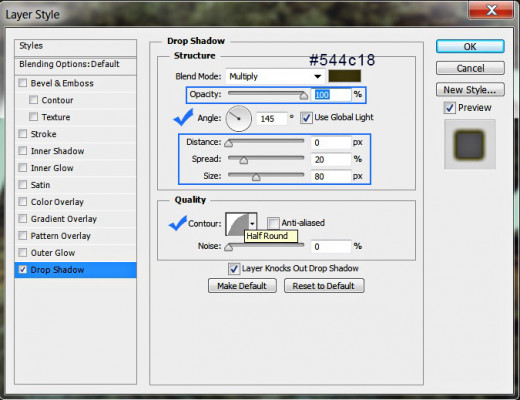
Right click on your Text layer and select Blending Options (Layer, Layer Style, Blending Options). The first Layer Style to be applied is Drop Shadow so check it and change seven of its settings: Set Color of Shadow to #544c18, increase Opacity to 100% and change the Angle to 145 degrees. Then lower Distance to 0px, increase Spread to 20% and Size to 80px. At last choose Half Round contour from the Contour Picker.
Keep Layer Style dialog box opened because we have to add six more Blending Options in the coming steps.
STEP 19
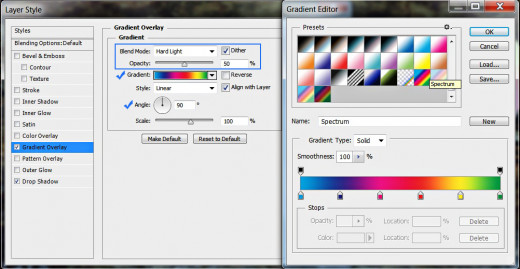
The second Layer Style to be applied on our Text layer is Gradient Overlay. Change its Blend Mode to Hard Light, check Dither and lower the Opacity to 50%. Find Spectrum Gradient in the Gradient Picker and set the Angle to 90 degrees.
STEP 20
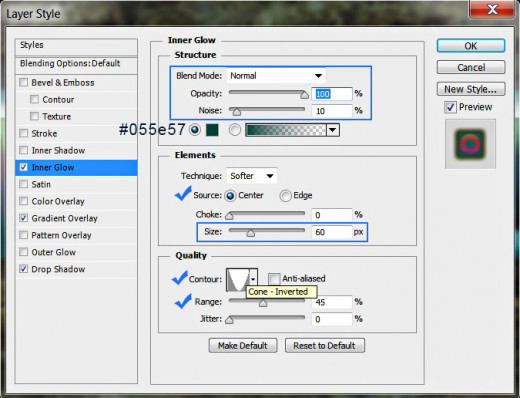
The third Layer Style we have to add is Inner Glow. Set its Blend Mode to Normal, heighten the values of Opacity to 100% and Noise to 10%, then Set Color of Glow to #055e57. Change also the Source from Edge to Center, set Size to 60px, select Cone-Inverted Contour and increse Range to 45%.
STEP 21
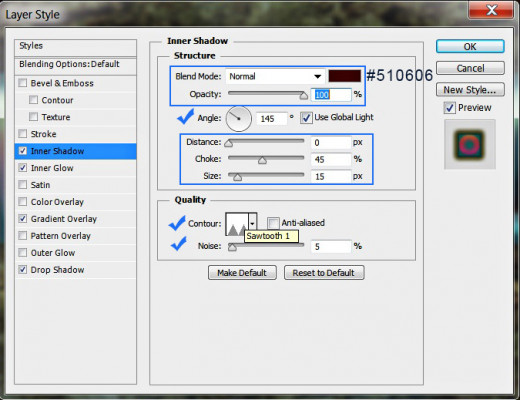
Now it is time to add Inner Shadow Layer Style. Modify these settings:
Blend Mode: Normal
Color of Shadow: #510606
Opacity: 100%
Angle: 145 degrees
Distance: 0px
Choke: 45%
Size: 15px
Contour: Sawtooth 1
Noise: 5%.
STEP 22
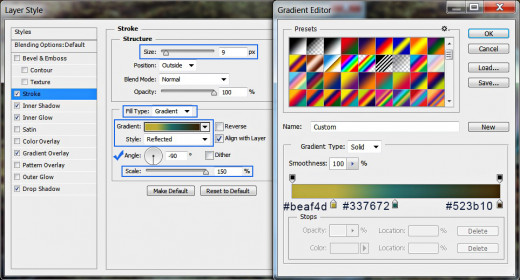
Now we are going to add thick Stroke Layer Style to our Text. Firstly set the Stroke Size to 9px and choose Gradient from the Fill Type drop down menu. Set the Gradient Color Stops as follows:
First Color Stop (Location 20%): #beaf4d
Second Color Stop (Location 50%): #337672
Third Color Stop (Location 100%): #523b10
Select also Reflected Style of Gradient, set the Angle to -90 degrees and increase Scale to 150%.
STEP 23
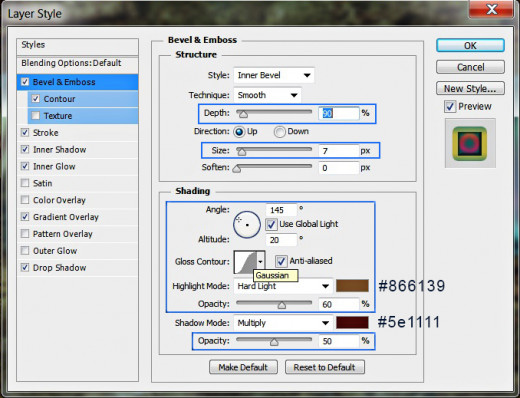
In order to add 3D effect to our Text layer, we should apply Bevel and Emboss Layer Style. Change the following settings in the dialog box:
Depth: 90%
Size: 7px
Angle: 145 degrees
Altitude: 20 degrees
Gloss Contour: Gaussian
Anti-aliased: checked
Highlight Mode: Hard Light
Color for Highlight: #866139
Opacity: 60%
Color of Shadow: #5e1111
Opacity: 50%.
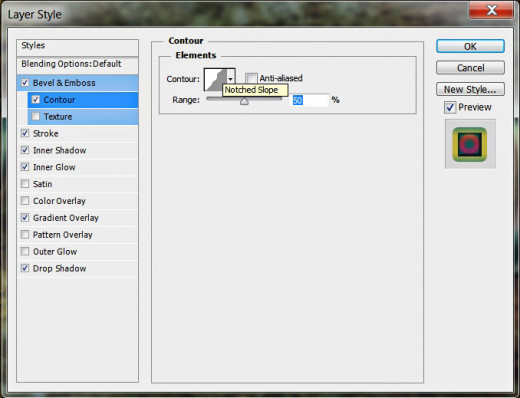
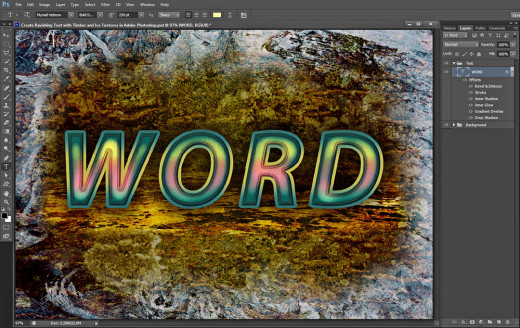
The last Layer Style to be added to Word Text layer is Contour. Only change the type of Contour in the dialog box to Notched Slope and leave the other two settings as given by default.
You should get this result on your canvas if you have followed all my steps so far:
STEP 24
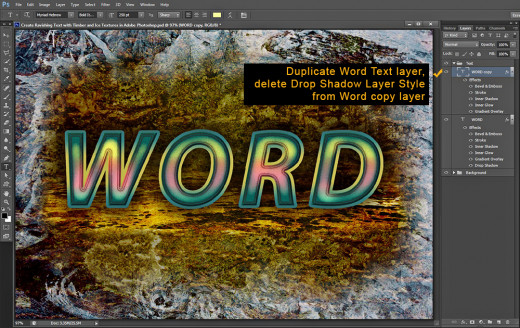
While your Text layer is selected, right click on it and choose Duplicate Layer or just press Ctrl+J. Delete Drop Shadow Layer Style from the duplicated layer- just select the Style and drag it to the Recycle Bin icon at the bottom of your Layers panel. Don't delete or change the other layer styles on the duplicated layer.
STEP 25
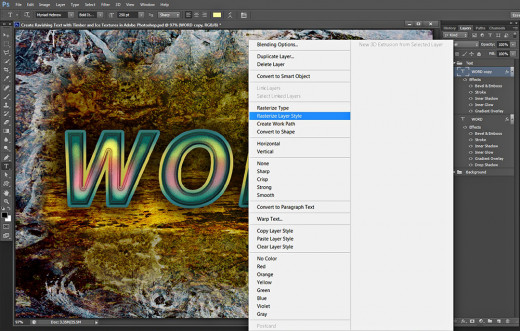
Right click on the duplicated Text layer and select Rasterize Layer Style in order to apply the Blending Options. We are going to add new ones in the next steps.
STEP 26
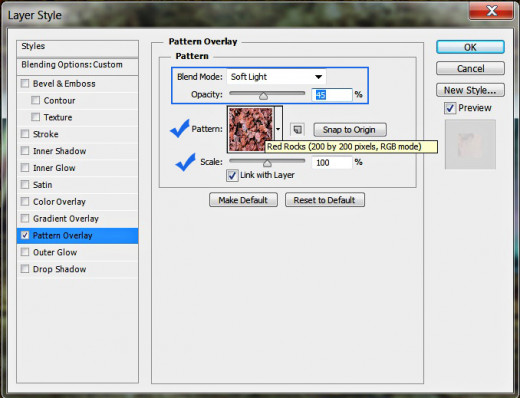
Double click on your duplicated and rasterized layer's thumbnail to call Layer Style box. Check firstly Pattern Overlay, change its Blend Mode to Soft Light and lower Opacity to 45%. Select Red Rocks Pattern from the Pattern Picker menu and set the Scale to 100%.
Keep Layer Style dialog box active. More Blending Options are coming in the next steps.
STEP 27
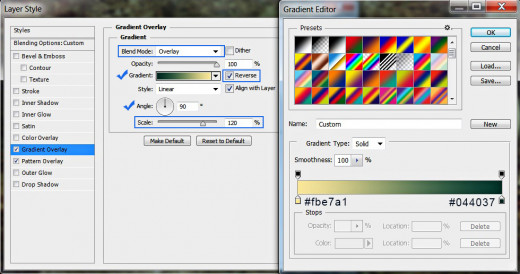
The second Layer Style to be applied on the duplicated layer (in my case Word copy layer) is Gradient Overlay. Change its Blend Mode to Overlay then click on the Gradient swatch and set these two Color Stops:
First Color Stop (Location 0%): #fbe7a1
Second Color Stop (Location 100%): #044037
Check also Reverse option, change the Gradient Angle to 90 degrees and set the Scale to 120%.
STEP 28
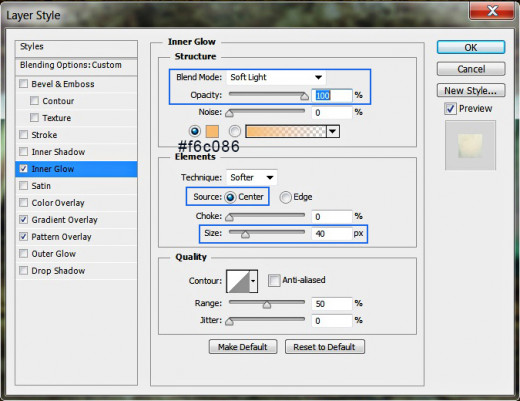
The next Layer style we have to add is Inner Glow. We need to modify five of its settings. Change the Blend Mode to Soft Light, heighten Opacity to 100%, Set Color of Glow to #f6c086, then check Center from Source options and increase Size to 40px.
STEP 29
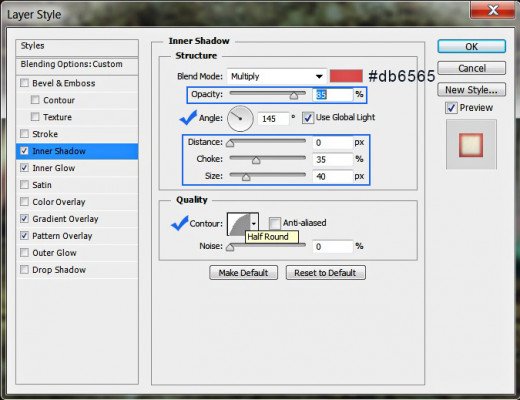
This time check Inner Shadow Layer Style to give the Text reddish shades. Set Color of Shadow to #db6565, change Opacity to 85%, the Angle should be 145 degrees. Reduce Distance to 0px, increase Choke to 35% and Size to 40px, then choose Half Round Contour from the Contour Picker.
STEP 30
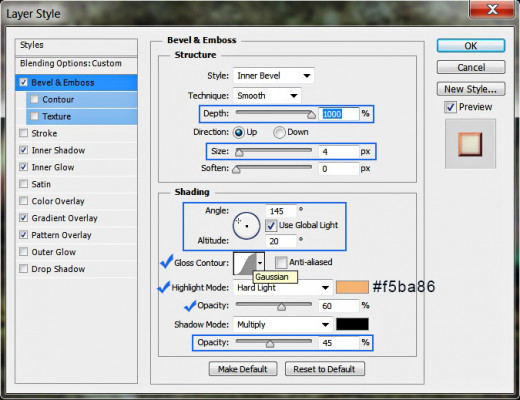
We have one last Layer Style to add. Tick Bevel and Emboss in Layer Style box, increase its Depth to the maximum of 1000%, slightly reduce Size to 4px, Angle and Altitude should be 145 degrees and 20 degrees respectively, choose Gaussian from Gloss Contour Picker, change Highlight Mode to Hard Light and Color for Highlight to #f5ba86. Reduce Color for Highlight Opacity to 60% and Color of Shadow Opacity to 45% and voila, we are ready with our stunning Text.
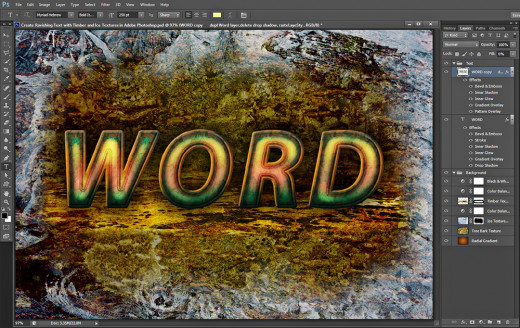
If you have organized your .psd document as per my previous steps, you should have these two groups and layers in your Layers panel:
-
Background group which includes the following seven layers: Radial Gradient, Tree Bark Texture, Ice Texture, Color Balance 1, Timber Texture, Color Balance 2 and Black & White Adjustment layer and
-
Text group with two layers in it: Word and Word copy.
STEP 31
This is my outcome saved in .jpg format.
Hope you learned something new from this tut and found it awesome and easy to follow.
If you have any questions, don't hesitate to ask me. Comments and critiques are welcome.
