Create Old Clock Poster with Textures and Brushes in Photoshop

From this tutorial you will learn how to create awesome composition with Clock image, custom shapes, textures and brushes.
In the process of work we'll be using also Polygonal Lasso for triangles drawing and Smudge Tool.
All brushes used are exclusive for Adobe Photoshop. If your version does not have Stipple Dense Brush, you can replace it with any Spatter Brush.
All images used for creation of this poster- Clock photo, Cracked Paint Texture, Ice Texture and Water are my own photos and unrestricted stock. You don't need my permission to use them for your own projects.
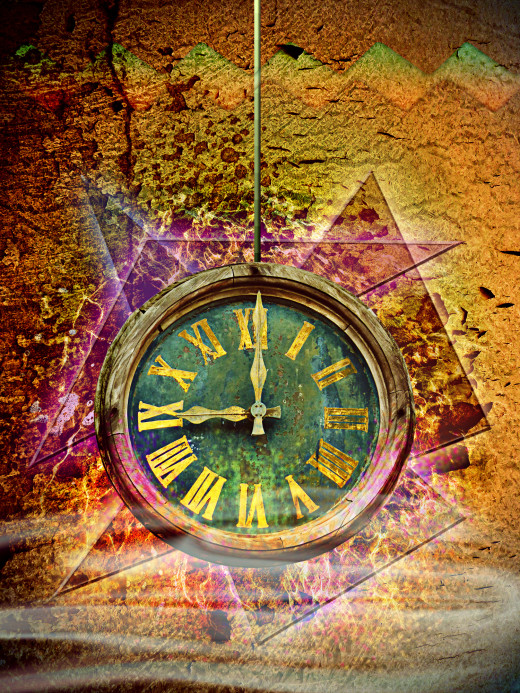
This is the result you should get if you follow all my steps:
STEP 1
Firstly create a folder where you are going to keep your work and the stock photos.
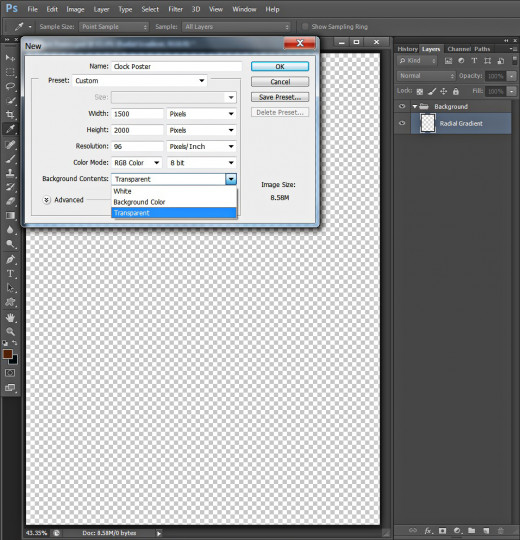
Open Adobe Photoshop and create a new .psd document (File, New). Name the file Clock Poster, then insert 1500 Pixels for Width and 2000 Pixels for Height. Set the Resolution value to 96 Pixels/Inch (300 Pixels/Inch if you intend to print your work), then choose RGB Color from Color Mode drop down menu (CMYK Color for those who print). Set also the Background Contents to Transparent in order to get an editable first layer.
Rename your Layer 1 to Radial Gradient then press Ctrl+G to put it in a group. Rename that Group 1 to Background.
Create Rough Background with Dark Shaded Gradient and Cracked Paint Texture
In the next four steps your work will be to fill the first Layer in Background group with brown to dark grey Radial Gradient.
When you are ready with this Background base, you have to Paste on a new layer cool Cracked Paint Texture, then Resize it and change its Blend Mode to make it transparent and blending with the Radial Gradient on the layer below.
STEP 2
While Radial Gradient layer is highlighted, set Foreground/Background Color to #4e2008/00090e. Grab Gradient Tool (or press G), then navigate to the Options bar to change the instrument's settings. Select Foreground to Background Gradient (the first one in the Gradient Picker) and also click on Radial Gradient icon. Drag with the Gradient from the middle to a chosen corner of the canvas and you'll get the result shown below:

STEP 3
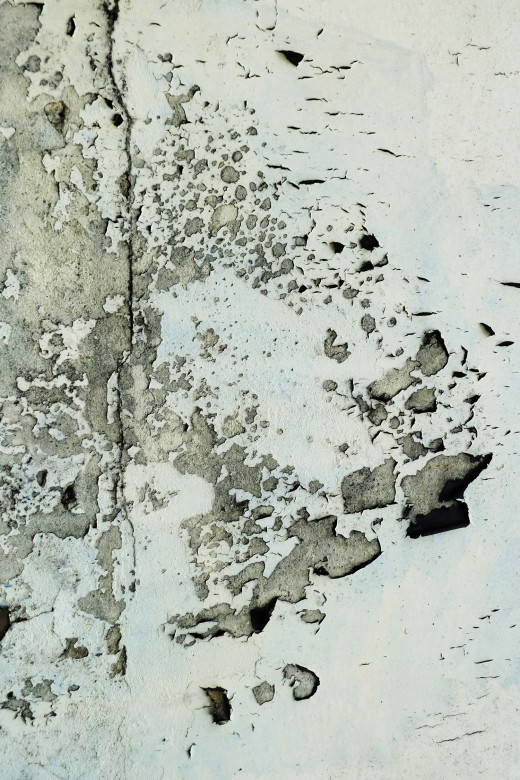
The first photo you have to download is this Cracked Paint Texture. Simly click on it to get it in high resolution, then right click on it and choose Save As to place it in your folder.
STEP 4
Create a New Layer on top of Background group and call it Cracked Paint Texture.
Open in Photoshop the photo you downloaded in the previous step, press Ctrl+A to Select the whole image then press Ctrl+C to Copy it.'
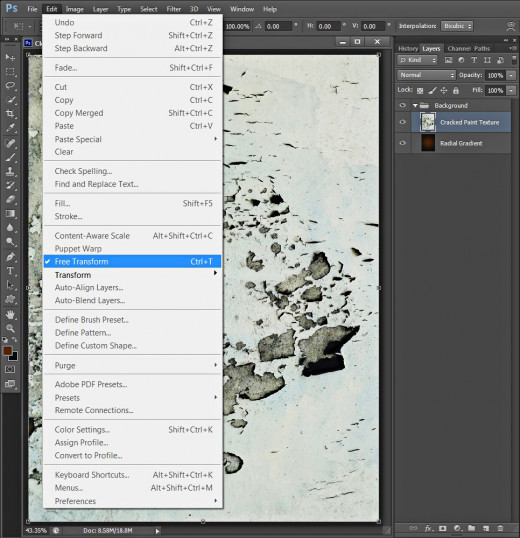
Return to your Clock Poster document, select Cracked Paint Texture layer and press Ctrl+V to paste there the image.
As the Texture does not fit the size of your canvas, navigate to the Menu bar, select Edit, Free Transform and move the nodes until the Texture covers you canvas. Press Enter to apply the Transformation when you are ready.
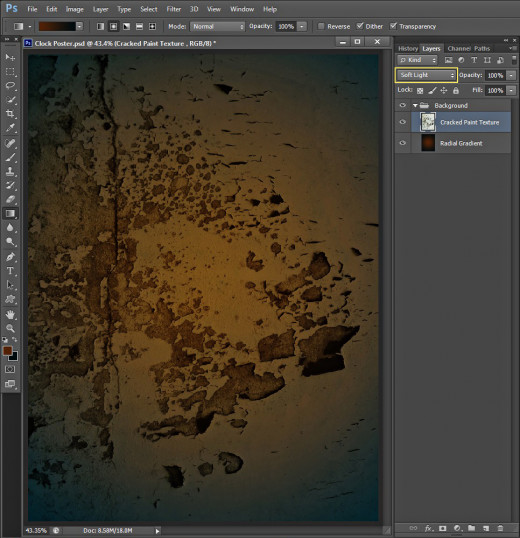
STEP 5
Change the Blend Mode of Cracked Paint Texture layer to Soft Light.
Add Ice Texture to Improve the Relief of the Background
In the coming four steps your task is to Paste glossy Ice Texture on a new layer on top of Background group. You should decrease the Size of the Texture with the help of Free Transform then change its Blend Mode to merge its colors and relief with the contents of the previous two layers. You need to duplicate the Ice Texture layer and keep its Blend Mode to enhance the glowing effect.
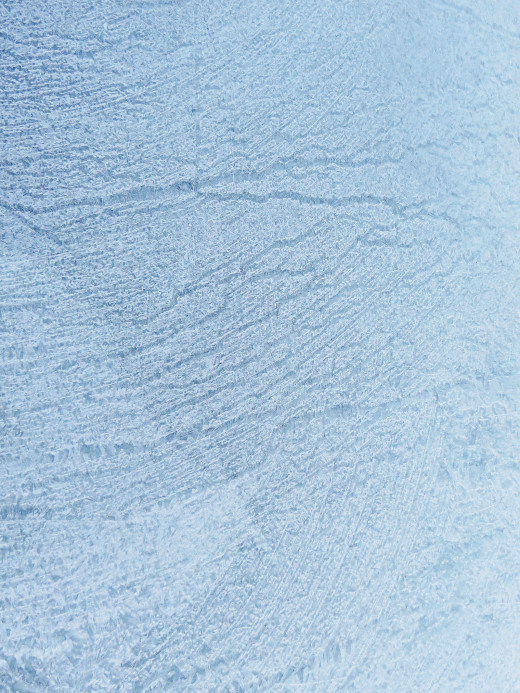
STEP 6
Now you should download this Ice Texture:
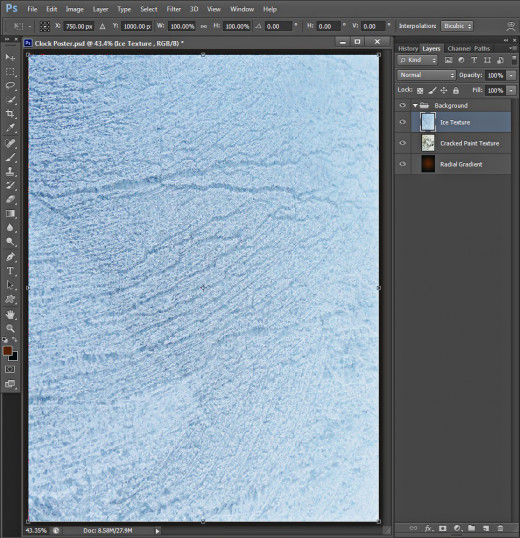
STEP 7
Create a New Layer on top of Background group and name it Ice Texture then Paste there the previously downloaded image. Apply Edit, Free Transform to make the Texture size identical to the size of the canvas (see Step 4 for a reference).
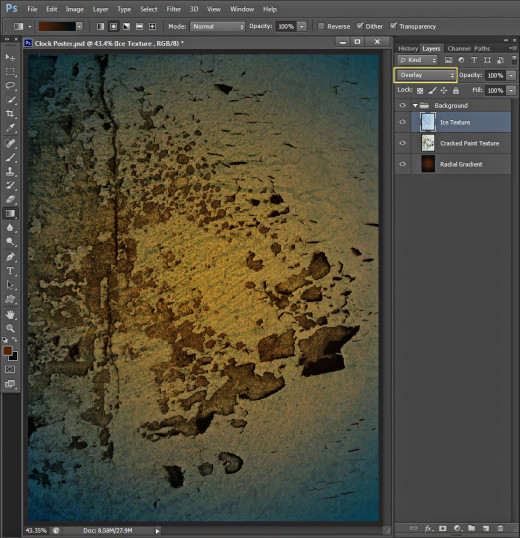
STEP 8
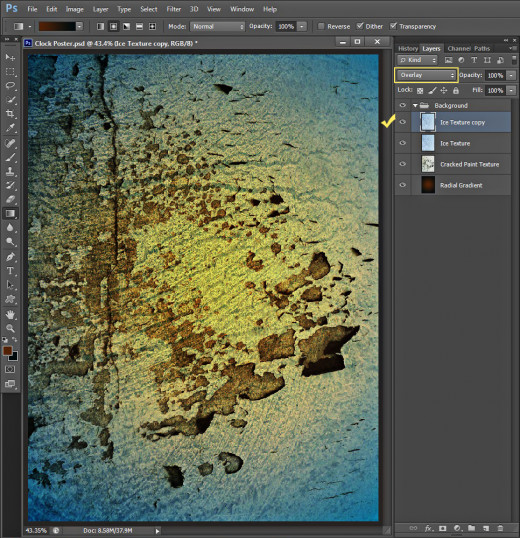
Change the Blend Mode of Ice Texture layer to Overlay.
STEP 9
While Ice Texture layer is still selected press Ctrl+J (Layer, Duplicate Layer) to duplicate it. Don't change the Overlay Blend Mode of Ice Texture copy layer.
Apply Two Adjustment Layers to Improve the Colors and Contrast of the Background
In the coming two steps you should add two Adjustment layers on top of Background group. Firstly you have to apply Red Photo Filter, change its Blend Mode and decrease Opacity option then erase the middle portions of the Adjustment Layer using Soft Brush while working within the Layer Mask.
The next Adjustment Layer you have to apply is Color Balance. You need to modify only the Midtones settings.
STEP 10
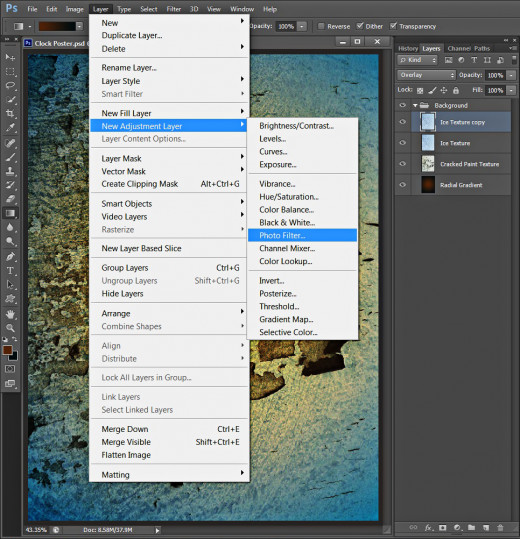
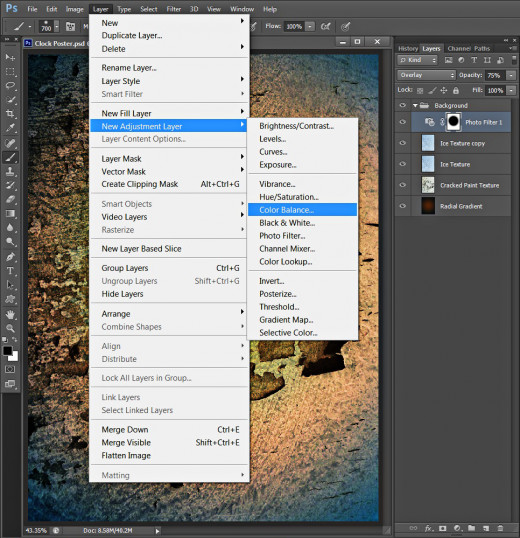
Keep Ice Texture copy layer highlighted, then navigate to the Menu bar and select Layer, New Adjustment Layer, Photo Filter.
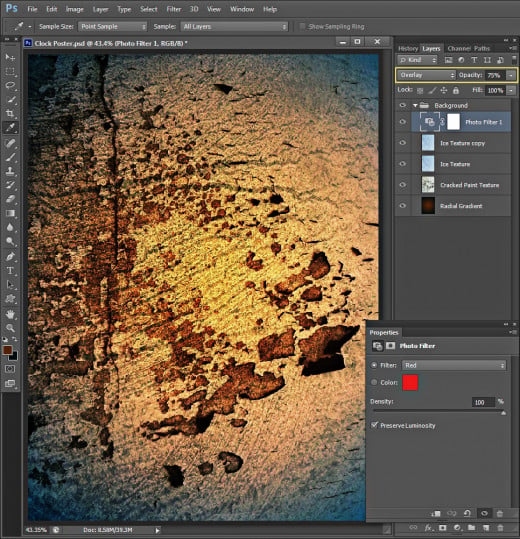
When Photo Filter Properties dialog box pops up on your screen, choose Red from Filter drop down menu, then increase Density value to 100%.
Change the Blend Mode of Photo Filter layer to Overlay and decrease its Opacity to 75%.
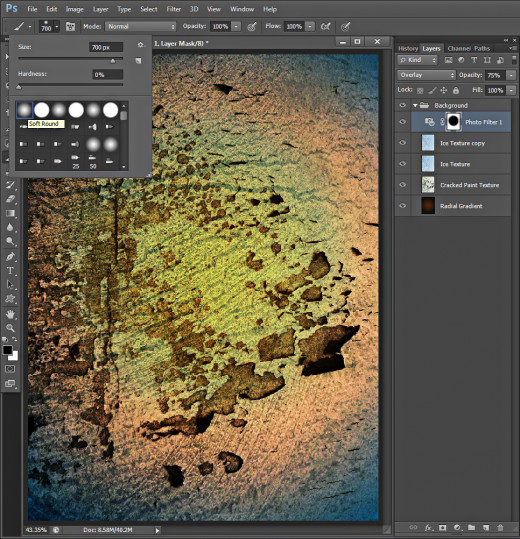
Keep Photo Filter layer highlighted then grab Brush tool, select Soft Round Brush and set its Size to 700px. Change the Foreground Color to Black. Start brushing in the middle of your canvas, don't erase only the border parts of the Photo Filter layer.
STEP 11
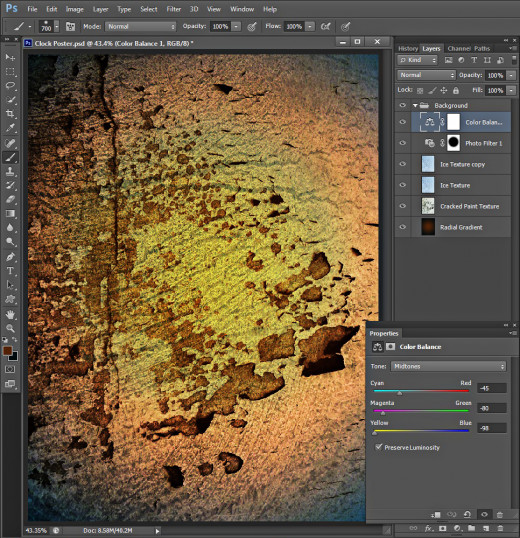
Navigate to the Menu bar and again choose Layer, New Adjustment Layer, but this time select Color Balance.
In Color Balance Properties dialog box change only the Midtones settings as follows:
Cyan-Red: -45
Magenta-Green: -80
Yellow-Blue: -98.
Add Water Texture to Create Glowing Oval in the Center of the Canvas
In Steps 12-17 you should download glossy Water Texture and Paste it in a new layer on top of Background group. After you have resized it with Free Transform, you have to apply Layer Mask to erase with Soft Brush the rough edges of the Water Texture and shape an oval in the central part of the canvas.
Your next task is to create a duplicate of the Water Texture layer and add Color Balance Adjustment layer with modified Midtones and Shadows settings.
STEP 12
In the coming steps we have to finish our hard work on the Background.
Firstly download this beautiful sparkling Water Texture.

STEP 13
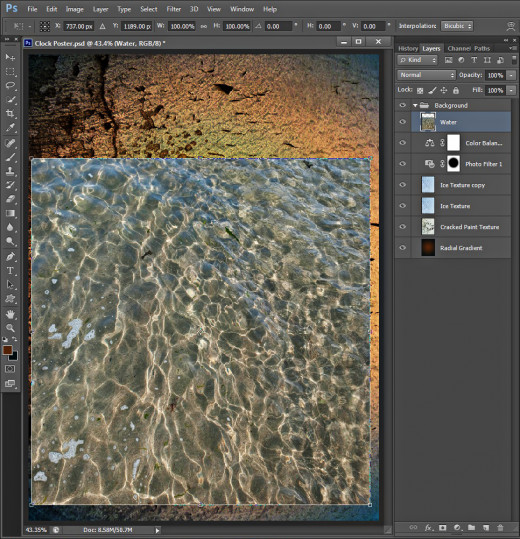
Create a New Layer on top of Background group and call it Water. Paste there the Water Texture you already downloaded and resize it using Edit, Free Transform as you see on the screenshot below.
STEP 14
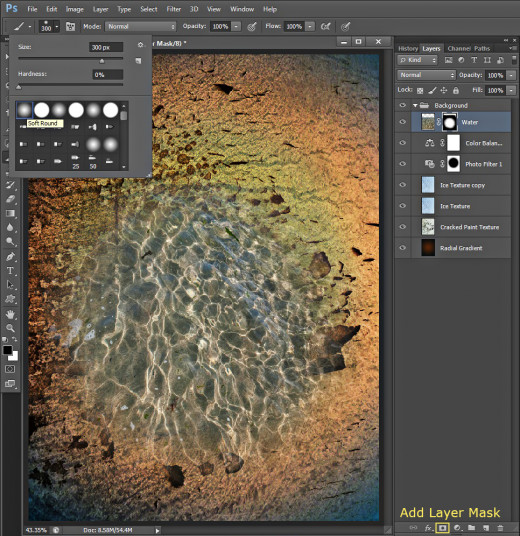
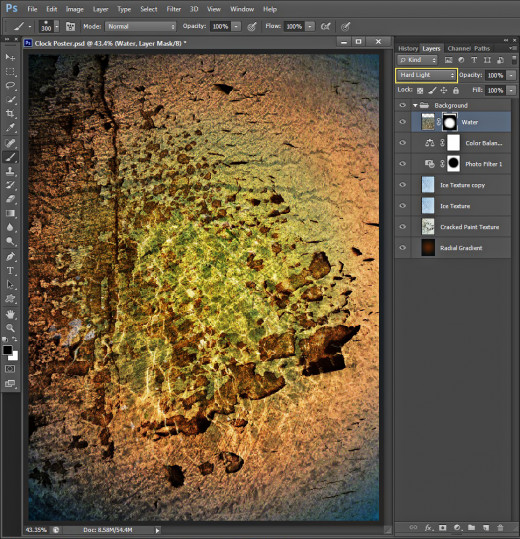
While Water layer is selected, click on Add Layer Mask icon at the bottom of Layers pane (Layer, Layer Mask, Reveal All). Foreground/Background colors should be automatically set to Black/White. Take Soft Round Brush (Brush tool) and change its Size to 300px then while the Layer Mask thumbnail is selected, start brushing the borders of the Water Texture to remove them. As a result you should get similar oval texture to the one shown below:
STEP 15
Change the Blend Mode of Water layer to Hard Light.
STEP 16
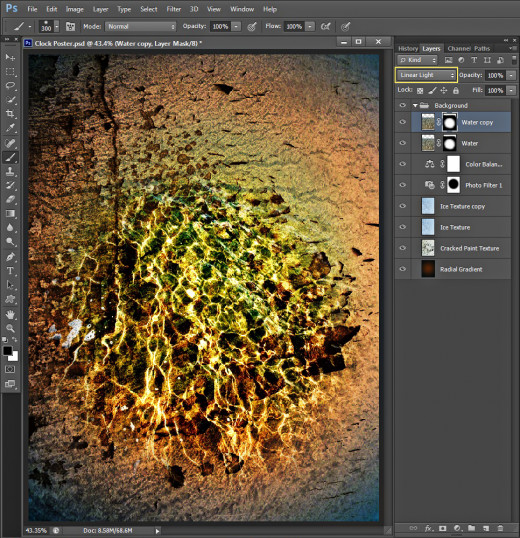
Duplicate Water layer and change the Blend Mode of the duplicated one to Linear Light.
![Adobe Photoshop Elements 2018 [Old Version]](https://m.media-amazon.com/images/I/51AQ4wl7eOL._SL160_.jpg)
STEP 17
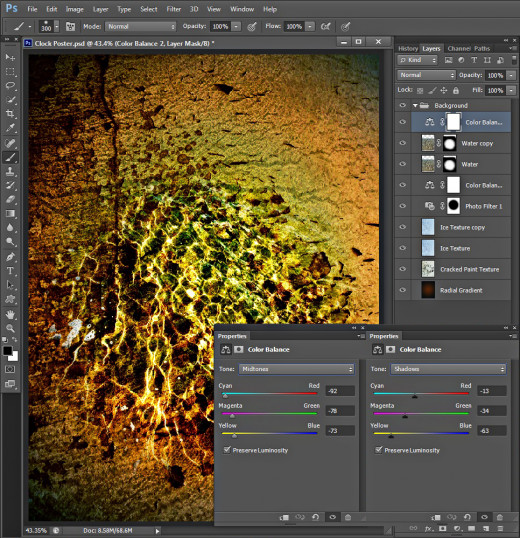
Add another Color Balance Adjustment layer and this time change the values of both Midtones and Shadows:
Midtones:
Cyan-Red: -92
Magenta-Green: -78
Yellow-Blue: -73
Shadows:
Cyan-Red: -13
Magenta-Green: -34
Yellow-Blue: -63.
Paste the Old Clock Image on the Canvas
In Steps 18-24 you have to select the Clock image, then paste it in the Clock Poster document on top of Layers panel. You are also going to add some shadow using Selection and Soft Round Brush and have to draw a thin line with Stipple Dense Brush on which the Clock will hang. Your last task during this stage of the tut is to apply 3D Effect and segmented Gradient to the straight line.
STEP 18
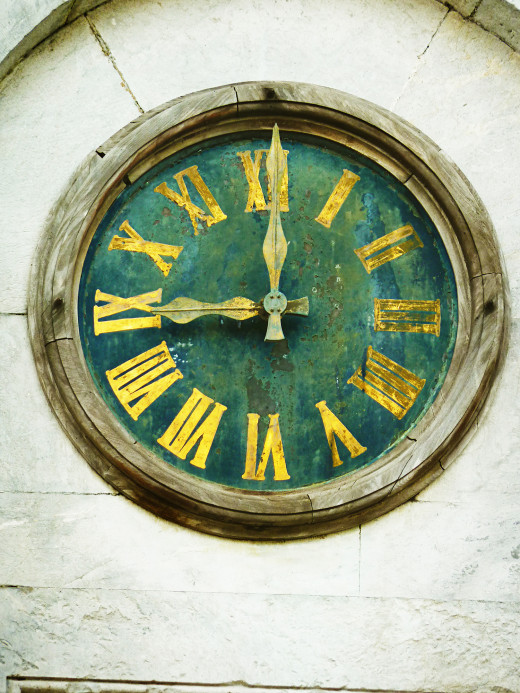
It is time to download the most important object for our composite- the Old Clock image:
STEP 19
Open the Clock Image in Adobe Photoshop and use your favorite Selection tool to separate the Clock itself from its background. I used Polygonal Lasso Tool with 1px Feather.
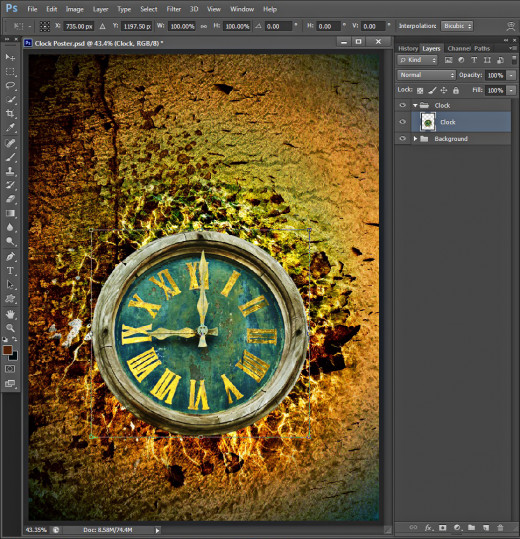
Create a New Layer on top of your Layers pane and name it Clock. Place it in a group called Clock too. Paste there the Old Clock image and apply Edit, Free Transform to resize it. Hold down Alt+Shift while moving the Free Transform node in order to keep the proportions of the object.
Place the Clock image as you see on the screenshot below. The Water Texture should encircle it.
STEP 20
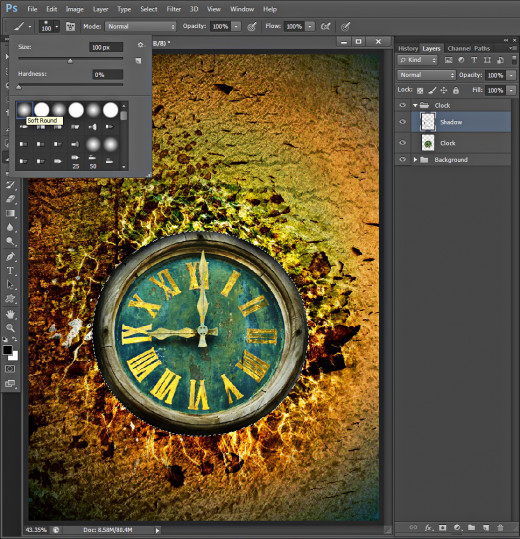
Create a New Layer on top of Clock group called Shadow.
Set the Foreground Color to Black.
Grab Soft Round Brush of 100px Size then hold down Ctrl and click on Clock layer's thumbnail to Load Selection (Select, Load Selection). Start brushing the borders of the Selection.
STEP 21
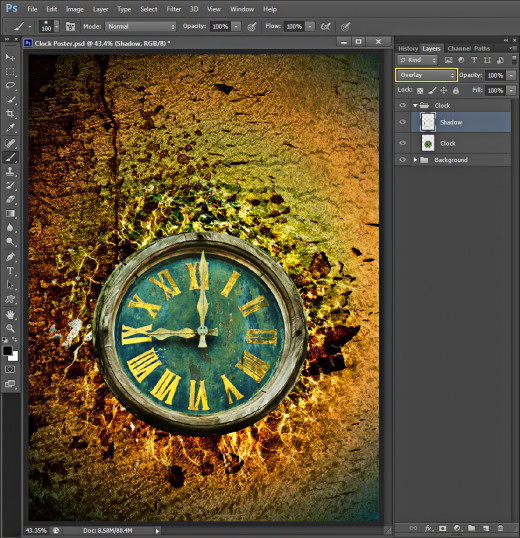
Change the Blend Mode of Shadow layer to Overlay and press Ctrl+D to Deselect (Select, Deselect).
STEP 22
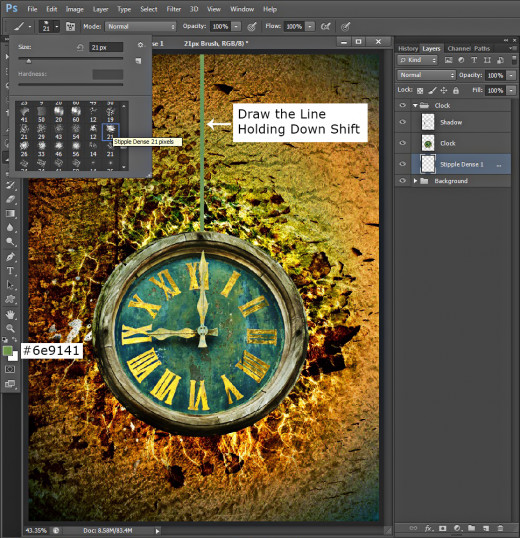
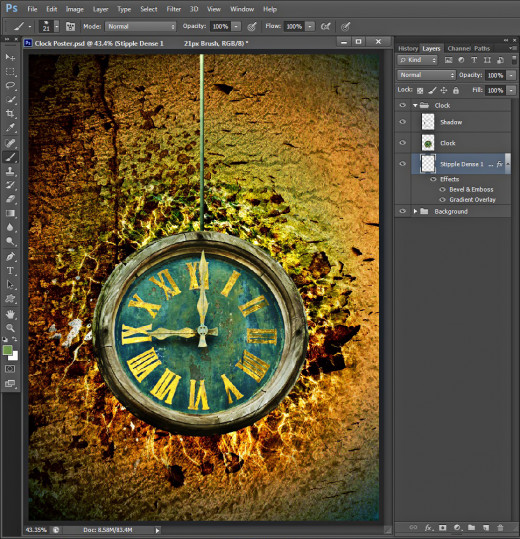
Now Set Foreground Color to #6e9141. Create a New Layer at the bottom of Clock group and name it Stipple Dense 1 after the Brush we are going to use in this step.
Grab Brush tool and find Stipple Dense Brush of 21px Size in the Brush Preset Picker. You can use any other rought looking Brush if you like. Draw a line from the upper part of the image to the Clock while holding down Shift to make the line straight.
STEP 23
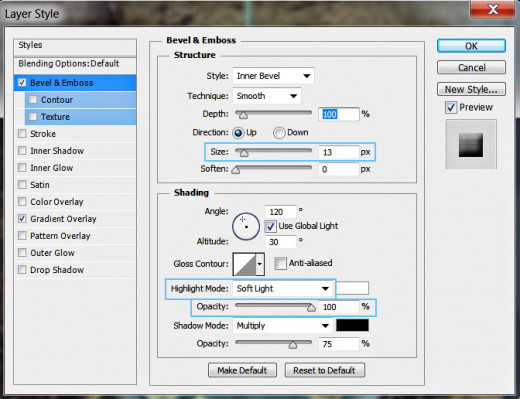
Double click on Stipple Dense 1 layer's thumbnail to activate Layer Style dialog box (Layer, Layer Style, Blending Options). Check Bevel and Emboss to add 3D Effect to the line and change these three settings:
Size: 13px
Highlight Mode: Soft Light
Color for Highlight Opacity: 100%.
Still don't close Layer Style dialog box because we have to add awesome segmented Gradient in the coming step.
STEP 24
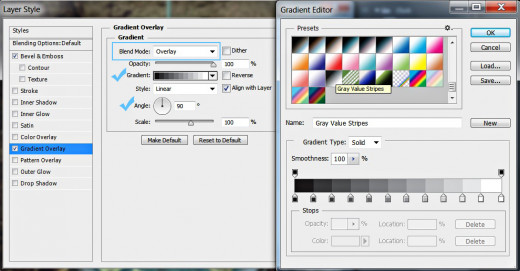
Check Gradient Overlay in the Layer Style box, set its Blend Mode to Overlay, find Gray Value Stripes Gradient from the Gradient Picker and change the Angle to 90 degrees.
This is how your Clock Poster will look so far:
Draw Glossy Triangles Behind the Clock
Awesome touch will be added to our Old Clock in the coming seven steps. You have to draw three triangles (each one on a separate layer!) with the help of Polygonal Lasso tool, then you are going to colorize their selections and apply layer styles- Outer Glow and 3D Effect.
STEP 25
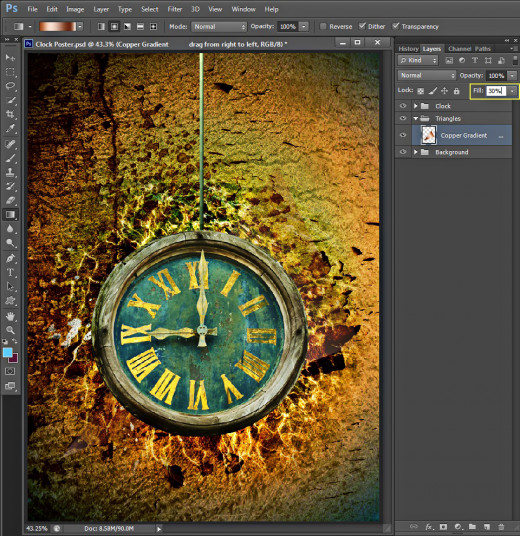
Create a New Layer placed between Background and Clock group. Name it Copper Gradient, then place it in a group named Triangles.
Take Polygonal Lasso tool and draw a triangular selection behind the Clock as you see on the following screenshot. After that take Gradient Tool, select Copper Gradient from the Picker in the Options bar and click on Linear Gradient icon. Drag with the tool from the right side of the triangle to its left point. Press Ctrl+D to Deselect when you are ready.
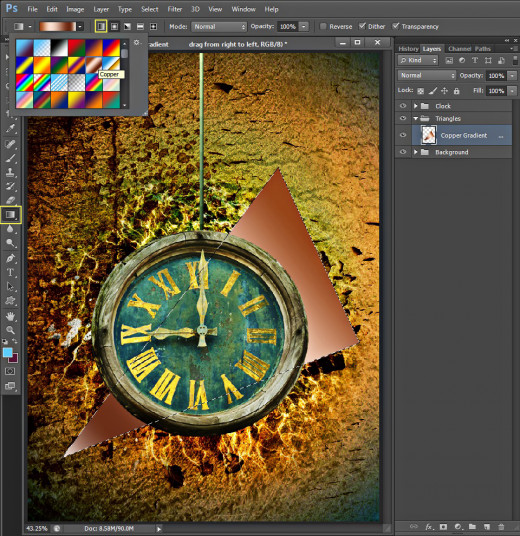
Lower Fill Opacity of Copper Gradient layer to 30%. The triangle will almost disappear from your canvas, but in the next steps we are going to change it.
STEP 26
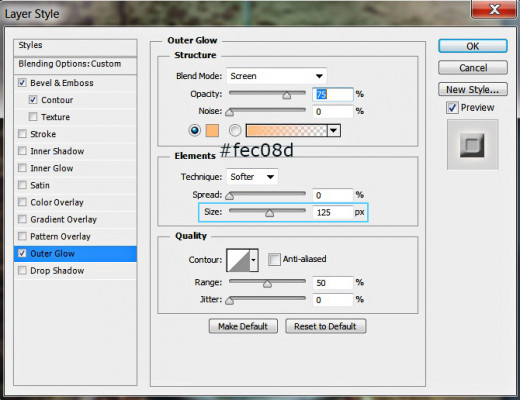
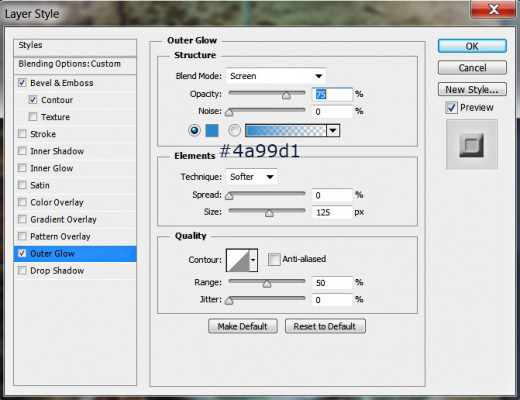
Double click on Copper Gradient layer's thumbnail to call Layer Style box then check Outer Glow and change only two of its settings. Insert #fec08d for Color of Glow and increase Size option to 125px.
STEP 27
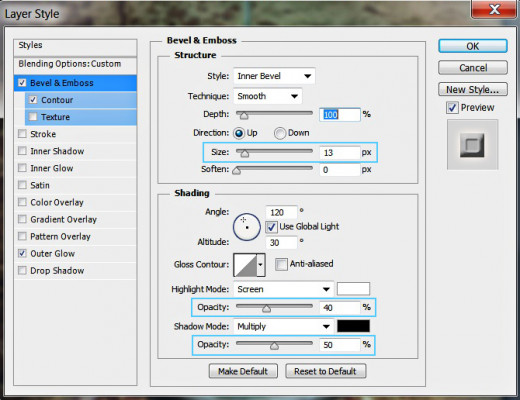
Apply also Bevel and Emboss Layer Style on Copper Gradient layer. Heighten the value of the Size to 13px, then lower Color of Highlight Opacity to 40% and Color of Shadow Opacity to 50%.
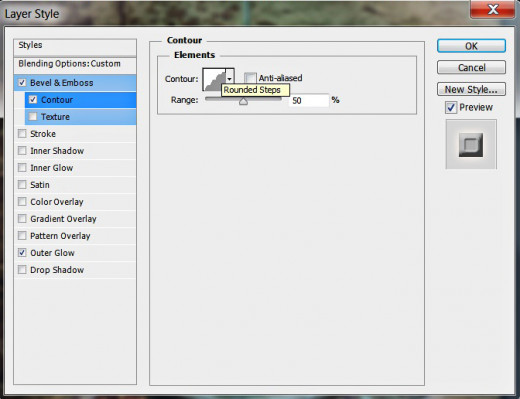
The last Layer Style to be added to Copper Gradient layer is Contour. Change only the Contour type to Rounded Steps and leave all other default settings unchanged.
This is how our first Copper Gradient triangle will look after applying the three Blending Options:

STEP 28
Create a New Layer above Copper Gradient layer in Triangles group and call it Blue.
Set Foreground Color to #3392e2 then grab Polygonal Lasso tool and draw the second acute-angled triangle. Colorize it either with the Paint Bucket tool or use Edit, Fill Foreground Color. Deselect (Ctrl+D) when you are ready.
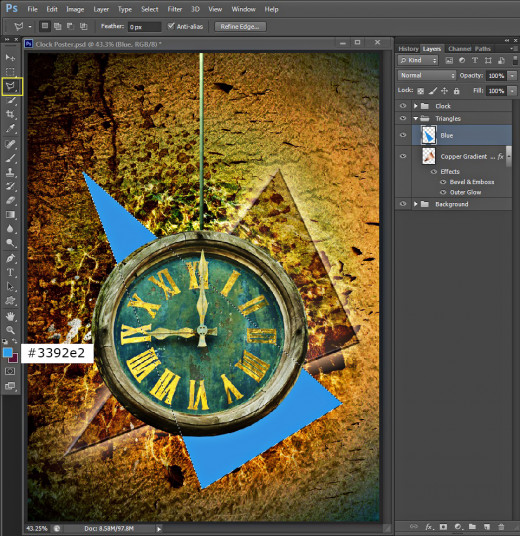
Reduce Fill Opacity of Blue layer to 30%.

STEP 29
Right click on Copper Gradient layer and select Copy Layer Style then return to the Blue layer, right click on it and select Paste Layer Style. After you have pasted all layer styles, double click on Outer Glow to open its dialog box and only change the Color of Glow to #4a99d1.
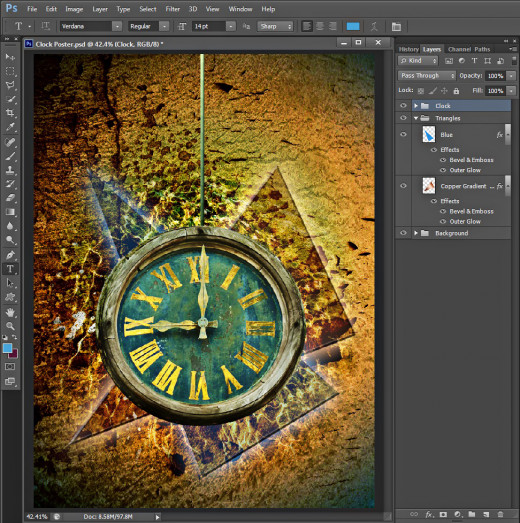
This is how our Old Clock will look so far with both triangles behind it:
STEP 30
Create a New Layer on top of Triangles group and name it Purple. Change Foreground Color to #d233d5 and draw with Polygonal Lasso tool the third triangle as you see on the screenshot below. Colorize it with the Foreground Color then Deselect (Ctrl+D).
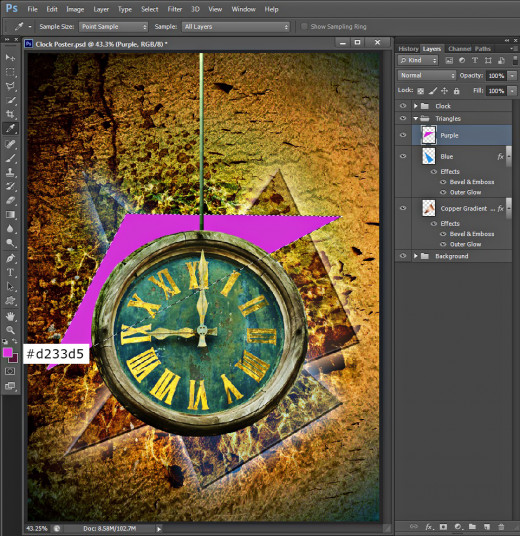
Reduce Fill Opacity of the purple triangle to 30% just as you did with both previous triangles.
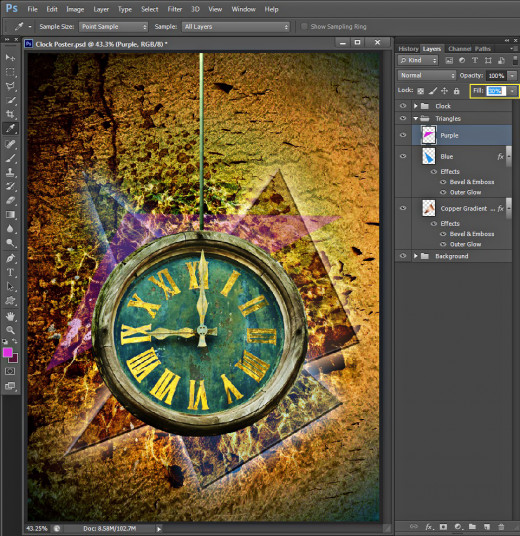
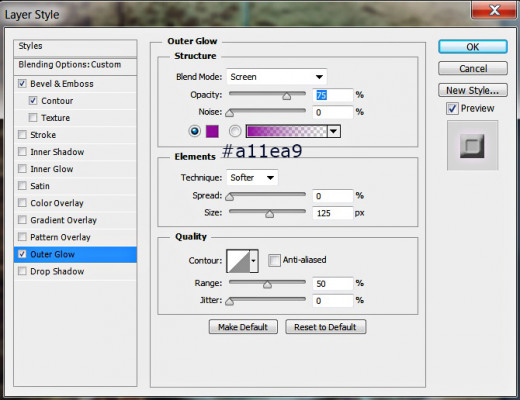
STEP 31
Copy the layer styles from any of the first two triangles and paste them on Purple layer. Double click on the Outer Glow Layer Style and only change the Color of Glow to #a11ea9.
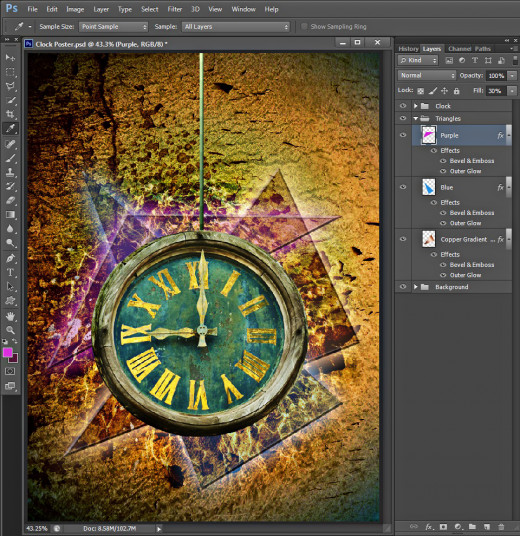
We finished our work in Triangles group. This is the outcome so far:
Add Colorful Spots, Clouds and ZigZag Shape
From the next step till the end of our tut you should add some front effects to make the Clock Poster more enchanting.
Firstly you'll be using Stipple Dense Brush (could be replaced with Spatter one) to add tiny colorful spots to the Clock and Background, then you'll create clouds using Soft Round Brush and Smudge tool. As a final touch, you have to add ZigZag Custom Shape at the upper part of the canvas, change its Blend Mode and colorize it with Inner Shadow and Gradient.
You will finish your work on the Poster when you add one more Color Balance Adjustment Layer on top of Layers Panel.
STEP 32
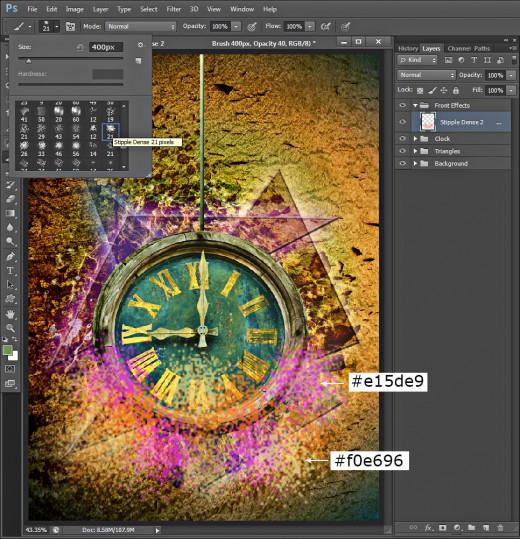
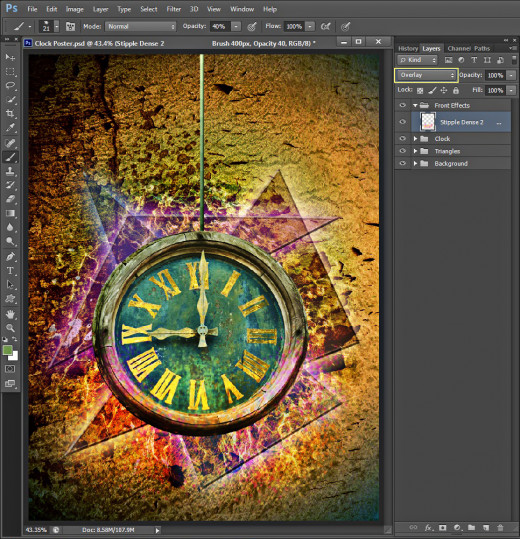
Create a New Layer on top of Layers pane and name it Stipple Dense 2. Place it in a group called Front Effects.
Grab Brush tool and find Stipple Dense brush of 21px Size. Increase the Brush Size to 400px. You remember that we have already used the same Brush to draw the line on which our clock hangs.
Make a few dabs with the chosen Brush to almost cover the bottom half of the Clock. I have used these two colors: #e15de9 and #f0e696.
STEP 33
Change the Blend Mode of Stipple Dense 2 layer to Overlay.
STEP 34
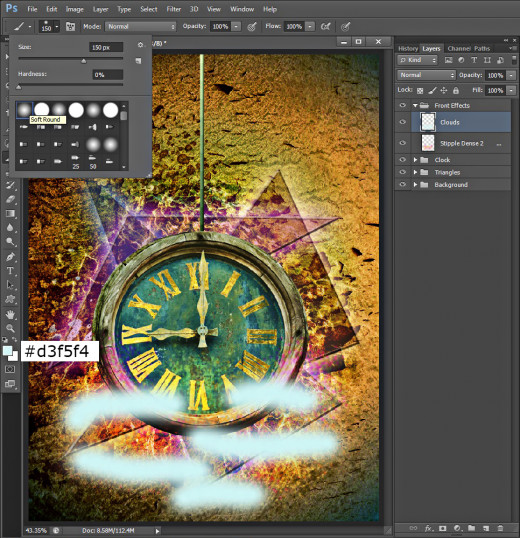
Create a New Layer called Clouds on top of Front Effects group.
Set Foreground Color to #d3f5f4 and take Soft Round Brush of 150 px Size. Draw a few lines with it at the bottom of the canvas. Have a look at the screenshot below for a reference.
STEP 35
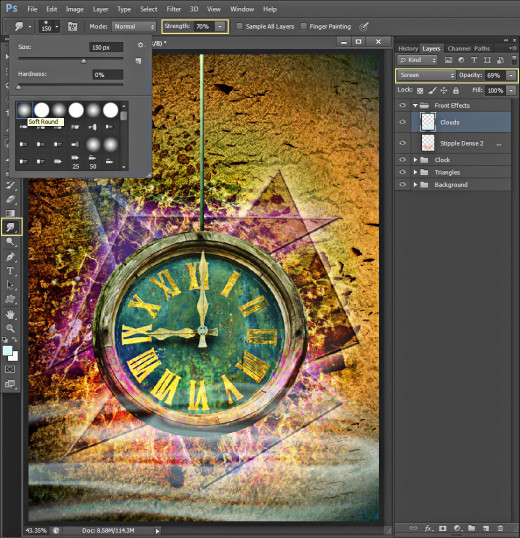
While Clouds layer is still selected, take Smudge tool of 70% Strength and 150px Soft Round Brush. Start smudging the lines and make them cover the bottom part of the Clock.
Change the Blend Mode of Clouds layer to Screen and lower its Opacity to 69-70%.
STEP 36
Hope you keep your Foreground Color set to #d3f5f4- the color we used for the Clouds.
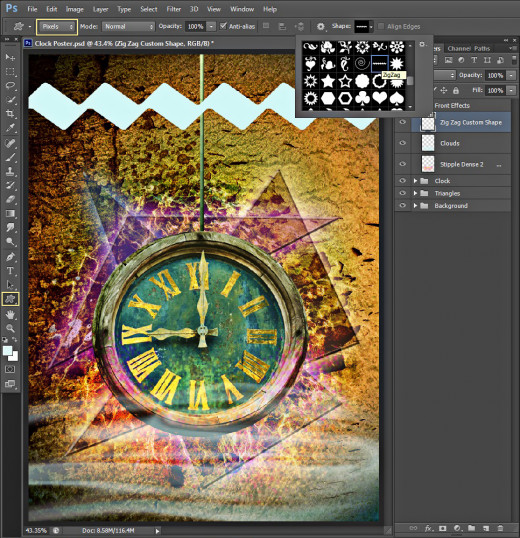
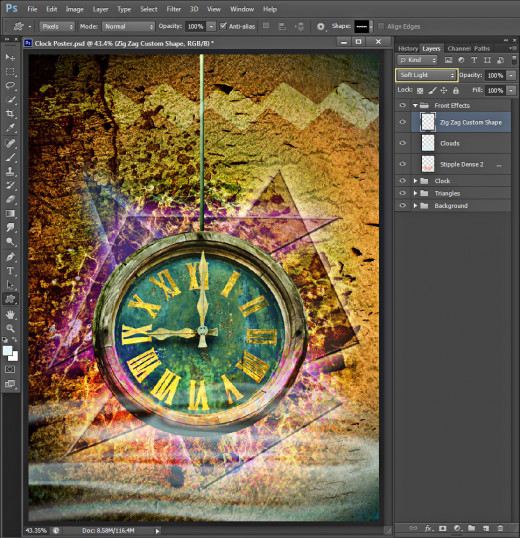
Now Create a New Layer on top of Front Effects group and name it ZigZag Custom Shape after the Shape we are going to use right now.
Take Custom Shape tool and set its Mode to Pixels in the Options bar then find ZigZag Shape in the Custom Shape Picker and draw it at the upper part of the canvas.
STEP 37
Change the Blend Mode of ZigZag Custom Shape layer to Soft Light and you'll get this outcome:
STEP 38
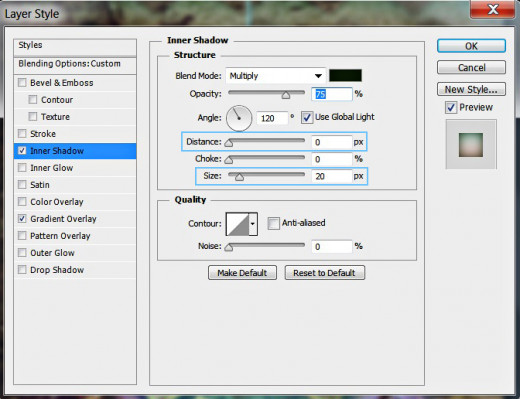
Now double click on ZigZag Custom Shape layer's thumbnail to call Layer Style box. Firstly tick Inner Shadow and reduce its Distance to 0px then increase Size to 20px.
STEP 39
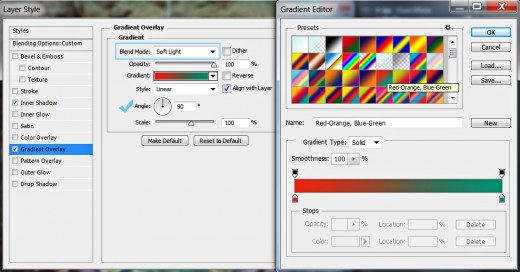
The second Layer Style to be added to ZigZag Custom Shape layer is Gradient Overlay. Set its Mode to Soft Light then select Red-Orange, Blue-Green Gradient from the Gradient Picker and change the Angle to 90 degrees.
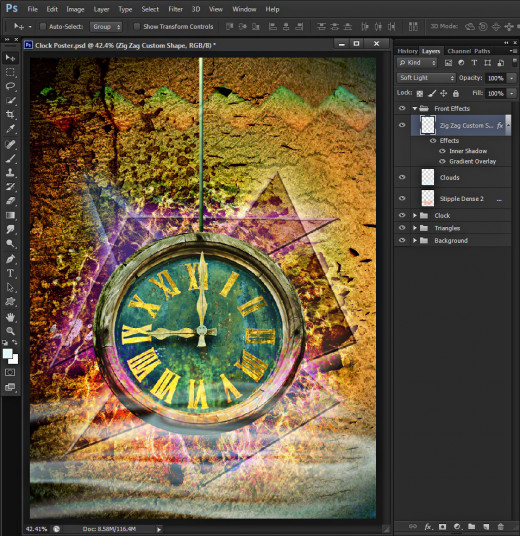
This is the result of applying both Blending Options on the ZigZag Shape:
STEP 40
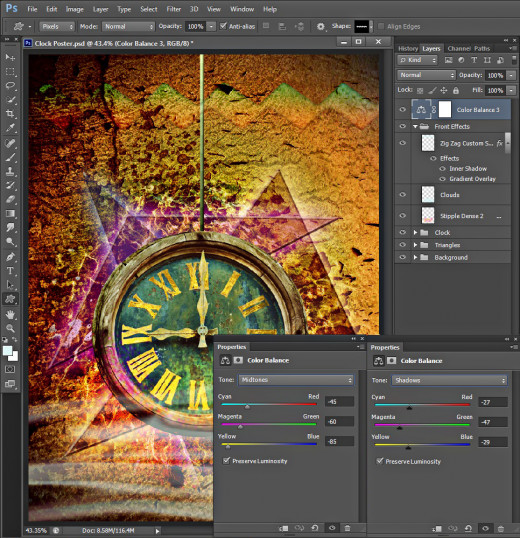
Now add one more Color Balance Adjustment layer placed on top of Layers panel, out of all groups. Change the values of both Midtones and Shadows as follows:
Midtones:
Cyan-Red: -45
Magenta-Green: -60
Yellow-Blue: -85
Shadows:
Cyan-Red: -27
Magenta-Green: -47
Yellow-Blue: -29.
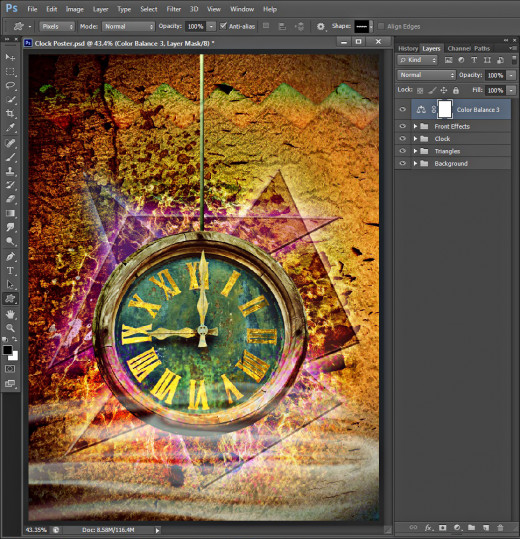
This is how your Old Clock poster will look so far after adding the last Adjustment Layer:
STEP 41
This is my Old Clock Poster saved in .jpg format. You can apply Filter, Sharpen, Unsharp Mask with settings according to your taste to improve the quality of the image.
Hope you like this a bit long but very detailed tutorial. If you find something difficult just leave a comment below. Iwill be happy to help.
Thanks a lot for reading and God bless! :)