Create Beautiful Text on Old Paper Background

This Adobe Photoshop tutorial consists of two parts. In Part 1 you are going to create awesome old paper background and you will learn really useful tricks how to make the paper looking worn-out and damaged by the humidity. Part 2 is dedicated to creating pastel colored text effect with cool relief achieved by using default Texture Layer Style.
In the process of work we'll be using Clouds and Craquelure filters, lots of Blending Options and Scattered Leaves Brush- they are exclusive for all Photoshop versions so don't worry if you use an older one.
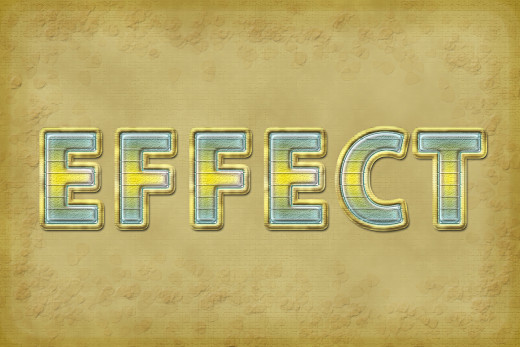
This is a preview of the outcome you should get:

STEP 1
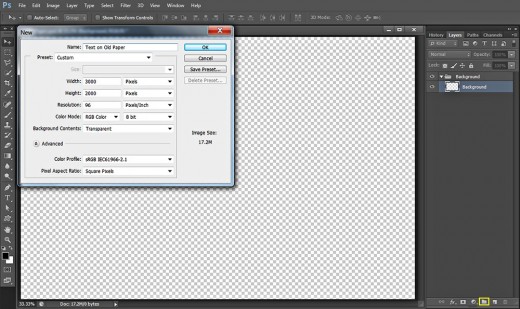
I usually prefer to work with smaller files when it comes to tutorials, but this time we'll create a bigger image because of the Background. If it's of higher res, you'll be able to use it for more serious designs. So open your photoshop and create a new .psd file of 3000 Pixels Width and 2000 Pixels Height. Name the document Text on Old Paper, insert 96 Pixels/Inch for Resolution or 300 Pixels/Inch if you plan to print the final result. Select RGB Color for Color Mode and Transparent for Background Contents. You'll get transparent and editable Layer 1 in your Layers panel. Rename it to Background and click on the Folder icon at the bottom of the panel (Ctrl+G or Layer, Group Layers) to place the layer in a group. Rename the new Group 1 to Background.
Part 1: Create Old Paper Texture with Filters, Brush, Layer Mask and Blending Options
In Steps 2-15 I am going to show you how to create Old Paper Texture. We'll start our work with colorizing the Background. Then we are going to add pastel colored Vignette Effect with the help of Inner Shadow Layer Style.
After that we have to apply Clouds Filter to make our old paper looks spotty.
The next Filter we need to use is Craquelure. This will create awesome subtle Texture. We'll create worn-out effect by means of Layer Mask.
As a final touch, we'll be using Scattered Leaves Brush (default) which will make the borders of the Old Paper damaged by the time and moisture.
STEP 2
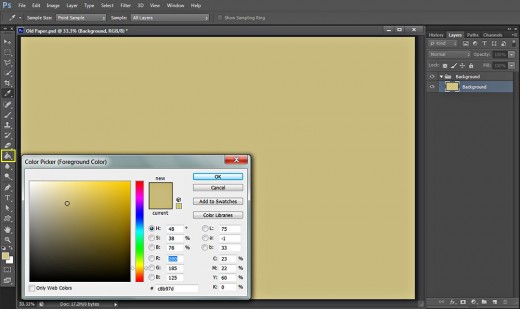
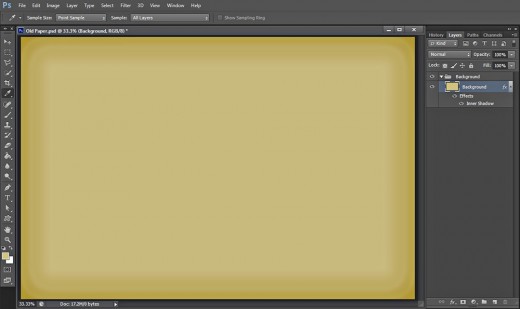
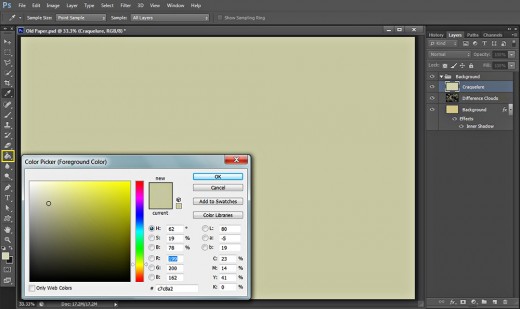
Keep Background layer selected then click on Set Foreground Color Swatch in the Tools bar and insert #c8b97d for Color Code. Grab Paint Bucket Tool and drag once on the canvas to colorize it with this nice pastel shade.
STEP 3
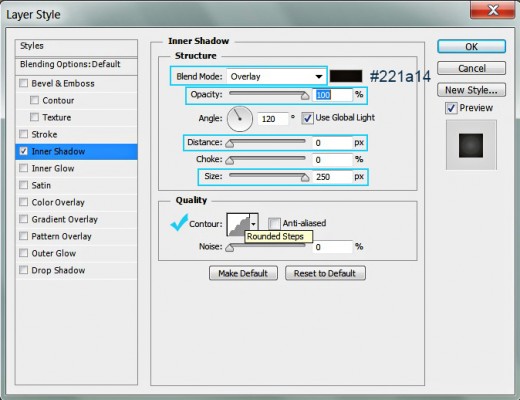
Double click on Background layer's thumbnail to activate Layer Style dialog box (Layer, Layer Style, Blending Options). Select Inner Shadow Layer Style and change six of its settings:
Blend Mode: Overlay
Color of Shadow: #221a14
Opacity: 100%
Distance: 0px
Size: 250px
Contour: Rounded Steps.
Press OK button to apply the settings when you are ready. We created the base layer for our Background.
This is the outcome of applying Inner Shadow Layer Style:
STEP 4
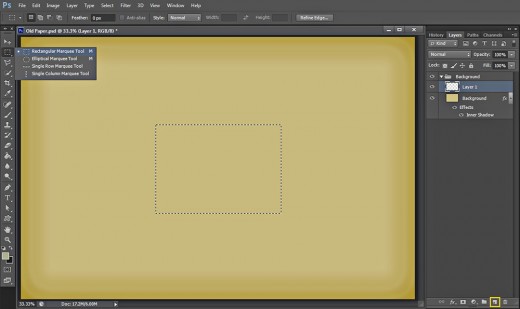
Now Create a New Layer on top of Background group- go to Layer, New, Layer or click on Create a New Layer icon at the bottom of Layers pane. Take Rectangular Marquee tool and draw a small selection somewhere on your canvas.
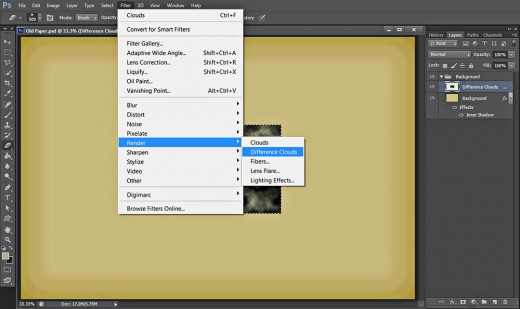
STEP 5
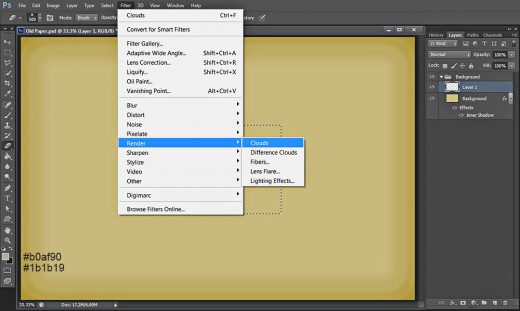
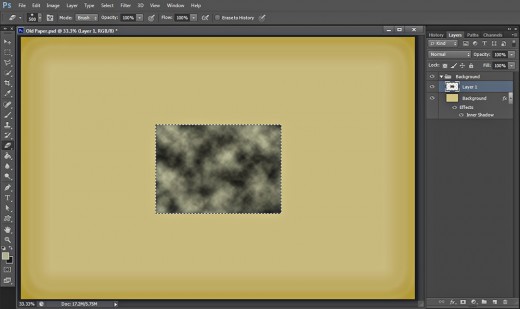
While the newly created layer is highlighted and the rectangular selection active, change the Foreground Color to #b0af90 and Background Color to #1b1b19. Navigate to the Menu bar and select Filter, Render, Clouds. You can press Ctrl+F a few times to repeat the filter and to improve the final effect.
This is how your small rectangle will look filled with clouds:
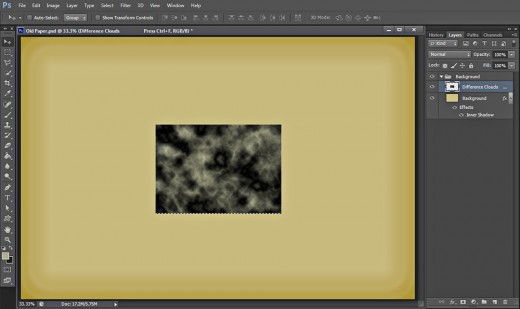
STEP 6
Now you can rename your newly created layer (the one with the clouds) to Difference Clouds after the Filter we are going to use right now. Go to Filter, Render, Difference Clouds, then press Ctrl+F one-two times to reapply the Filter. Press Ctrl+D (Select, Deselect) to remove the selection.
You should get something like this after using the second Filter:
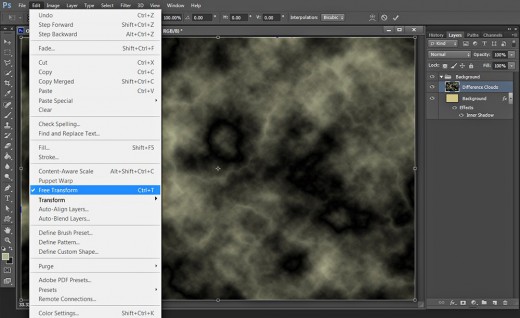
STEP 7
With Difference Clouds layer highlighted, go to Edit, Free Transform and move the nodes so that the clouds texture covers your canvas. Press Enter to apply the Transformation when you are ready.
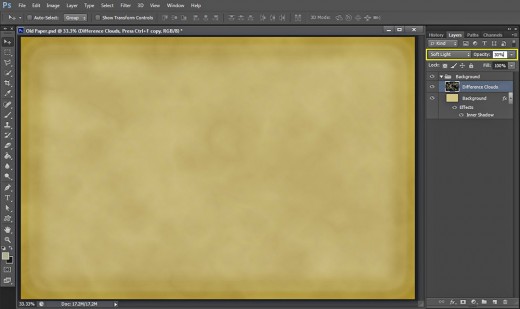
STEP 8
Change Blend Mode of Difference Clouds layer to Soft Light and lower the Opacity to 30%. Now we have stained old paper background.
STEP 9
Create a New Layer on top of Background group and name it Craquelure after the filter we'll be using in the coming step. Set the Foreground Color to #c7c8a2 and use Paint Bucket Tool to colorize the canvas.
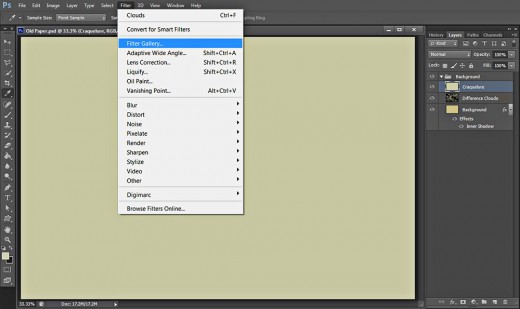
STEP 10
While Craquelure layer is highlighted, go to Filter, Filter Gallery. Your Foreground Color should be # c7c8a2 (as in the previous step) and Background Color- black (#000000) or very dark grey.
When Filter Gallery window appears on your screen, select Texture type of filters and click on Craquelure swatch. Set the Crack Spacing to 30, Crack Depth to 10 and Crack Brightness to 7. Press OK button to apply the filter.
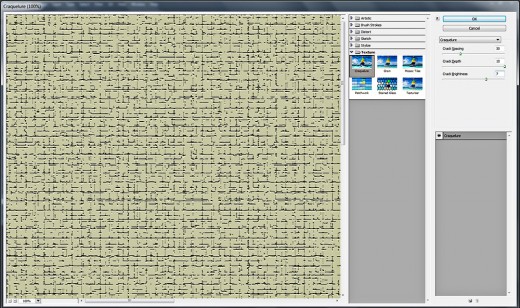
The result on your canvas should resemble my screenshot below after applying Craquelure filter:
STEP 11
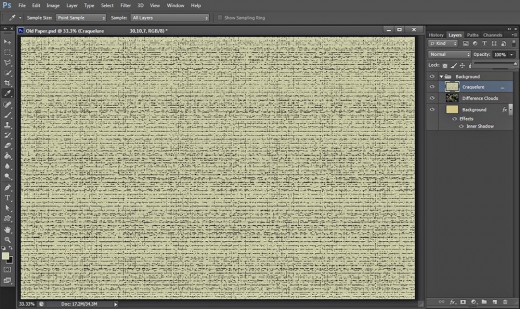
Change the Blend Mode of Craquelure layer to Soft light and reduce Opacity to 30%. Thus we slightly texturized our old paper.

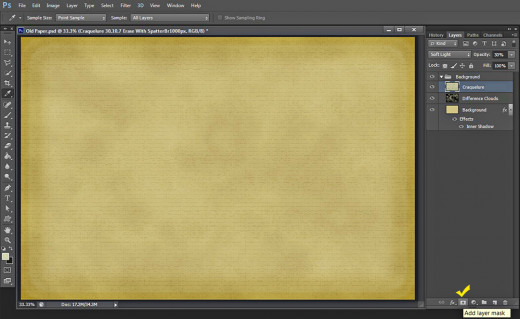
STEP 12
While Craquelure layer is still highlighted, click on Add Layer Mask icon at the bottom of your Layers pane or go to Layer, Layer Mask, Reveal All.
This is how your masked layer will look in Layers panel:
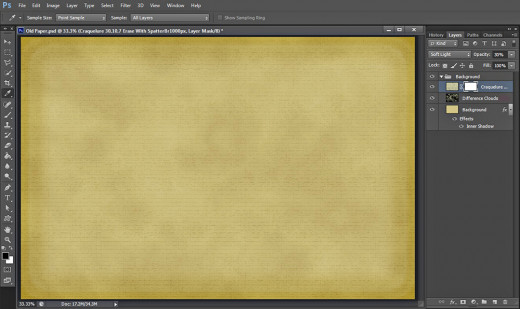
Grab Brush Tool and find any Spatter Brush in the Brush Preset Picker (I have chosen Spatter 14 pixels). Increase the Brush Size to 1000 pixels.

Now check if the Layer Mask thumbnail is selected and Foreground Color is black, then make a few dabs with the previously chosen Spatter Brush to erase some parts of the Craquelure texture:

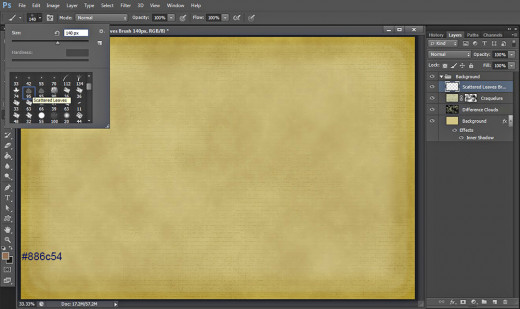
STEP 13
Create a New Layer on top of Background group and call it Scattered Leaves Brush after the Brush we'll be using right now. Grab Brush tool and find Scattered Leaves Brush then increase its Size to 140 pixels. Set also the Foreground Color to #886c54.
Start brushing with the Scattered Leaves Brush to cover the borders of your canvas with small semi-transparent leaves.
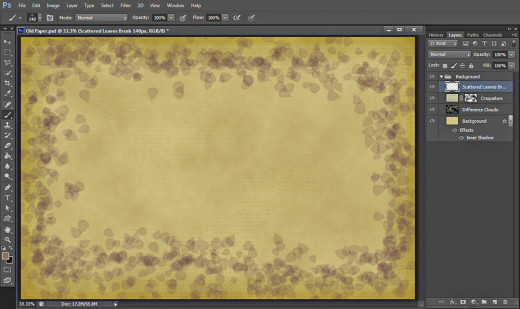
STEP 14
Change Blend Mode of Scattered Leaves Brush layer to Soft Light and you should get a similar result:
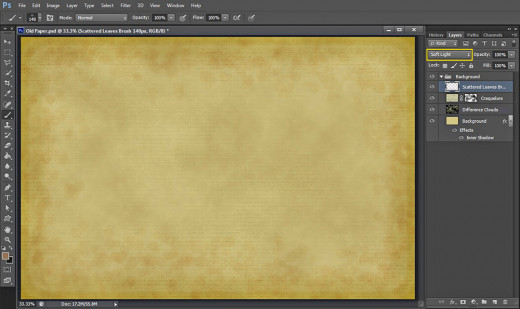
STEP 15
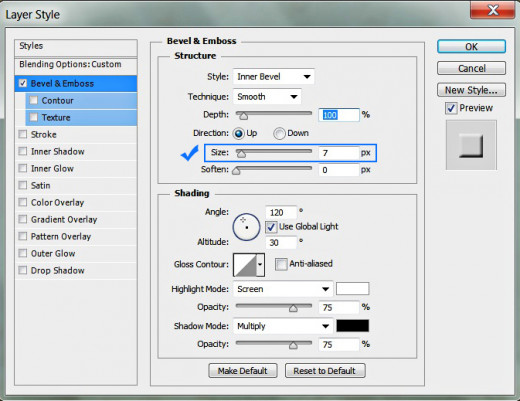
Double click on Scattered Leaves Brush layer's thumbnail to call Layer Style dialog box. Check Bevel and Emboss and only slightly increase its Size to 7px. Leave all other default settings intact.
This is the result of giving 3D Effect to the leaves. Nice relief, isn't it? Now our Old Paper texture look like really damaged by the time and humidity.
Our Background is ready. You can stop now with this tutorial if you need only the Texture. If you are interested in learning how to create the awesome patterned Text, now you can proceed your work with the rest of this tut.

Part 2: Create Cool Pastel Shaded Text Effect with Notebook and Yellow Lined Textures
In Steps 16-34 I am going to show you how to create patterned Text Effect with beautiful color shades using default Kozuka Gothic Font. In the process of work we'll be using gradients, Satin, Bevel and Emboss, contours and other Blending Options. We are also going to add Notebook and Yellow Lined Texture overlay which will give the Text unique pattern and relief.
STEP 16
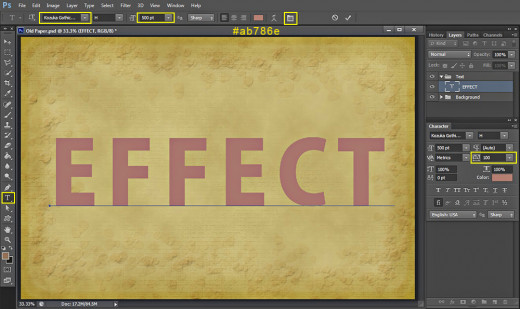
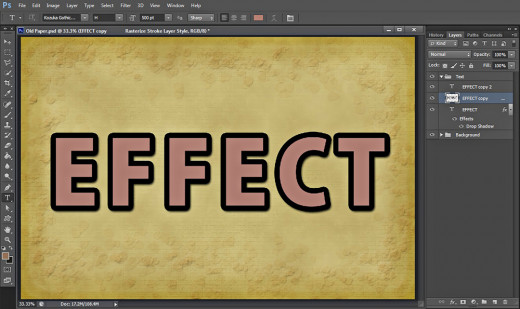
Take Horizontal Type Tool and navigate to the Options bar to change the settings. Firstly select Kozuka Gothic Pr6N (or any other thick Font), set the Font Size to 500pt and choose #ab786e for Text Color. Type Effect using capital letters.
As we are going to apply big sized Stroke Layer Style on our Text and it might make the letters to overlap, we need a bigger distance between them. For the purpose click on Toggle the Character and Paragraph Panels icon in the Options bar and when Character dialog box pops up on your screen, insert 100 for Tracking.
After you are ready with the Text, place your Text layer on top of Layers panel and put it in a group (Ctrl+G) called Text.
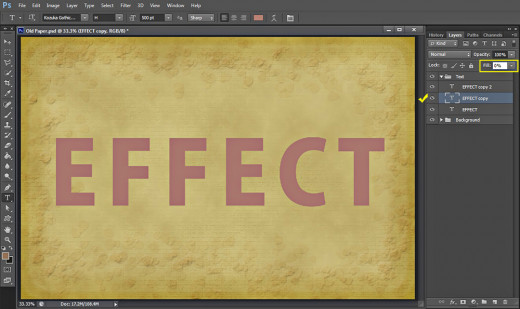
STEP 17
While your Text layer is selected, press twice Ctrl+J (Layer, Duplicate Layer) to make two duplicates. Change the Fill Opacity of Effect copy Text layer to 0%.
STEP 18
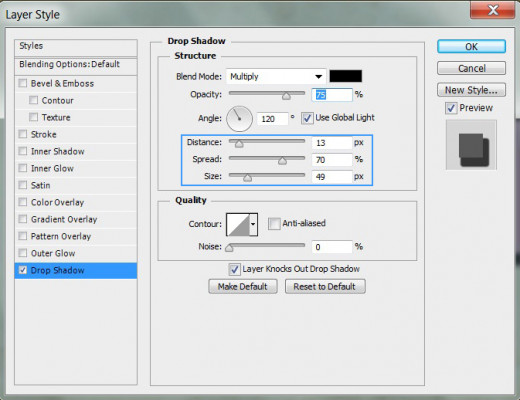
Now go back to the original Effect Text layer, right click on it and select Blending Options to activate Layer Style dialog box then check Drop Shadow. Heighten the values of Distance to 13px, Spread to 70% and Size to 49px.
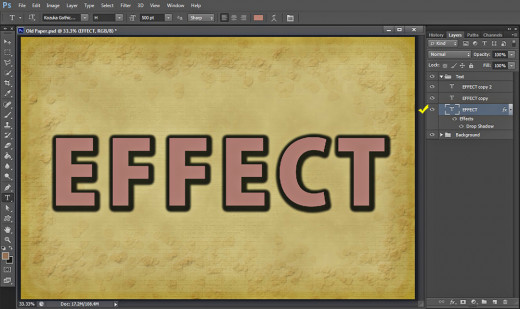
You should get the following outcome on your canvas after you have applied Drop Shadow on the first Text layer:
STEP 19
Now select the second Text layer- Effect copy. Double click on its layer's thumbnail and check Stroke Layer Style. Increase only the Size to 40px.
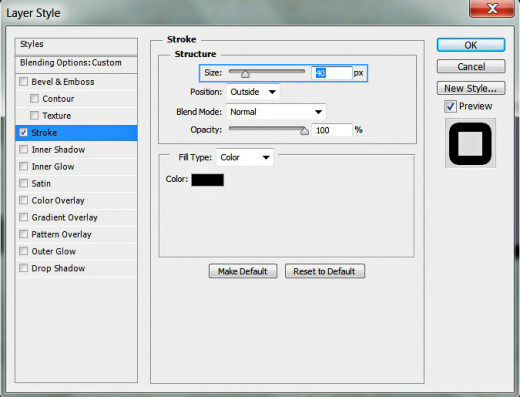
Your Text will look like this after adding the Stroke:

STEP 20
Right click on Effect copy layer and select Rasterize Layer Style from the fly-out menu.
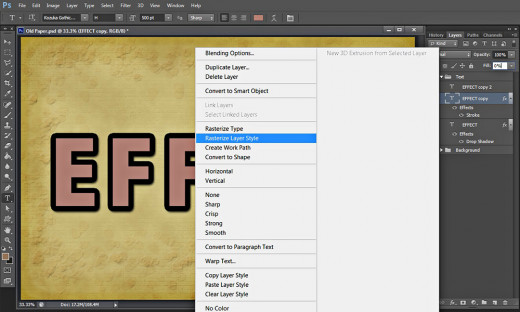
Look at your Layers pane and you'll see that Effect copy layer now looks like an ordinary layer- it turned from vector to pixels after rasterizing the Stroke Layer Style.
STEP 21
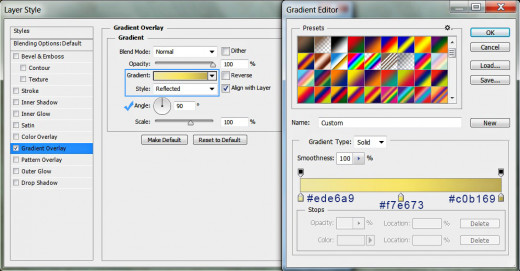
In this and the next four steps we are going to apply new layer styles on the rasterized Effect copy layer. Double click on its layer's thumbnail and firstly check Gradient Overlay Layer Style. Firstly click on the Gradient swatch and set the Color Stops as follows:
First Color Stop (Location 0%): #ede6a9
Second Color Stop (Location 50%): #f7e673
Third Color Stop (Location 100%): #c0b169
Change also the Style of the Gradient to Reflected and its Angle to 90 degrees.
Keep Layer Style box active because we'll have to add more Blending Options.
STEP 22
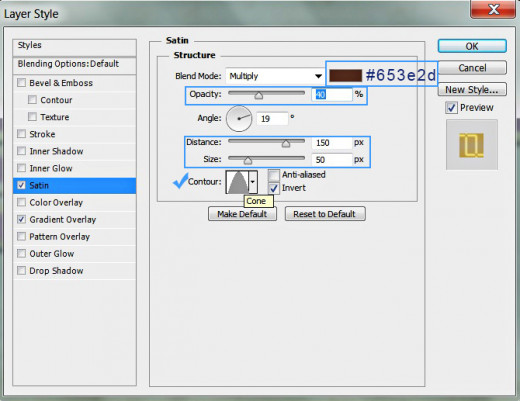
The second Layer Style to be applied on Effect copy layer is Satin. Change the following settings:
Color of Effect: #653e2d
Opacity: 40%
Distance: 150px
Size: 50px
Contour: Cone.
STEP 23
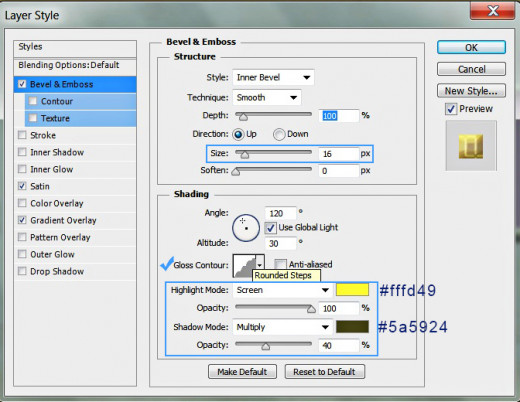
Let us add 3D Effect to our Effect copy layer. Select Bevel and Emboss Layer Style, increase its Size to 16px, choose Rounded Steps type of Contour from the Contour Picker, then change the Color for Highlight to #fffd49 and heighten its Opacity to 100%. Change also the Color of Shadow to #5a5924 and lower its Opacity to 40%.
STEP 24
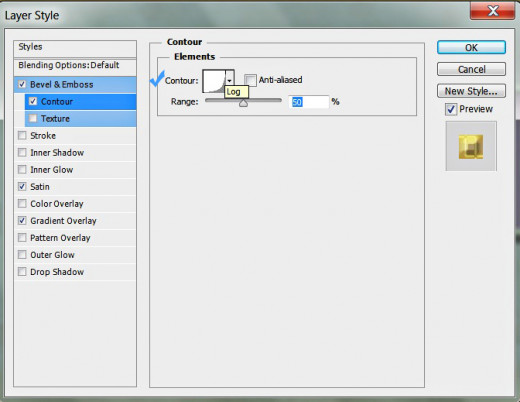
Tick Contour Layer Style which is below Bevel and Emboss and select Log type of Contour. Don't change the other two settings.
STEP 25
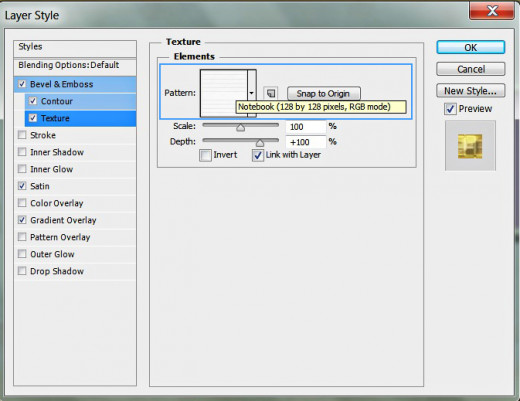
The last Layer Style which is to be added to Effect copy layer is Texture. Find Notebook (128 by 128 pixels, RGB mode) Texture from the Pattern Picker and voila, we finished our work on this layer which is nothing but just a stroke.
This should be your result so far. Now the text has awesome golden shaded and textured stroke:

STEP 26
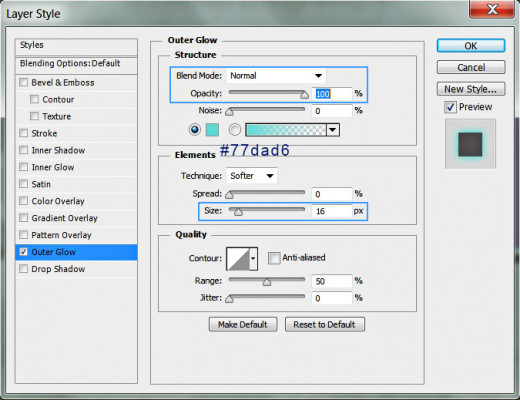
This time select Effect copy 2 Text layer and firstly apply Outer Glow Layer Style on it (Layer, Layer Style, Blending Options, Outer Glow). Set the Blend Mode to Normal, increase Opacity to 100% and choose #77dad6 for Color of Glow. Increase the Size of the Effect to 16px.
Keep Layer Style box active and please, don't hate me. We have to add another seven layer styles in the coming steps. :)
STEP 27
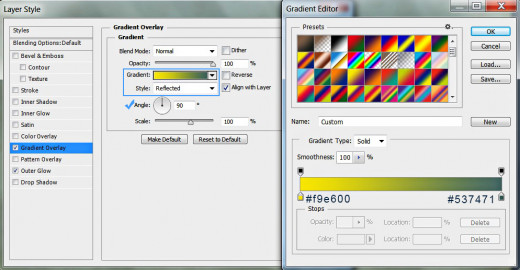
The next Layer Style we have to add to Effect copy 2 layer is Gradient Overlay. Click on the Gradient swatch to change both Color Stops as follows:
First Color Stop (Location 0%): #f9e600
Second Color Stop (Location 100%): #537471
Select also Reflected for Gradient Style and set the angle to 90 degrees.
STEP 28
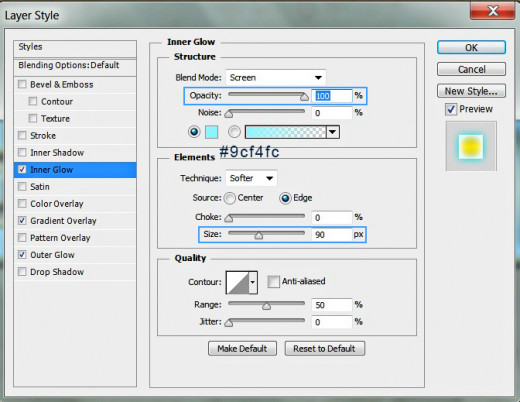
The third Layer Style to be applied on Effect copy 2 Text layer is Inner Glow. Increase the Opacity to 100% and select #9cf4fc as Color of Glow. Increase also the Size to 90px.
STEP 29
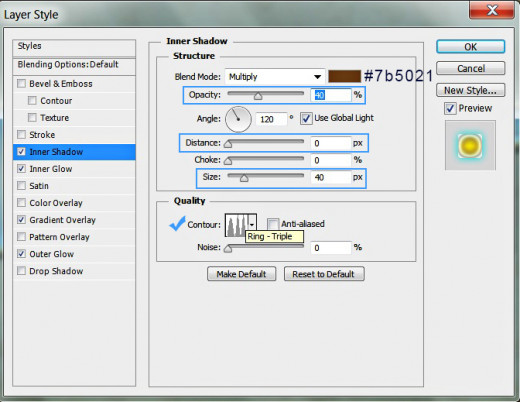
Now it's time to apply Inner Shadow Layer Style with the following modified settings:
Color of Shadow: #7b5021
Opacity: 40%
Distance: 0px
Size: 40px
Contour: Ring-Triple.
STEP 30
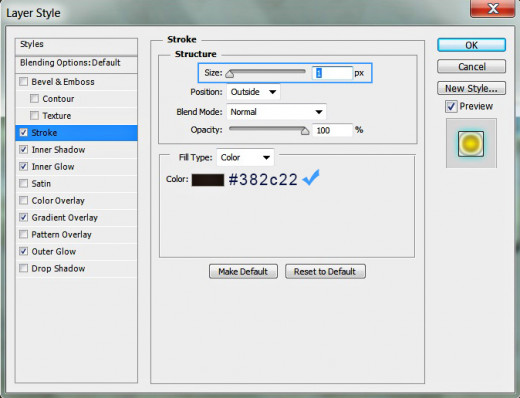
In this step we need to add very thin Stroke so check Stroke Layer Style, decrease its Size to only 1px and set Color of Stroke to #382c22.
STEP 31
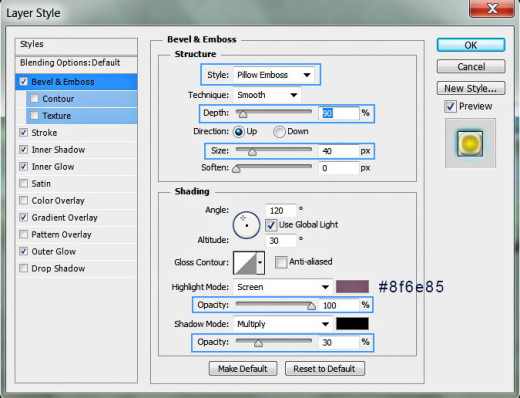
In order to add 3D look, check Bevel and Emboss and change the following six settings:
Style: Pillow Emboss
Depth: 90%
Size: 40px
Color for Highlight: #8f6e85
Color for Highlight Opacity: 100%
Color of Shadow Opacity: 30%.
STEP 32
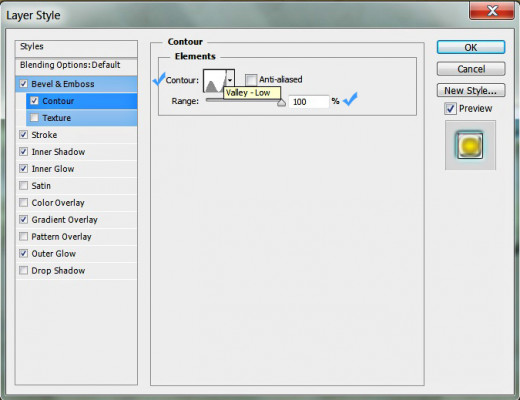
Now apply Contour Layer Style: select Valley-Low from the Contour Picker and increase Range to 100%.
STEP 33
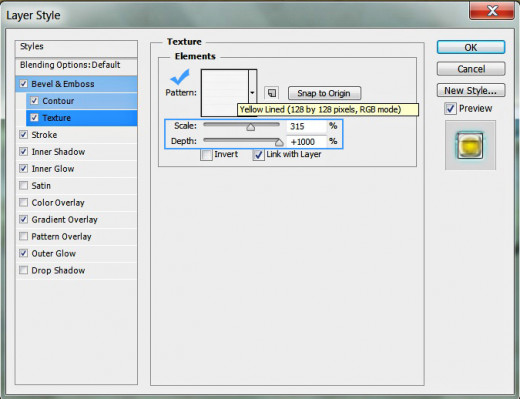
The last Layer Style to be added is Texture. Select Yellow Lined (128 by 128 pixels, RGB mode) from the Contour Picker, set the Scale to 315% and Depth to +1000%.
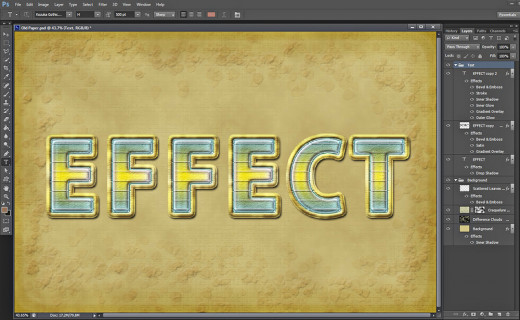
Below is shown the result you should have after adding the Blending Options to Effect copy 2 layer.
We completed our work on the Text Effect. If you have followed all my steps correctly, you should have the following two groups of layers in your Layers pane:
-
Background group which includes these four layers: Background, Difference Clouds, Craquelure and Scattered Leaves Brush and
-
Text group with these three layers in it: Effect, Effect copy (resterized) and Effect copy 2.
STEP 34
Below is shown a preview of my outcome saved in .jpg format. Hope you enjoyed this tutorial and learned new techniques. If you have any questions or critiques, you are welcome to leave a comment below. Thank you very much for reading! :)