Create Mystic Grunge Style Number with Textures and Layer Masks in Photoshop

From this short and easy to follow tutorial you will learn how to create grunge style 77 Number by means of textures, layer masks and layer styles. Using the same method described here, you can also create grunge style text effects, custom shapes etc.
My 77 Grunge Number effect is created in Adobe Photoshop CS6 but all other versions, including Photoshop Elements are applicable. The sign itself is typed using default Hobo Std Font and the 3D effect is achieved with Bevel and Emboss Layer Style. In order to apply the three textures on the sign we'll be also using layer masks- I prefer the non-destructive layer masks to Eraser or any other method of cutting parts of the image as they keep the contents of the layer intact.
All Textures applied are my own photos and unrestricted stock so you can use them for your own art and design works if you like them
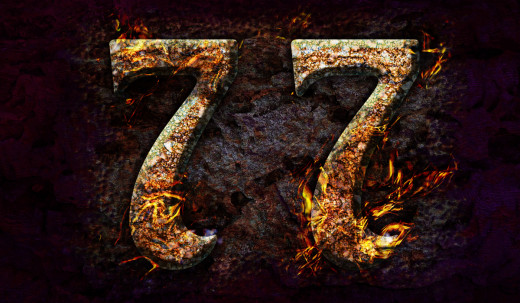
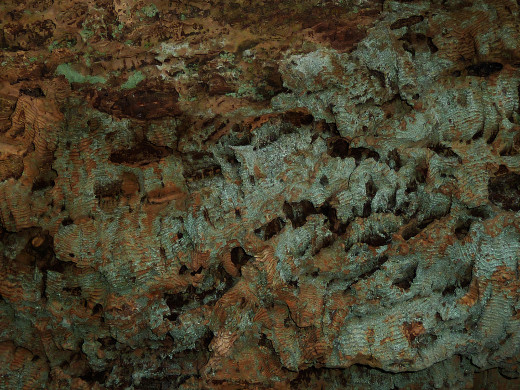
This is what you are going to create:
STEP 1
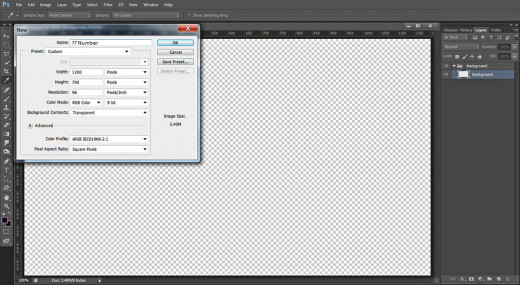
Let's get down to work. Firstly open your Adobe Photoshop program and then navigate to the Menu bar. Select File, New to create a new .psd file. You can name your new document 77 Number for example. Insert 1200px for Width and set the Height to 700px. Insert also 96 Pixels/Inch for Resolution and choose RGB Color from the Color Mode drop down menu. If you prefer to get editable first layer, select Transparent for Background Contents. Those of you who intend to print the final result, should set the Resolution to 300 Pixels/Inch and select CMYK for Color Mode.
When you are ready with the settings of your new .psd file, press OK button. You'll see transparent Layer 1 in your Layers panel.
Double click on Layer 1 name and write Background in the white space to rename the layer. Press Ctrl+G (or go to Layer, Group Layers) to place the Background layer in a Group. Name the newly created Group Background too.
Colorize the Background with Purple, Add Stone Texture and Shape it Using Layer Mask and Spatter Brush
In Steps 2-8 of this tut, you will start to create your dark grunge Background. Firstly you need to fill the first layer in Background group with purple color, then you should Copy and Paste into your document, on top of the group, the Stone Texture and Resize it using Edit, Free Transform.
Your next task is to apply Layer Mask to the Stone Texture layer, then with the help of Spatter Brush you have to make the borders of the Stone Texture looking rough and crude.
As a final touch, you should add Drop Shadow and Bevel and Emboss Blending Options to enhance the grunge effect.
STEP 2
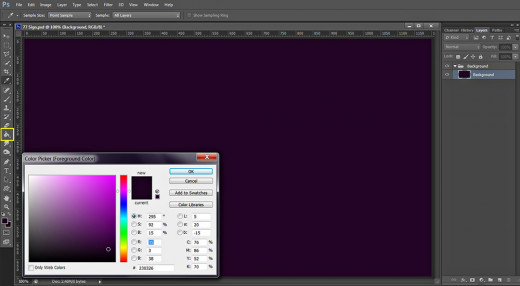
Keep Background layer (not the Group) highlighted. Now we are going to fill it with color.
Navigate to the Tools bar, then click once on Set Foreground Color swatch in the Tools bar. When the Color Picker dialog box appears on your screen insert #230326 in the color code field and press OK. Grab Paint Bucket Tool and drag once on your canvas to colorize it.
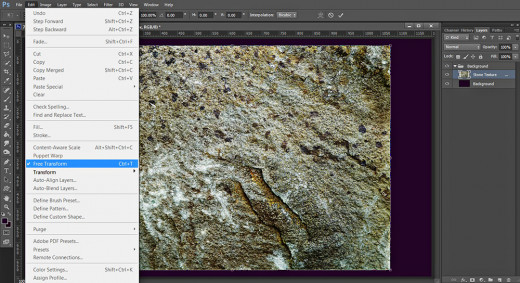
STEP 3
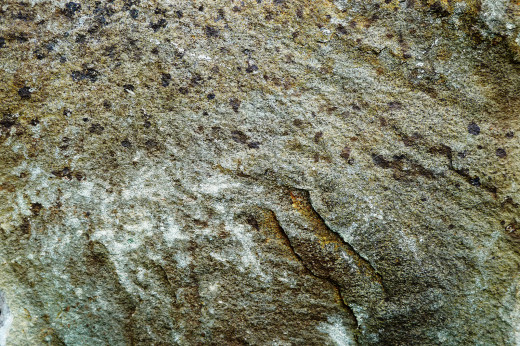
Click on the Stone Texture shown below to open it in a new window then right click and select Save Image As to save it in the respective folder in your computer.
STEP 4
Create a New Layer (go to Layer, New or click on Create a New Layer icon at the bottom of Layers panel) above the Background layer and call it Stone Texture.
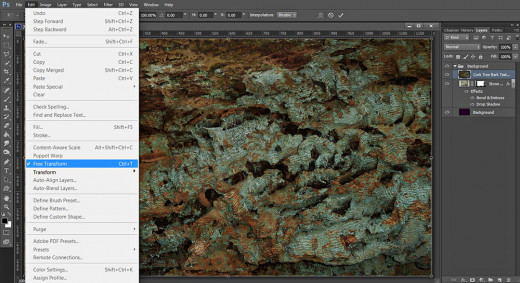
Open in Adobe Photoshop the Stone Texture you already downloaded in the previous step, press Ctrl+A to load selection on the whole image then press Ctrl+C to copy it. Go back to your 77 Number .psd file. Check if the Stone Texture layer is selected and press Ctrl+V to paste the texture there. As the texture is bigger than your canvas, go to Edit, Free Transform and drag the nodes vertically and horizontally so that to resize the texture to cover your canvas. Press Enter key to apply the transformation when you are ready.
STEP 5
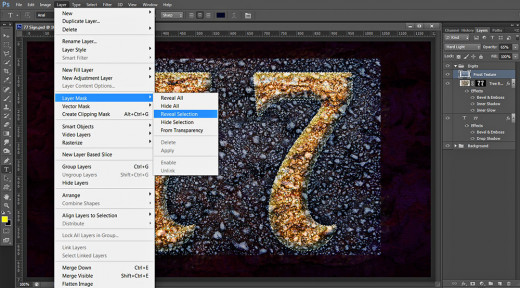
While Stone Texture Layer is highlighted, click on Add Layer Mask button at the bottom of Layers pane or go to Layer, Layer Mask and select Reveal All. After your layer get masked, your Foreground/Background color in the Tools bar should change to Black/White.
Grab Brush tool, find any Spatter Brush in the Brush Preset Picker and increase its Size to 200px.
With the Layer Mask selected and Foreground color set to black, start brushing the edges of the texture until you get the following result:
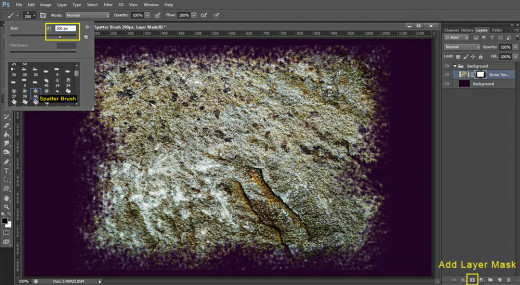
STEP 6
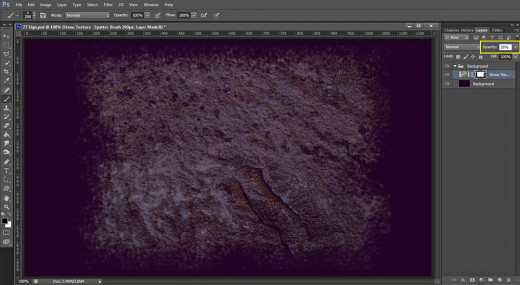
Now reduce Opacity of Stone Texture layer to 35%. In the next steps we are going to add layer styles to this layer.
STEP 7
Double click on Stone Texture layer's thumbnail or go to Layer, Layer Style, Blending Options. Firstly check Drop Shadow Layer Style and insert the following settings:
Blend Mode: Multiply
Color of Shadow: #000000 (black)
Opacity: 100%
Angle: 120 degrees
Use Global Light: checked
Distance: 1px
Spread: 47%
Size: 1px
Contour: Linear
Anti-aliased: unchecked
Noise: 0%
Layer Knocks Out Drop Shadow: checked.
Keep Layer Style dialog box activated. We are going to add slight 3D effect in the next step.

STEP 8
The second Layer Style to be added to the Stone Texture layer is Bevel and Emboss. Change the settings as follows:
Style: Inner Bevel
Technique: Smooth
Depth: 145%
Direction: Up
Size: 5px
Soften: 0px
Angle: 120 degrees
Use Global Light: checked
Altitude: 30 degrees
Gloss Contour: Linear
Anti-aliased: not checked
Highlight Mode: Screen
Color for Highlight: #fba02a
Opacity: 100%
Shadow Mode: Multiply
Color of Shadow: #000000
Opacity: 100%.
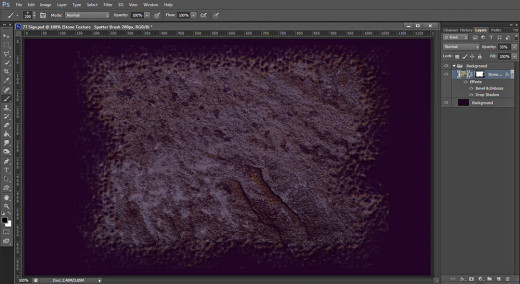
Press OK button to close Layer Style box. We finished our work in the first background texture layer (Stone Texture).

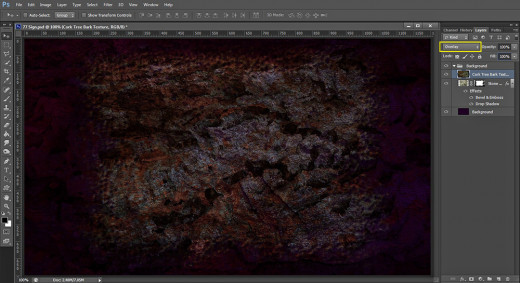
This is how your Background should look after applying Layer Mask and Blending Options to Stone Texture layer:
Add Cork Texture to Complete Your Dark Grunge Background
In the coming three steps your task is very simple. You need only to download the Cork Texture, Paste it in your .psd document in a new layer on top of Background group. After that you should change its Blend Mode to Overlay in order to give it transparency and to blend it with the purple Background and the previous Stone Texture.
STEP 9
Now download the following Cork Tree Bark Texture. You can click on the screenshot below and select Save Image As when it opens in a new window to put it in your folder.
STEP 10
Create a New Layer on top of Background Group and call it Cork Tree Bark Texture.
Copy and Paste the Texture you downloaded in the previous step and Apply Edit, Free Transform to resize it so that it covers your canvas. Press Enter when ready.
STEP 11
Change Blend Mode of Cork Tree Bark Texture layer to Overlay. With this we finished our work on the Background. In the next steps we are going to develop our 77 Number project.
Create the Number with Hobo Std Font and Two Layer Styles
In the next three steps you will have to type the two digits number using Hobo Std Font, which is default for Photoshop, then you'll need to add Drop Shadow and Bevel and Emboss layer styles to give the number volume and 3D look.
STEP 12
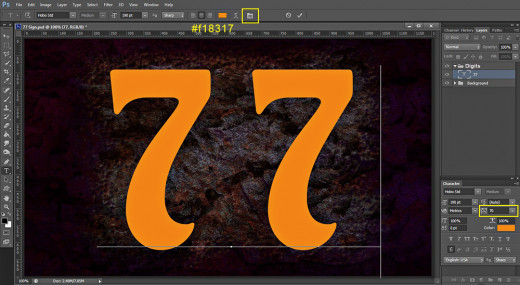
Now select the whole Background Group. Take Horizontal Type Tool (hot keyT) from the Tools bar. Select Hobo Std default Font from the Font Family drop down menu. Insert 190pt for Font Size. Choose #f18317 for Text Color then type 77.
When you are ready with typing the digits, select it then click on Toggle the Character and Paragraph Panels icon in your Options bar and Set the Tracking for the Selected Characters to 70. You can insert bigger value if you like, but don't choose tracking lower than 70 as you won't get nice result when we start applying textures to the digits..
With 77 Text layer selected, press Ctrl+G (Layer, Group Layers) and name the new Group Digits.
If you prefer to turn your 77 Number from vector image to pixels, right click on its layer and select Rasterize Layer. I decided not to rasterize, in order to leave the layer editable- to be able to change Font, Size, Digits or Letters etc.

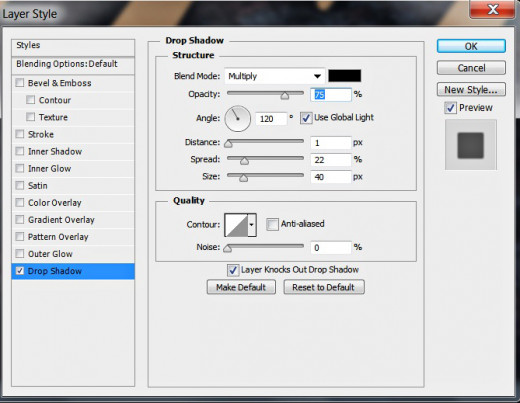
STEP 13
Right click on 77 Text layer, select Blending Options and firstly check Drop Shadow. Change its settings like this:
Blend Mode: Multiply
Color of Shadow: #000000 (black)
Opacity: 75%
Angle: 120 degrees
Use Global Light: checked
Distance: 1px
Spread: 22%
Size: 40px
Contour: Linear
Anti-aliased: unchecked
Noise: 0%
Layer Knocks Out Drop Shadow: checked.
Keep Layer Style dialog box opened. We are going to add another Layer Style in the coming step.
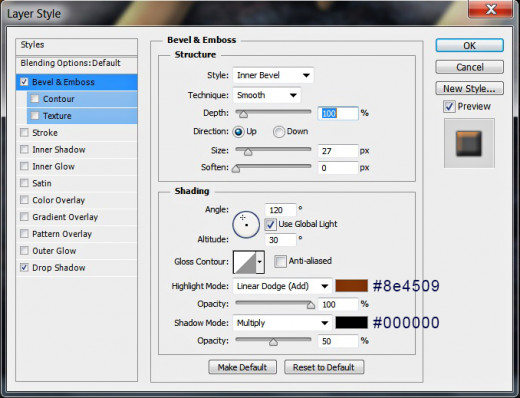
STEP 14
In order to add relief to our 77 Number, check Bevel and Emboss Layer Style and apply the following settings:
Style: Inner Bevel
Technique: Smooth
Depth: 100%
Direction: Up
Size: 27px
Soften: 0px
Angle: 120 degrees
Use Global Light: checked
Altitude: 30 degrees
Gloss Contour: Linear
Anti-aliased: not checked
Highlight Mode: Linear Dodge
Color for Highlight: #8e4509
Opacity: 100%
Shadow Mode: Multiply
Color of Shadow: #000000
Opacity: 50%.
Press OK button to close Layer Style dialog box. We finished our work on the digits layer. In the next steps comes the fun part- we are going to play with the textures.
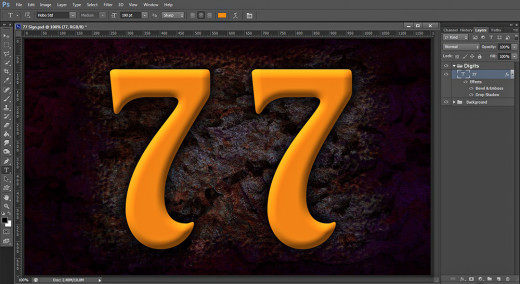
This is how your 77 Number should look after adding Drop Shadow and Bevel and Emboss:
Apply the First Tree Bark Texture to the Number
In Steps 15-21 you have to download the first Texture which is to be blended with the 77 Number. After you place this Tree Bark Texture on top of Digits group, you should resize it using the Transformation option, then change its Blend Mode and add Layer Mask so that the Texture covers only the Number.
You have also to apply navy blue Inner Glow, Shadow and Bevel and Emboss to make the Tree Bark Texture more prominent.
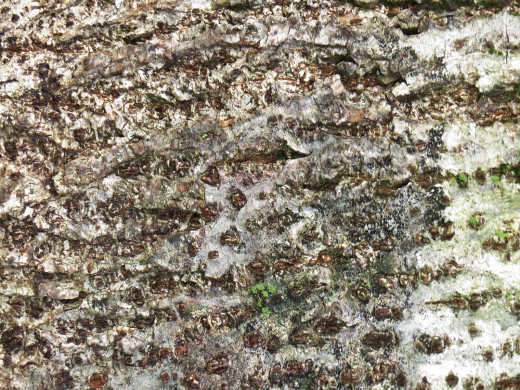
STEP 15
It is time to download the Tree Bark Texture shown below:
STEP 16
Create a New Layer on top of Digits Group and call it Tree Bark Texture. Keep this new layer highlighted. Copy and Paste or use Move Tool to move the Texture into your 77 Number .psd file. Use Edit, Free Transform to resize the Texture in order to cover the 77 digits. Press Enter to apply the Transformation.

STEP 17
Keep Tree Bark Texture layer selected. Ctrl+click on 77 Text layer's thumbnail to Load Selection. Change Blend Mode of Tree Bark Texture layer to Hard Light.
After you have loaded Selection on the digits, with Tree Bark Texture layer highlighted, go to Layer, Layer Mask, Reveal Selection.
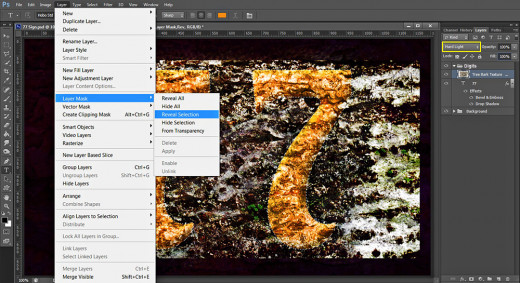
STEP 18
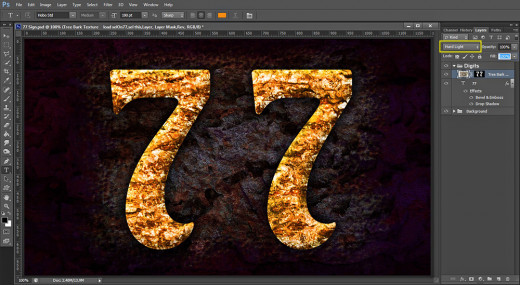
After you have revealed the Selection, only your digits will appear covered in Texture.
You can achieve the same result by using Clipping Mask, but there is one drawback. You can't apply Blending Options properly on Clipping Mask. If you have used Layer Mask the Blending Options affect only the masked part, not all contents of the layer.
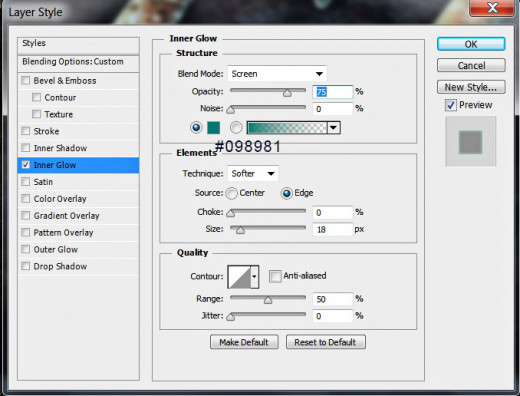
STEP 19
Double click on Tree Bark Texture layer and when Layer Style dialog box appears on your screen, check Inner Glow. Insert these settings:
Blend Mode: Screen
Opacity: 75%
Noise: 0%
Color of Glow: #098981
Technique: Softer
Source: Edge
Choke: 0%
Size: 18px
Contour: Linear
Anti-aliased: unchecked
Range: 50%.
Jitter: 0%.
Still don't close Layer Style box. We are going to apply two more Blending Options in the next steps.
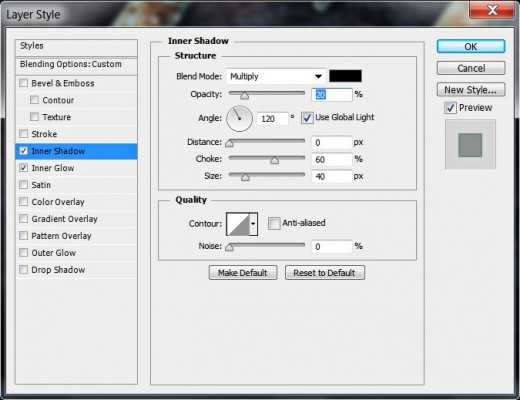
STEP 20
Now check Inner Shadow Layer Style and insert these settings:
Blend Mode: Multiply
Color of Shadow: #000000 (black)
Opacity: 20%
Angle: 120 degrees
Use Global Light: checked
Distance: 0px
Choke: 60%
Size: 40px
Contour: Linear
Anti-aliased: unchecked
Noise: 0%.
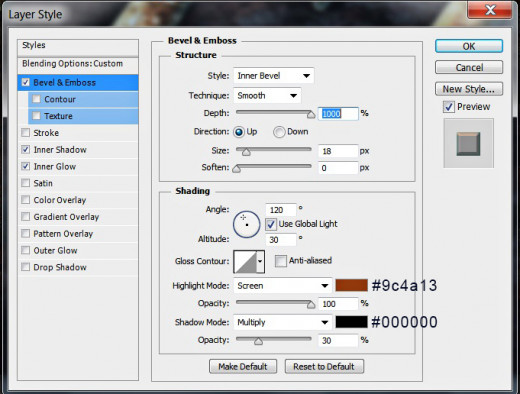
STEP 21
It is time to check Bevel and Emboss Layer Style to give the Texture some volume. Insert the following settings:
Style: Inner Bevel
Technique: Smooth
Depth: 1000%
Direction: Up
Size: 18px
Soften: 0px
Angle: 120 degrees
Use Global Light: checked
Altitude: 30 degrees
Gloss Contour: Linear
Anti-aliased: not checked
Highlight Mode: Screen
Color for Highlight: #9c4a13
Opacity: 100%
Shadow Mode: Multiply
Color of Shadow: #000000
Opacity: 30%.
Press OK button to close Layer Style box. We finished our work in Tree Bark Texture layer.
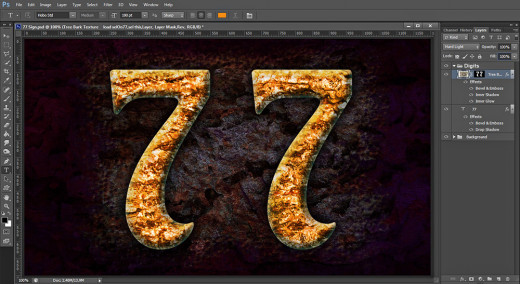
This is how your image should look if you have followed in detail all my previous steps:
Apply Frost Texture to the Number to Create Rough Grainy Look
In Steps 22-26 you have to Paste into your .psd document the Frost Texture, resize it and change its Blend Mode and Opacity Option. As you did in Step 17, you have to add Layer Mask with Revealed Selection as you need the Texture to cover only the Number.
Bevel and Emboss Layer Style will improve the relief and color shades of the Texture.
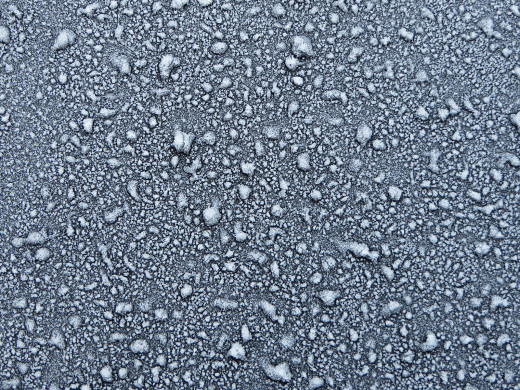
STEP 22
You have to download this Frost Texture now:
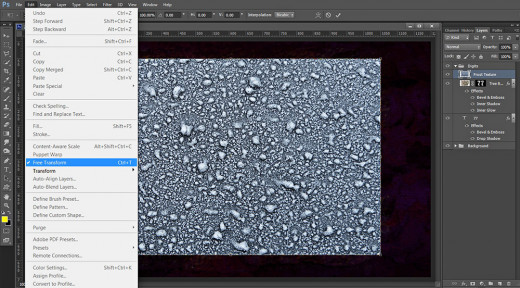
STEP 23
Create a New Layer on top of Digits Group and name it Frost Texture. Copy and Paste the previously downloaded Texture in this layer and resize it by means of Edit, Free Transform. The Frost Texture should cover the 77 Number.
STEP 24
Change Blend Mode of Frost Texture layer to Hard Light and reduce its Opacity to 65%.
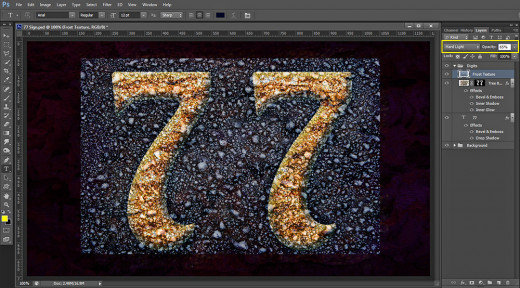
STEP 25
Now we are going to mask our Frost Texture layer. Firstly Ctrl+click on 77 Text layer's thumbnail and after you Load Selection on the digits, highlight Frost Texture layer then navigate to the Menu bar and select Layer, Layer Mask, Reveal Selection.
This is the result you should get. In Layers panel you can see the mask added to the Frost Texture layer.

STEP 26
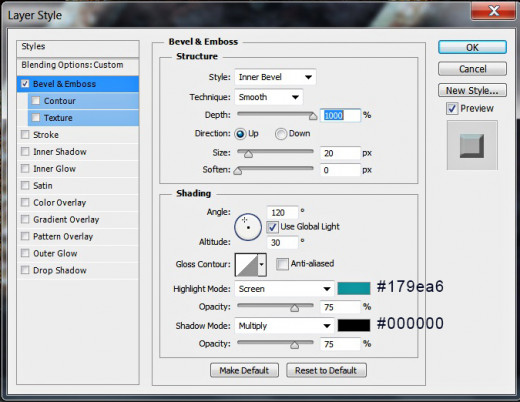
Double click on Frost Texture layer's thumbnail to call Layer Style box, tick Bevel and Emboss and apply these settings:
Style: Inner Bevel
Technique: Smooth
Depth: 1000%
Direction: Up
Size: 20px
Soften: 0px
Angle: 120 degrees
Use Global Light: checked
Altitude: 30 degrees
Gloss Contour: Linear
Anti-aliased: not checked
Highlight Mode: Screen
Color for Highlight: #179ea6
Opacity: 75%
Shadow Mode: Multiply
Color of Shadow: #000000
Opacity: 75%.
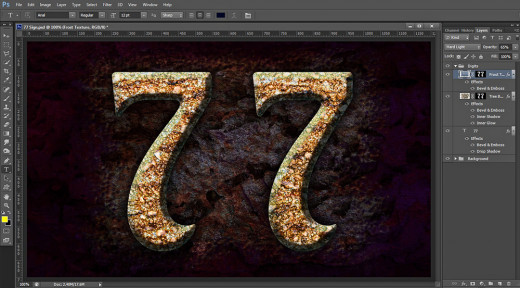
Press OK button to close Layer Style dialog box. We completed our work in Frost Texture layer.
This is how your 77 Number image is to look up to now:
Add Golden Water Texture to Give the Number Unique Mystic Look
You will finish this tut with adding the last Texture on top of Digits group. This time you are going to use an ordinary Layer Mask (no previous selection loaded) applied on the Golden Water Texture layer. You should do some work in the Layer Mask with default Spatter Brush to remove the excess portions of the Texture then change its Blend Mode to create illusion of cold flames.
STEP 27
The last Texture you should download in this tut is Golden Water Texture shown below:
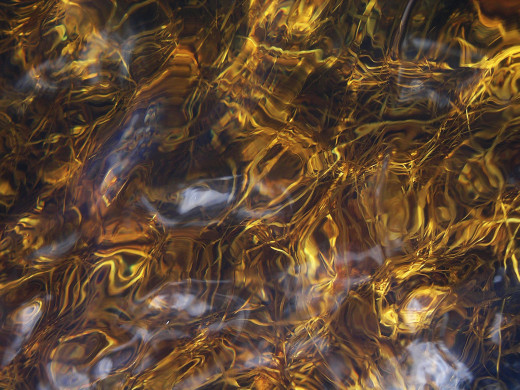
STEP 28
Create a New Layer on top of Digits Group and call it Water Texture. Copy and Paste our Golden Water Texture in this new layer, than apply Edit, Free Transform to resize the Texture so that it covers our digits. Press Enter key when ready.

STEP 29
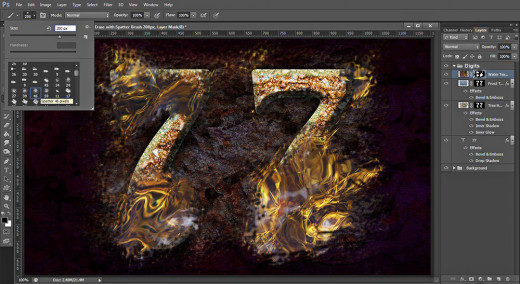
While Water Texture is selected, click on Add Layer Mask button at the bottom of Layers pane, and when the mask is added to the layer and Foreground color gets black, take Brush tool, select again Spatter Brush of 200px Size and erase most parts of the texture- leave only some of them which cover the digits. See the following screenshot for a reference:
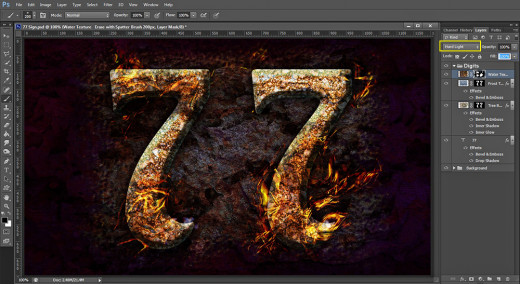
STEP 30
Now we are going to turn the water into fire. Change Blend Mode of Water Texture layer to Hard Light. As you can see the digits now look like they are in flames. We are ready with our 77 Number project.
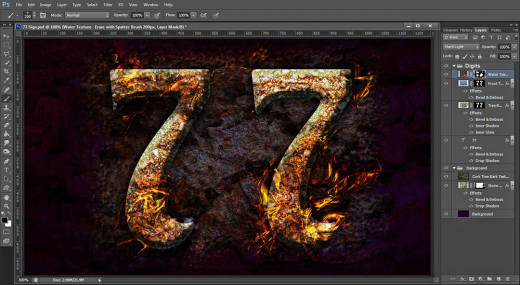
STEP 31
Compare your Layers panel with my screenshot below. If you have followed correctly all my previous steps, you should have two groups of layers:
-
Background Group which contains three layers: Background, Stone Texture and Cork Tree Bark Texture and
-
Digits Group which includes the following layers: 77 Text layer, Tree Bark Texture, Frost Texture and Water Texture layer.
STEP 32
This is the ready image saved in .jpg format. If you prefer to sharpen the image, open your 77 Number.jpg file in Adobe Photoshop and apply Filter, Sharpen, Unsharp Mask. Play with the settings until you are happy with the final result. The same you can achieve by duplicating the Background, applying Filter, Other, High Pass on the duplicate and change its Blend Mode to Soft Light. Then Flatten the Image (Layer, Flatten Image).


